HP Photosmart 618 HP Photosmart 618 digital camera - (English) User Guide - Page 11
Setting the Timer Mode, Setting the Auto Focus Range, Timer Mode Settings, Auto Focus Range Settings
 |
View all HP Photosmart 618 manuals
Add to My Manuals
Save this manual to your list of manuals |
Page 11 highlights
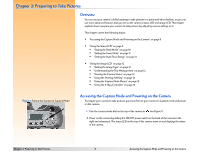
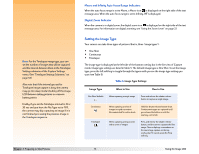
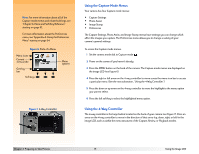
Note: The 10-Second Timer mode is disabled for the Timelapse image type. (See "Setting the Image Type" on page 13.) Note: After each timed exposure in 10-Second Timer mode, the camera will default to the Off timer mode setting. You must reset the timer to take another timed picture. In contrast, the 3-Second Remote timer mode setting remains set shot-to-shot. Note: The auto focus range remains set between shots, but returns to Normal after you cycle the power on the camera (power it off and then on again). If you change the focus mode from Auto to Manual Focus in the Photo Assist menu (see "Using the Capture Mode Menus" on page 15), the auto focus range is cancelled. If you set the camera to the Macro auto focus range, the image LCD will turn on. This is because you will be unable to frame an image properly in the viewfinder due to parallax error. Finally, if the camera cannot focus when set to the Normal auto focus range, it will make a "best guess" at the focus and take the picture. However, if it cannot focus when set to Macro, it will not take a picture. Chapter 2: Preparing to Take Pictures Setting the Timer Mode Your camera has three timer modes. The default timer mode is Off. Each mode is displayed on the status LCD with the icon shown in Table 3. To set the timer mode, press the timer mode button beneath the status LCD to toggle through the icons on the status LCD until you see the timer setting you want (see Table 3). Table 3: Timer Mode Settings Timer Mode Off (default) 10-Second Timer 3-Second Remote Icon Displayed When to Use No Icon To take pictures without using the timer. To take a picture 10 seconds after pressing the shutter release button. To use the remote infrared trigger on the HP Remote Control (included with the camera), which has a 3-second delay. Setting the Auto Focus Range You can choose from three auto focus ranges that are available via the status LCD. The default auto focus range is Normal. Each range setting is displayed on the status LCD with the icon shown in Table 4. To set the auto focus range, press the auto focus range button beneath the status LCD to toggle through the icons on the status LCD until you see the setting you want (see Table 4). Table 4: Auto Focus Range Settings Auto Focus Range Icon Displayed When to Use Normal (default) No Icon To take a picture of a subject that is within the normal focus range (neither close-up nor in the distance). The focus range is set from 0.5 meters to infinity. Macro To take a close-up picture of a subject, such as a flower. The focus range is set from 0.1 to 0.6 meters. Infinity To take a picture of a subject in the distance, such as a mountain range. The focus range is set at infinity. 11 Using the Status LCD
-
 1
1 -
2
-
3
-
4
-
5
-
 6
6 -
 7
7 -
 8
8 -
 9
9 -
 10
10 -
 11
11 -
 12
12 -
 13
13 -
 14
14 -
 15
15 -
 16
16 -
17
-
18
-
19
-
20
-
21
-
22
-
23
-
24
-
25
-
26
-
27
-
28
-
29
-
30
-
31
-
32
-
33
-
34
-
35
-
36
-
37
-
38
-
39
-
40
-
41
-
42
-
43
-
44
-
45
-
46
-
47
-
48
-
49
-
50
-
51
-
52
-
53
-
54
-
55
-
56
-
57
-
58
-
59
-
60
-
61
-
62
-
63
-
64
-
65
-
66
-
67
-
68
-
69
-
70
-
71
-
72
-
73
-
74
-
75
-
76
-
77
-
78
-
79
-
80
-
81
-
82
-
83
-
84
-
85
-
86
-
87
-
88
-
89
-
90
-
91
-
92
-
93
-
94
-
95
-
96
-
97
-
98
-
99
-
100
-
101
-
102
-
103
-
104
-
105
-
106
-
107
-
108
-
109
-
110
-
111
-
112
-
113
-
114
-
115
-
116
-
117
-
118
-
119
-
120
-
121
-
122
-
123
-
124
-
125
-
126
-
127
-
128
-
129
 |
 |
