HP Photosmart 618 HP Photosmart 618 digital camera - (English) User Guide - Page 99
Setting the Date and Time, Appendix A: Using the Preferences Menu
 |
View all HP Photosmart 618 manuals
Add to My Manuals
Save this manual to your list of manuals |
Page 99 highlights
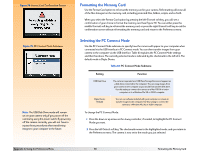
Figure 76: Set Date & Time Submenu Note: Press the up or down arrow on the 4-way controller to scroll through the numbers on the left side of the screen. Press the right or left arrow to move between the date/time fields in the center of the screen. Setting the Date and Time Use the Set Date & Time submenu to set the camera's date and time. If you wish to change the format that is used for the date and time, see the next subsection, "Format Dialog." Press the up or down arrow on the 4-way controller to scroll through the list of numbers on the left side of the screen until you reach the number you want. The number in the currently highlighted field in the center of the screen (such as the Month field, as shown in the example in Figure 76) changes accordingly. When you have selected the number for the currently highlighted field, press the right arrow on the 4-way controller to move to the next field. When you have finished setting the date and time, press the right (Exit) soft key to save the date and time settings and return to the Preferences menu. For example, to set the date to September 18, 2000 and the time to 2:51 pm, as shown in the example in Figure 76: 1 Press the up or down arrow on the 4-way controller until you highlight 9, which sets the Month field in the center of the screen to 9 (for the month of September). 2 Press the right arrow on the 4-way controller to move to the Day field. 3 Press the up or down arrow on the 4-way controller until you highlight 18. 4 Press the right arrow on the 4-way controller to move to the Year field. 5 Press the up or down arrow on the 4-way controller until you highlight 00. 6 Press the right arrow on the 4-way controller to move to the Hour field. 7 Press the up or down arrow on the 4-way controller until you highlight 02. 8 Press the right arrow on the 4-way controller to move to the Minutes field. 9 Press the up or down arrow on the 4-way controller until you highlight 51. Since the am/pm setting is set to pm by default, simply leave the am/pm field as it is. 10 Press the right (Exit) soft key to save the date and time settings and return to the Preferences menu. Appendix A: Using the Preferences Menu 99 Setting the Date and Time
-
 1
1 -
2
-
3
-
4
-
5
-
6
-
7
-
8
-
9
-
10
-
11
-
12
-
13
-
14
-
15
-
16
-
17
-
18
-
19
-
20
-
21
-
22
-
23
-
24
-
25
-
26
-
27
-
28
-
29
-
30
-
31
-
32
-
33
-
34
-
35
-
36
-
37
-
38
-
39
-
40
-
41
-
42
-
43
-
44
-
45
-
46
-
47
-
48
-
49
-
50
-
51
-
52
-
53
-
54
-
55
-
56
-
57
-
58
-
59
-
60
-
61
-
62
-
63
-
64
-
65
-
66
-
67
-
68
-
69
-
70
-
71
-
72
-
73
-
74
-
75
-
76
-
77
-
78
-
79
-
80
-
81
-
82
-
83
-
84
-
85
-
86
-
87
-
88
-
89
-
90
-
91
-
92
-
93
-
 94
94 -
 95
95 -
 96
96 -
 97
97 -
 98
98 -
 99
99 -
 100
100 -
 101
101 -
 102
102 -
 103
103 -
 104
104 -
105
-
106
-
107
-
108
-
109
-
110
-
111
-
112
-
113
-
114
-
115
-
116
-
117
-
118
-
119
-
120
-
121
-
122
-
123
-
124
-
125
-
126
-
127
-
128
-
129
 |
 |
