HP Photosmart 618 HP Photosmart 618 digital camera - (English) User Guide - Page 21
Shooting Timelapse Images, What’s Next?, Second Remote
 |
View all HP Photosmart 618 manuals
Add to My Manuals
Save this manual to your list of manuals |
Page 21 highlights
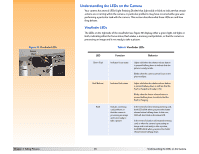
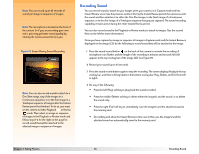
Note: The 10-Second Timer mode is disabled for the Timelapse image type. Note: If the interval you set for Timelapse image capture is long, the camera may go into sleep mode (shutting off the image LCD) between taking pictures to conserve battery power. Also, if you set the Timelapse interval to 15 or 30 sec and you have the File Type set to TIFF, the camera may skip capturing an image if it is not finished processing the previous image in the Timelapse sequence. Note: If you are unhappy with one or more images within a Timelapse sequence, you can delete only those images in the Review mode (rather than deleting all of the images in the sequence during Instant Review). To do this, see "Deleting Images" on page 32. Note: All images in a Timelapse sequence are saved as one group on the memory card. Chapter 3: Taking Pictures Shooting Timelapse Images If you are using the: Š Shutter release button with no timer mode set, press and release the shutter release button one time. Then the camera captures the first image of the Timelapse sequence. Š 3-Second Remote timer mode, point the HP Remote Control at the camera, and press and release the Remote Control's trigger button one time. The timer LED on the front of the camera (see page 24) blinks faster for 3 seconds. Then the camera captures the first image of the Timelapse sequence. The settings in the Timelapse menu option of the Capture Settings menu determine the number of pictures that are taken and the interval between pictures in the Timelapse sequence of images that are captured. (To change the Timelapse settings, see "Timelapse Settings Submenu" on page 54.) The image LCD displays the previously captured image while counting down to the next image capture. The only option you have is to stop the Timelapse sequence by pressing the right (Stop) soft key. If Instant Review is on (see "Using Instant Review" on page 25). at the end of taking a Timelapse sequence of images, the first image in the sequence is displayed in the Instant Review on the image LCD. You can do any of the following during the Instant Review period: Š Record sound that will be attached to the first image of the sequence. For information on how to do this, see "Recording Sound" on page 26. Š Delete all of the images in the sequence by pressing the middle (Delete) soft key. Š Save all of the images in the sequence to the memory card and return to the Capture mode immediately by pressing the right (Exit) soft key. Š Do nothing and, when Instant Review times out (the default time-out is 3 seconds), all of the images in the sequence are then saved to the memory card automatically. What's Next? The following sections provide more information about various features of your camera that you can use when taking pictures (such as the zoom), or that provide you with important feedback on the status of your camera while you are taking pictures (such as the LEDs). Once you have read through the following sections, continue on to Chapter 4 to learn how to view and review the images you have captured via the camera's Playback and Review modes. 21 Taking More Advanced Pictures
-
 1
1 -
2
-
3
-
4
-
5
-
6
-
7
-
8
-
9
-
10
-
11
-
12
-
13
-
14
-
15
-
 16
16 -
 17
17 -
 18
18 -
 19
19 -
 20
20 -
 21
21 -
 22
22 -
 23
23 -
 24
24 -
 25
25 -
 26
26 -
27
-
28
-
29
-
30
-
31
-
32
-
33
-
34
-
35
-
36
-
37
-
38
-
39
-
40
-
41
-
42
-
43
-
44
-
45
-
46
-
47
-
48
-
49
-
50
-
51
-
52
-
53
-
54
-
55
-
56
-
57
-
58
-
59
-
60
-
61
-
62
-
63
-
64
-
65
-
66
-
67
-
68
-
69
-
70
-
71
-
72
-
73
-
74
-
75
-
76
-
77
-
78
-
79
-
80
-
81
-
82
-
83
-
84
-
85
-
86
-
87
-
88
-
89
-
90
-
91
-
92
-
93
-
94
-
95
-
96
-
97
-
98
-
99
-
100
-
101
-
102
-
103
-
104
-
105
-
106
-
107
-
108
-
109
-
110
-
111
-
112
-
113
-
114
-
115
-
116
-
117
-
118
-
119
-
120
-
121
-
122
-
123
-
124
-
125
-
126
-
127
-
128
-
129
 |
 |