HP Photosmart 618 HP Photosmart 618 digital camera - (English) User Guide - Page 13
Setting the Image Type, Macro and Infinity Auto Focus Range Indicators, Digital Zoom Indicator
 |
View all HP Photosmart 618 manuals
Add to My Manuals
Save this manual to your list of manuals |
Page 13 highlights
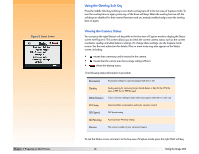
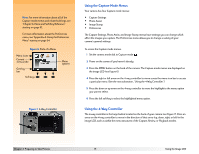
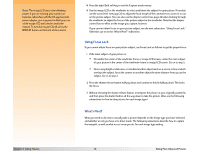
Note: For the Timelapse image type, you can set the number of images that will be captured and the interval between them in the Timelapse Settings submenu of the Capture Settings menu. (See "Timelapse Settings Submenu" on page 54.) Also note that if the interval you set for Timelapse image capture is long, the camera may go into sleep mode (shutting off the image LCD) between taking pictures to conserve battery power. Finally, if you set the Timelapse interval to 15 or 30 sec and you have the File Type set to TIFF, the camera may skip capturing an image if it is not finished processing the previous image in the Timelapse sequence. Chapter 2: Preparing to Take Pictures Macro and Infinity Auto Focus Range Indicators When the auto focus range is set to Macro, a Macro icon is displayed on the right side of the text message area. When the auto focus range is set to Infinity, INF is displayed. Digital Zoom Indicator When the camera is in digital zoom, the digital zoom icon is displayed on the right side of the text message area. For information on digital zooming, see "Using the Zoom Lever" on page 22. Setting the Image Type Your camera can take three types of pictures (that is, three "image types"): Š One Shot Š Continuous Š Timelapse The image type is displayed at the left side of the bottom overlay bar in the live view of Capture mode. Image type settings are listed in Table 5. The default image type is One Shot. To set the image type, press the left soft key to toggle through the types until you see the image type setting you want (see Table 5). Table 5: Image Type Settings Image Type One Shot (default) When to Use When capturing a single image. How to Use Press and release the shutter release button to capture a single image. Continuous Timelapse When capturing a series of images in rapid succession. Recommended for action shots. Hold the shutter release button down. Continuous images are captured until you release the button or until the memory card is full. When capturing a slow process with a series of images. Press and release the shutter release button, and the camera captures the first image. Then it displays a countdown to the next image capture on the top overlay bar. To cancel, press the Stop soft key. 13 Using the Image LCD
-
 1
1 -
2
-
3
-
4
-
5
-
6
-
7
-
 8
8 -
 9
9 -
 10
10 -
 11
11 -
 12
12 -
 13
13 -
 14
14 -
 15
15 -
 16
16 -
 17
17 -
 18
18 -
19
-
20
-
21
-
22
-
23
-
24
-
25
-
26
-
27
-
28
-
29
-
30
-
31
-
32
-
33
-
34
-
35
-
36
-
37
-
38
-
39
-
40
-
41
-
42
-
43
-
44
-
45
-
46
-
47
-
48
-
49
-
50
-
51
-
52
-
53
-
54
-
55
-
56
-
57
-
58
-
59
-
60
-
61
-
62
-
63
-
64
-
65
-
66
-
67
-
68
-
69
-
70
-
71
-
72
-
73
-
74
-
75
-
76
-
77
-
78
-
79
-
80
-
81
-
82
-
83
-
84
-
85
-
86
-
87
-
88
-
89
-
90
-
91
-
92
-
93
-
94
-
95
-
96
-
97
-
98
-
99
-
100
-
101
-
102
-
103
-
104
-
105
-
106
-
107
-
108
-
109
-
110
-
111
-
112
-
113
-
114
-
115
-
116
-
117
-
118
-
119
-
120
-
121
-
122
-
123
-
124
-
125
-
126
-
127
-
128
-
129
 |
 |