HP Photosmart 618 HP Photosmart 618 digital camera - (English) User Guide - Page 26
Recording Sound, Screen During Sound Recording
 |
View all HP Photosmart 618 manuals
Add to My Manuals
Save this manual to your list of manuals |
Page 26 highlights
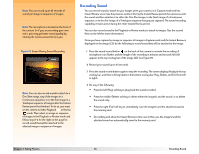
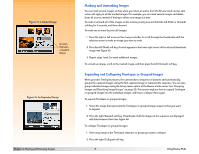
Note: You can record up to 45 seconds of sound per image or sequence of images. Note: The microphone is located on the front of the camera. So if you are recording your own voice, you may get better sound quality by rotating the camera around to face you. Figure 13: Screen During Sound Recording Note: You can also record sound to attach to a One Shot image, any of the images in a Continuous sequence, or to the first image in a Timelapse sequence of images after the Instant Review period has finished. To do so, you must set the camera to either Playback or Review mode. Then select an image or sequence of images in the Playback or Review mode and follow steps 1-4 (to the right on this page) to record sound that will be attached to the selected image or sequence of images. Recording Sound You can record sound to attach to your images when your camera is in Capture mode and has Instant Review set on (see the previous section). During the Instant Review period, the camera records the sound and then attaches it to either the One Shot image, to the final image of a Continuous sequence, or to the first image of a Timelapse sequence that you just captured. The sound recording capability remains active during the entire Instant Review period. You can also record sound in the Playback or Review modes to attach to images. (See the second Note on the left for more information.) Once you have captured an image or sequence of images in Capture mode and the Instant Review is displayed on the image LCD, do the following to record sound that will be attached to the image: 1 Press the sound record button on the back of the camera to activate the recording. A microphone icon flashes and the length of the recording in minutes and seconds (00:00) appears in the top overlay bar of the image LCD (see Figure 13). 2 Record your sound (up to 45 seconds). 3 Press the sound record button again to stop the recording. The screen displays Ready in the top overlay bar, and three soft key labels in the bottom overlay bar: Play, Delete, and Exit (from left to right). 4 Do any of the following: Š Press the left (Play) soft key to play back the sound recorded. Š Press the middle (Delete) soft key to delete either the image(s) and the sound, or to delete the sound only. Š Press the right (Exit) soft key to immediately save the image(s) and the attached sound to the memory card. Š Do nothing and allow the Instant Review to time out. In this case, the image(s) and the attached sound are automatically saved to the memory card. Chapter 3: Taking Pictures 26 Recording Sound
-
 1
1 -
2
-
3
-
4
-
5
-
6
-
7
-
8
-
9
-
10
-
11
-
12
-
13
-
14
-
15
-
16
-
17
-
18
-
19
-
20
-
 21
21 -
 22
22 -
 23
23 -
 24
24 -
 25
25 -
 26
26 -
 27
27 -
 28
28 -
 29
29 -
 30
30 -
 31
31 -
32
-
33
-
34
-
35
-
36
-
37
-
38
-
39
-
40
-
41
-
42
-
43
-
44
-
45
-
46
-
47
-
48
-
49
-
50
-
51
-
52
-
53
-
54
-
55
-
56
-
57
-
58
-
59
-
60
-
61
-
62
-
63
-
64
-
65
-
66
-
67
-
68
-
69
-
70
-
71
-
72
-
73
-
74
-
75
-
76
-
77
-
78
-
79
-
80
-
81
-
82
-
83
-
84
-
85
-
86
-
87
-
88
-
89
-
90
-
91
-
92
-
93
-
94
-
95
-
96
-
97
-
98
-
99
-
100
-
101
-
102
-
103
-
104
-
105
-
106
-
107
-
108
-
109
-
110
-
111
-
112
-
113
-
114
-
115
-
116
-
117
-
118
-
119
-
120
-
121
-
122
-
123
-
124
-
125
-
126
-
127
-
128
-
129
 |
 |
