HP Photosmart 618 HP Photosmart 618 digital camera - (English) User Guide - Page 22
Using the Zoom Lever, Using the Diopter Control,
 |
View all HP Photosmart 618 manuals
Add to My Manuals
Save this manual to your list of manuals |
Page 22 highlights
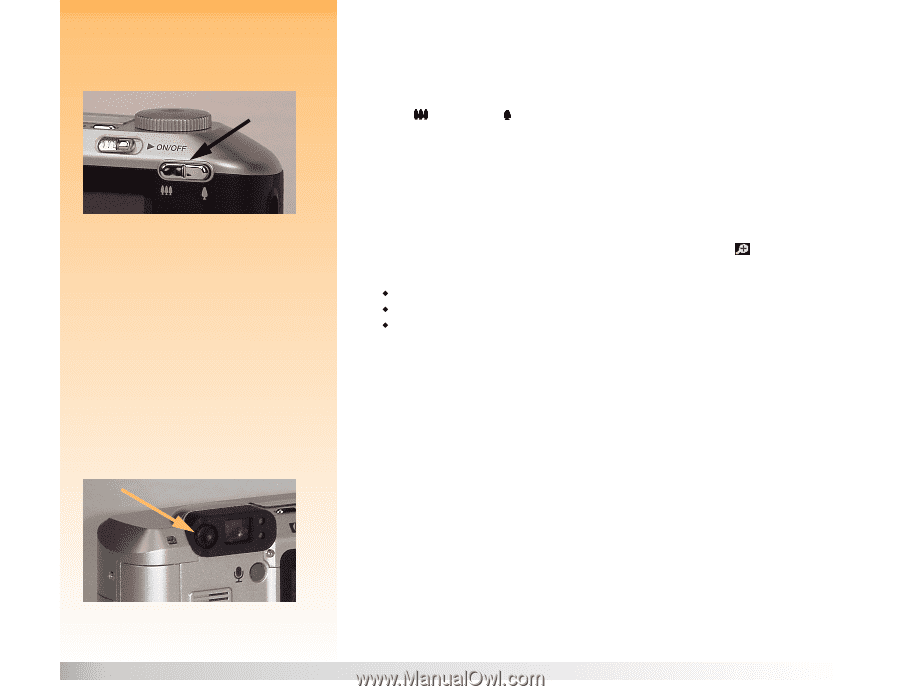
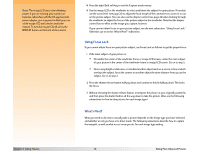
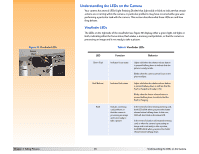
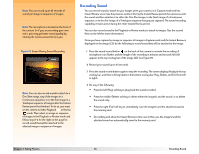
Figure 8: Zoom Lever Note: In digital zoom mode, enlargement is accomplished without changes in the lens configuration. Since the lens is not involved in digital zoom, the changes appear only in the image LCD; they are not evident through the viewfinder. Figure 9: Diopter Control Using the Zoom Lever While you are framing the subject for a picture, you will likely find that you need to zoom in or out on the subject. This section explains the camera's zoom lever, which you can use for this purpose. Rocking the zoom lever (see Figure 8) left and right moves the lens continuously between wide angle and telephoto focal lengths for optical zooming. The zoom lever also controls digital zooming. Digital zooming refers to digital cropping of the image, giving the appearance of greater zoom. After the optical zoom is at its maximum setting, you can digitally zoom in three steps (see below). Note, however, that you must have the image LCD on for the digital zoom to operate. (To turn the image LCD on, press the DISPLAY button on the back of the camera.) If the image LCD is turned on and the camera's zoom is at the end of the telephoto range, releasing and pressing the zoom lever will initiate digital zooming. A digital zoom icon will appear in the text message area of the image LCD's top overlay bar. Digital zooming occurs in three steps: Š 1.2x Š 1.5x Š 2x The camera pauses for 250 milliseconds (1/4 second) between steps. Digital zoom remains set shotto-shot, but turns off when you cycle the power on the camera. It also turns off any time you exit the live view of Capture mode (for example, you press the MENU button on the camera to display the Capture mode menus, or you turn the camera mode dial to set the camera to another mode). To exit the digital zoom, you can also press, release, and then re-press the zoom lever in the wide angle direction. Using the Diopter Control The diopter control (see Figure 9) is the small dial on the left side of the viewfinder that you can turn to adjust the focus of the picture subject in the viewfinder. Note that the diopter control has no effect on the image you capture, however. Note: The diopter control does not affect the captured image itself. Chapter 3: Taking Pictures 22 Using the Zoom Lever
-
 1
1 -
2
-
3
-
4
-
5
-
6
-
7
-
8
-
9
-
10
-
11
-
12
-
13
-
14
-
15
-
16
-
 17
17 -
 18
18 -
 19
19 -
 20
20 -
 21
21 -
 22
22 -
 23
23 -
 24
24 -
 25
25 -
 26
26 -
 27
27 -
28
-
29
-
30
-
31
-
32
-
33
-
34
-
35
-
36
-
37
-
38
-
39
-
40
-
41
-
42
-
43
-
44
-
45
-
46
-
47
-
48
-
49
-
50
-
51
-
52
-
53
-
54
-
55
-
56
-
57
-
58
-
59
-
60
-
61
-
62
-
63
-
64
-
65
-
66
-
67
-
68
-
69
-
70
-
71
-
72
-
73
-
74
-
75
-
76
-
77
-
78
-
79
-
80
-
81
-
82
-
83
-
84
-
85
-
86
-
87
-
88
-
89
-
90
-
91
-
92
-
93
-
94
-
95
-
96
-
97
-
98
-
99
-
100
-
101
-
102
-
103
-
104
-
105
-
106
-
107
-
108
-
109
-
110
-
111
-
112
-
113
-
114
-
115
-
116
-
117
-
118
-
119
-
120
-
121
-
122
-
123
-
124
-
125
-
126
-
127
-
128
-
129
 |
 |