HP Photosmart 618 HP Photosmart 618 digital camera - (English) User Guide - Page 41
Transferring Images Using the USB Disk Drive Setting, Setting the USB Disk Drive Mode on the Camera
 |
View all HP Photosmart 618 manuals
Add to My Manuals
Save this manual to your list of manuals |
Page 41 highlights
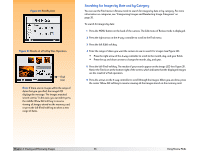
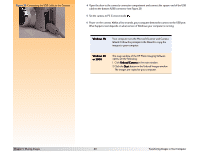
Note: If you have a Macintosh computer and have already followed the instructions in the HP 618 Digital Camera Quick Start Guide to set the USB Disk Drive mode on your camera, skip these instructions and go on to "Using Your Camera as a USB Mass Storage Device to Transfer Images" on page 42. Transferring Images Using the USB Disk Drive Setting If your computer is running either Macintosh OS 8.6 or better, or Windows Me, 98, or 2000, you can transfer images from your camera to the computer by using the USB Disk Drive setting in the PC Connect Mode submenu. In so doing, the camera will operate as a USB Mass Storage Device and appear as a disk drive connected to your computer. You can then copy images from your camera to the computer as you would from another disk drive. The following two subsections explain how. Setting the USB Disk Drive Mode on the Camera You must first set your camera to USB Disk Drive mode as follows: 1 Set the camera mode dial to Capture mode . 2 Power on the camera if you haven't already. 3 Press the MENU button on the back of the camera. The Capture mode menus are displayed on the image LCD. 4 Press the right arrow on the 4-way controller three times to move to the Preferences menu. 5 Press the down arrow on the 4-way controller three times to move to the PC Connect Mode menu option. 6 Press the left (Edit) soft key. The PC Connect Mode submenu is displayed, and the USB Disk Drive option is highlighted. 7 Press the left (Select) soft key. The checkmark moves to the USB Disk Drive option, and you return to the Preferences menu of Capture mode. The camera is now set to USB Disk Drive mode. 8 Press the right (Exit) soft key to exit the menu. 9 Power off the camera by using the camera's power switch. The USB Disk Drive mode will remain set on your camera only if you power off the camera by using the power switch. By powering off the camera correctly, you will not have to repeat the previous procedures when transferring images to your computer via the USB Disk Drive mode in the future. Chapter 5: Sharing Images 41 Transferring Images to Your Computer
-
 1
1 -
2
-
3
-
4
-
5
-
6
-
7
-
8
-
9
-
10
-
11
-
12
-
13
-
14
-
15
-
16
-
17
-
18
-
19
-
20
-
21
-
22
-
23
-
24
-
25
-
26
-
27
-
28
-
29
-
30
-
31
-
32
-
33
-
34
-
35
-
 36
36 -
 37
37 -
 38
38 -
 39
39 -
 40
40 -
 41
41 -
 42
42 -
 43
43 -
 44
44 -
 45
45 -
 46
46 -
47
-
48
-
49
-
50
-
51
-
52
-
53
-
54
-
55
-
56
-
57
-
58
-
59
-
60
-
61
-
62
-
63
-
64
-
65
-
66
-
67
-
68
-
69
-
70
-
71
-
72
-
73
-
74
-
75
-
76
-
77
-
78
-
79
-
80
-
81
-
82
-
83
-
84
-
85
-
86
-
87
-
88
-
89
-
90
-
91
-
92
-
93
-
94
-
95
-
96
-
97
-
98
-
99
-
100
-
101
-
102
-
103
-
104
-
105
-
106
-
107
-
108
-
109
-
110
-
111
-
112
-
113
-
114
-
115
-
116
-
117
-
118
-
119
-
120
-
121
-
122
-
123
-
124
-
125
-
126
-
127
-
128
-
129
 |
 |
