HP Photosmart Premium TouchSmart Web All-in-One Printer - C309 User Guide - Page 9
Control panel features, Status Dashboard icons, Control panel features
 |
View all HP Photosmart Premium TouchSmart Web All-in-One Printer - C309 manuals
Add to My Manuals
Save this manual to your list of manuals |
Page 9 highlights
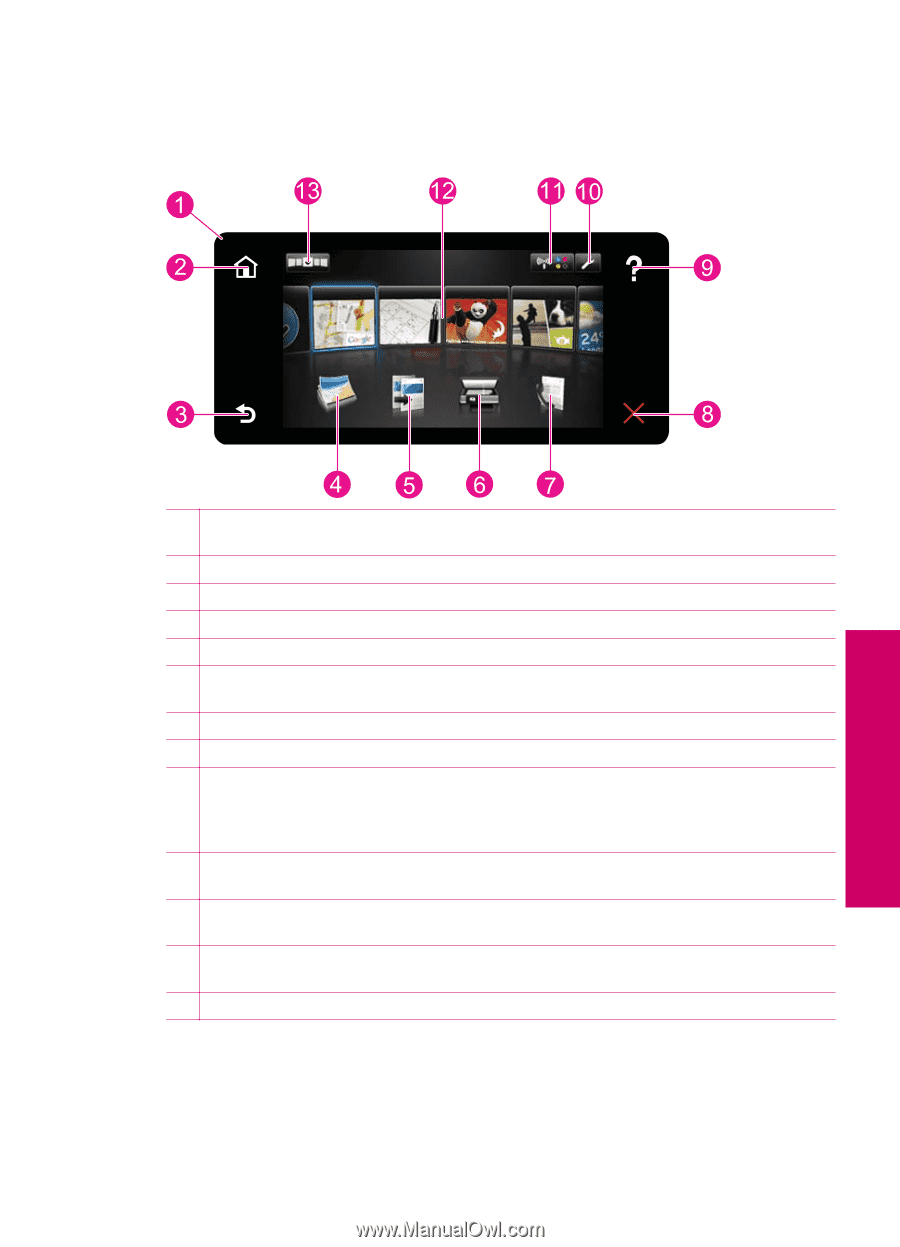
Control panel features Figure 2-1 Control panel features Get to know the HP Photosmart 1 Display: The touch screen display shows menus, photos, and messages. You can flick horizontally or vertically to scroll through the photos and menu options. 2 Home: Returns to the Homescreen (the default screen when you turn on the product). 3 Back: Returns to the previous screen on the display. 4 Photo: Opens the Photo Menu. 5 Copy: Opens the Copy menu where you can select a copy type or change the copy settings. 6 Scan: Opens the Choose Scan Destination menu where you can select a destination for your scan. 7 Fax: Opens the Fax menu from where you can send a black-and-white or a color fax. 8 Cancel: Stops the current operation. 9 Help: From the Home screen, touching Help lists the topics for which help is available. Depending on the topic you select, the topic will appear on the display or on your computer screen. When viewing screens other than the Home screen, the Help button provides help applicable to the current screen. 10 Setup: Opens the Setup menu where you can change product settings and perform maintenance functions. This is located in the top right corner of the Touch Screen. 11 Status Dashboard icon: Opens the Status Dashboard, which displays important information about the product status such as estimated ink levels, network connections, etc. 12 Apps: TouchSmart Web provides a quick and easy way to access and print information from the Web, such as maps, coupons, coloring pages, and puzzles. 13 Opens the TouchSmart Web Manager where you can add, rearrange, and remove Apps. Status Dashboard icons The Status Dashboard displays important information about the HP Photosmart. You can touch the following icons on the Status Dashboard to view specific details. Status Dashboard icons 7
-
 1
1 -
2
-
3
-
 4
4 -
 5
5 -
 6
6 -
 7
7 -
 8
8 -
 9
9 -
 10
10 -
 11
11 -
 12
12 -
 13
13 -
 14
14 -
15
-
16
-
17
-
18
-
19
-
20
-
21
-
22
-
23
-
24
-
25
-
26
-
27
-
28
-
29
-
30
-
31
-
32
-
33
-
34
-
35
-
36
-
37
-
38
-
39
-
40
-
41
-
42
-
43
-
44
-
45
-
46
-
47
-
48
-
49
-
50
-
51
-
52
-
53
-
54
-
55
-
56
-
57
-
58
-
59
-
60
-
61
-
62
-
63
-
64
-
65
-
66
-
67
-
68
-
69
-
70
-
71
-
72
-
73
-
74
-
75
-
76
-
77
-
78
-
79
-
80
-
81
-
82
-
83
-
84
-
85
-
86
-
87
-
88
-
89
-
90
-
91
-
92
-
93
-
94
-
95
-
96
-
97
-
98
-
99
-
100
-
101
-
102
-
103
-
104
-
105
-
106
-
107
-
108
-
109
-
110
-
111
-
112
-
113
-
114
-
115
-
116
-
117
-
118
-
119
-
120
-
121
-
122
-
123
-
124
-
125
-
126
-
127
-
128
-
129
-
130
-
131
-
132
-
133
-
134
-
135
-
136
-
137
-
138
-
139
-
140
-
141
-
142
-
143
-
144
-
145
-
146
-
147
-
148
-
149
-
150
-
151
-
152
-
153
-
154
-
155
-
156
-
157
-
158
-
159
-
160
-
161
-
162
-
163
-
164
-
165
-
166
-
167
-
168
-
169
-
170
-
171
-
172
-
173
-
174
-
175
-
176
-
177
-
178
-
179
-
180
-
181
-
182
-
183
-
184
-
185
-
186
-
187
-
188
-
189
-
190
-
191
-
192
-
193
-
194
-
195
-
196
-
197
-
198
-
199
-
200
-
201
-
202
-
203
-
204
-
205
-
206
-
207
-
208
-
209
-
210
-
211
-
212
 |
 |