Kyocera FS 3830N FS-3820N/3830N Operation Guide Rev-1.1 - Page 140
Replace toner Clean, printer, Clean printer Press GO, will appear after
 |
View all Kyocera FS 3830N manuals
Add to My Manuals
Save this manual to your list of manuals |
Page 140 highlights
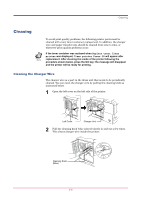
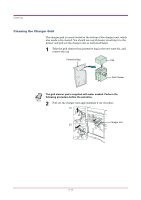
Toner Container Replacement 8 Push firmly on the top of the toner container at the positions marked PUSH HERE. When the toner container fits into place, it will lock with a clicking sound. 9 Close the top cover. It is necessary to clean the inside of the printer after replacing the toner container. If the toner container is replaced when Replace toner Clean Note printer is displayed, Clean printer Press GO will appear after replacement. After cleaning the inside of the printer (see Cleaning on page 3-9), the message will disappear when the GO key is pressed, and the printer will be ready for printing. 3-5
-
 1
1 -
2
-
3
-
4
-
5
-
6
-
7
-
8
-
9
-
10
-
11
-
12
-
13
-
14
-
15
-
16
-
17
-
18
-
19
-
20
-
21
-
22
-
23
-
24
-
25
-
26
-
27
-
28
-
29
-
30
-
31
-
32
-
33
-
34
-
35
-
36
-
37
-
38
-
39
-
40
-
41
-
42
-
43
-
44
-
45
-
46
-
47
-
48
-
49
-
50
-
51
-
52
-
53
-
54
-
55
-
56
-
57
-
58
-
59
-
60
-
61
-
62
-
63
-
64
-
65
-
66
-
67
-
68
-
69
-
70
-
71
-
72
-
73
-
74
-
75
-
76
-
77
-
78
-
79
-
80
-
81
-
82
-
83
-
84
-
85
-
86
-
87
-
88
-
89
-
90
-
91
-
92
-
93
-
94
-
95
-
96
-
97
-
98
-
99
-
100
-
101
-
102
-
103
-
104
-
105
-
106
-
107
-
108
-
109
-
110
-
111
-
112
-
113
-
114
-
115
-
116
-
117
-
118
-
119
-
120
-
121
-
122
-
123
-
124
-
125
-
126
-
127
-
128
-
129
-
130
-
131
-
132
-
133
-
134
-
 135
135 -
 136
136 -
 137
137 -
 138
138 -
 139
139 -
 140
140 -
 141
141 -
 142
142 -
 143
143 -
 144
144 -
 145
145 -
146
-
147
-
148
-
149
-
150
-
151
-
152
-
153
-
154
-
155
-
156
-
157
-
158
-
159
-
160
-
161
-
162
-
163
-
164
-
165
-
166
-
167
-
168
-
169
-
170
-
171
-
172
-
173
-
174
-
175
-
176
-
177
-
178
-
179
-
180
-
181
-
182
-
183
-
184
-
185
-
186
-
187
-
188
-
189
-
190
-
191
-
192
-
193
-
194
-
195
-
196
-
197
-
198
-
199
-
200
-
201
-
202
-
203
-
204
-
205
-
206
-
207
-
208
-
209
-
210
-
211
-
212
-
213
-
214
-
215
-
216
-
217
-
218
-
219
-
220
-
221
-
222
-
223
-
224
-
225
-
226
-
227
 |
 |

Toner Container Replacement
3-5
8
Push firmly on the top of the toner container at the positions marked
PUSH HERE
.
When the toner container fits into place, it will lock with a clicking
sound.
9
Close the top cover.
It is necessary to clean the inside of the printer after replacing the toner
container. If the toner container is replaced when
Replace toner Clean
printer
is displayed,
Clean printer Press GO
will appear after
replacement. After cleaning the inside of the printer (see
Cleaning
on
page
3-9
), the message will disappear when the GO key is pressed, and
the printer will be ready for printing.
Note