Kyocera FS 3830N FS-3820N/3830N Operation Guide Rev-1.1 - Page 146
Do not push the charger unit all the way in. Otherwise, water from
 |
View all Kyocera FS 3830N manuals
Add to My Manuals
Save this manual to your list of manuals |
Page 146 highlights
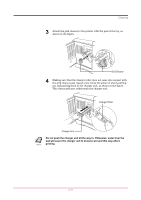
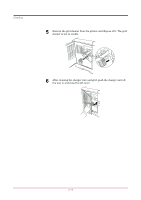
Cleaning 3 Attach the grid cleaner to the printer with the pad at the top, as shown in the figure. Grid Cleaner 4 Making sure that the charger roller does not come into contact with the grid cleaner pad, repeat a few times the action of slowly pulling out and pushing back in the charger unit, as shown in the figure. This cleans grid part underneath the charger unit. Charger Roller Charger Unit Do not push the charger unit all the way in. Otherwise, water from the pad will cause the charger unit to become wet and this may affect Note printing. 3-11
-
 1
1 -
2
-
3
-
4
-
5
-
6
-
7
-
8
-
9
-
10
-
11
-
12
-
13
-
14
-
15
-
16
-
17
-
18
-
19
-
20
-
21
-
22
-
23
-
24
-
25
-
26
-
27
-
28
-
29
-
30
-
31
-
32
-
33
-
34
-
35
-
36
-
37
-
38
-
39
-
40
-
41
-
42
-
43
-
44
-
45
-
46
-
47
-
48
-
49
-
50
-
51
-
52
-
53
-
54
-
55
-
56
-
57
-
58
-
59
-
60
-
61
-
62
-
63
-
64
-
65
-
66
-
67
-
68
-
69
-
70
-
71
-
72
-
73
-
74
-
75
-
76
-
77
-
78
-
79
-
80
-
81
-
82
-
83
-
84
-
85
-
86
-
87
-
88
-
89
-
90
-
91
-
92
-
93
-
94
-
95
-
96
-
97
-
98
-
99
-
100
-
101
-
102
-
103
-
104
-
105
-
106
-
107
-
108
-
109
-
110
-
111
-
112
-
113
-
114
-
115
-
116
-
117
-
118
-
119
-
120
-
121
-
122
-
123
-
124
-
125
-
126
-
127
-
128
-
129
-
130
-
131
-
132
-
133
-
134
-
135
-
136
-
137
-
138
-
139
-
140
-
 141
141 -
 142
142 -
 143
143 -
 144
144 -
 145
145 -
 146
146 -
 147
147 -
 148
148 -
 149
149 -
 150
150 -
 151
151 -
152
-
153
-
154
-
155
-
156
-
157
-
158
-
159
-
160
-
161
-
162
-
163
-
164
-
165
-
166
-
167
-
168
-
169
-
170
-
171
-
172
-
173
-
174
-
175
-
176
-
177
-
178
-
179
-
180
-
181
-
182
-
183
-
184
-
185
-
186
-
187
-
188
-
189
-
190
-
191
-
192
-
193
-
194
-
195
-
196
-
197
-
198
-
199
-
200
-
201
-
202
-
203
-
204
-
205
-
206
-
207
-
208
-
209
-
210
-
211
-
212
-
213
-
214
-
215
-
216
-
217
-
218
-
219
-
220
-
221
-
222
-
223
-
224
-
225
-
226
-
227
 |
 |

Cleaning
3-11
3
Attach the grid cleaner to the printer with the pad at the top, as
shown in the figure.
4
Making sure that the charger roller does not come into contact with
the grid cleaner pad, repeat a few times the action of slowly pulling
out and pushing back in the charger unit, as shown in the figure.
This cleans grid part underneath the charger unit.
Do not push the charger unit all the way in. Otherwise, water from the
pad will cause the charger unit to become wet and this may affect
printing.
Grid Cleaner
Charger Unit
Charger Roller
Note