Kyocera KM-3035 iTag Specification/Setup/Operation Guide Ver. 8.0 - Page 16
Index Fields Wizard Prev Field - scanner setup
 |
View all Kyocera KM-3035 manuals
Add to My Manuals
Save this manual to your list of manuals |
Page 16 highlights
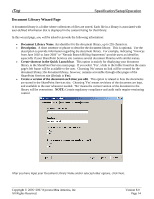
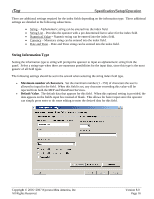
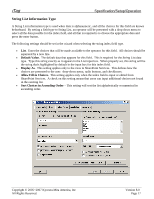
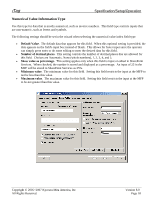
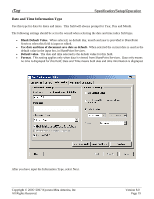
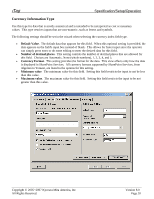
iTag Specification/Setup/Operation Index Fields Wizard Page Index fields provide a way of classifying a document several ways. Typically, a document library has several index fields associated with it. Each time a document is scanned, users are asked to input data for that index field. When the document library is viewed, users can quickly group together documents containing particular data. As an example, a document library containing billing statements may have the following index fields: • Department Name - Finance and Credit, MIS, Technical • Billing Type - Cell phone, Credit Card • Billing Month - January - December During scanning, the operator is asked to input all three fields from the MFP panel. When scanned documents are retrieved from SharePoint Services, an auditor can then choose to view only all Credit Card billing statements, or all billing statements for the month of February. When using the iTag configuration utility, up to five (5) index fields can be created. Use the 'Next Field' and 'Prev Field' buttons to move from one index field to the next. Press the 'Finished' button to proceed to the next part of the wizard if less than five (5) index fields are needed. You can input the following information in the Index Fields page. • Field name. An identifier for the index field, for example, Department Name, Invoice Type, depending on the data for the index field. • Description. A brief description of the index field. This is optional. • Information Type. The data type of the index field. Five (5) types of data can be selected: string, string list, numerical value, currency, and date and time. An explanation of each of these fields is available in the subsections. • Use this field in both MFP and SharePoint. A check means this index field can be input from the MFP panel, when the document is scanned. Unchecked means the document is available for editing only from the SharePoint Services web site (Default is checked). • Use this field to rename the file. A check means the data for this field is used to rename the file. MFP scanners typically have a pre-defined naming scheme for the scanned file. Checking this button enables dynamic naming of files, depending on data input for this field by the operator. • Required field. A check means the MFP and SharePoint Services will reject a blank value input for this field. Copyright © 2005~2007 Kyocera Mita America, Inc All Rights Reserved. Version 8.0 Page 15
-
 1
1 -
2
-
3
-
4
-
5
-
6
-
7
-
8
-
9
-
10
-
 11
11 -
 12
12 -
 13
13 -
 14
14 -
 15
15 -
 16
16 -
 17
17 -
 18
18 -
 19
19 -
 20
20 -
 21
21 -
22
-
23
-
24
-
25
-
26
-
27
-
28
-
29
-
30
-
31
-
32
-
33
-
34
-
35
-
36
-
37
-
38
-
39
-
40
-
41
-
42
-
43
-
44
-
45
-
46
-
47
-
48
-
49
-
50
-
51
-
52
-
53
-
54
-
55
-
56
-
57
-
58
-
59
-
60
-
61
-
62
-
63
-
64
-
65
-
66
-
67
-
68
-
69
-
70
-
71
-
72
-
73
-
74
-
75
-
76
-
77
-
78
-
79
-
80
-
81
-
82
-
83
-
84
-
85
-
86
-
87
-
88
-
89
-
90
-
91
-
92
-
93
-
94
-
95
-
96
 |
 |
