Kyocera KM-3035 iTag Specification/Setup/Operation Guide Ver. 8.0 - Page 26
Completing the Setup, Finish, Launch the KYOcapture Workflow, Launch the Process Designer - scanning manual
 |
View all Kyocera KM-3035 manuals
Add to My Manuals
Save this manual to your list of manuals |
Page 26 highlights
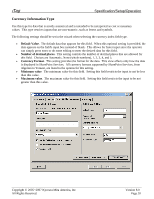
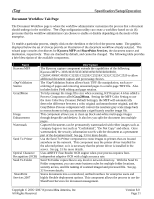
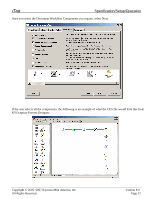
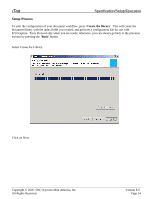
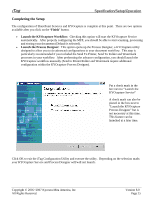
iTag Specification/Setup/Operation Completing the Setup The configuration of SharePoint Services and KYOcapture is complete at this point. There are two options available after you click on the 'Finish' button. • Launch the KYOcapture Workflow: Checking this option will start the KYOcapture Service automatically. After properly configuring the MFP, you should be able to start scanning, processing and storing your documents (Default is selected). • Launch the Process Designer: This option opens up the Process Designer, a KYOcapture utility designed to allow you to do advanced configurations to your document workflow. This step is particularly recommended if you included the Send To Printer, Send To Folder and Watermark processes in your workflow. After performing the advance configuration, you should launch the KYOcapture workflow manually (Send to Printer/Folder and Watermark require additional configuration within the KYOcapture Process Designer). Put a check mark in the box next to "Launch the KYOcapture Service" A check mark can also be placed in the box next to "Launch the KYOcapture Process Designer" but is not necessary at this time. This feature can be launched at a later time. Click OK to exit the iTag Configuration Utility and execute the utility. Depending on the selection made, your KYOcapture Service and Process Designer will/will not launch. Copyright © 2005~2007 Kyocera Mita America, Inc All Rights Reserved. Version 8.0 Page 25
-
 1
1 -
2
-
3
-
4
-
5
-
6
-
7
-
8
-
9
-
10
-
11
-
12
-
13
-
14
-
15
-
16
-
17
-
18
-
19
-
20
-
 21
21 -
 22
22 -
 23
23 -
 24
24 -
 25
25 -
 26
26 -
 27
27 -
 28
28 -
 29
29 -
 30
30 -
 31
31 -
32
-
33
-
34
-
35
-
36
-
37
-
38
-
39
-
40
-
41
-
42
-
43
-
44
-
45
-
46
-
47
-
48
-
49
-
50
-
51
-
52
-
53
-
54
-
55
-
56
-
57
-
58
-
59
-
60
-
61
-
62
-
63
-
64
-
65
-
66
-
67
-
68
-
69
-
70
-
71
-
72
-
73
-
74
-
75
-
76
-
77
-
78
-
79
-
80
-
81
-
82
-
83
-
84
-
85
-
86
-
87
-
88
-
89
-
90
-
91
-
92
-
93
-
94
-
95
-
96
 |
 |
