Kyocera KM-3035 iTag Specification/Setup/Operation Guide Ver. 8.0 - Page 88
Scan To PC - Export and Import
 |
View all Kyocera KM-3035 manuals
Add to My Manuals
Save this manual to your list of manuals |
Page 88 highlights
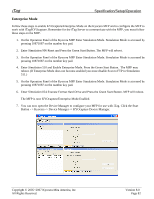
iTag Specification/Setup/Operation Scan To PC - Export and Import 1. With the Device Manager open, click on the desired MFP, Click the Device Tables Tab, PC List Tab. Click the Export Button. 2. You will be prompted to Save the Text File. For this demonstration we are saving the file in a ScanToPCFolder and naming the text fie ScanToPc.txt. Copyright © 2005~2007 Kyocera Mita America, Inc All Rights Reserved. Version 8.0 Page 87
-
 1
1 -
2
-
3
-
4
-
5
-
6
-
7
-
8
-
9
-
10
-
11
-
12
-
13
-
14
-
15
-
16
-
17
-
18
-
19
-
20
-
21
-
22
-
23
-
24
-
25
-
26
-
27
-
28
-
29
-
30
-
31
-
32
-
33
-
34
-
35
-
36
-
37
-
38
-
39
-
40
-
41
-
42
-
43
-
44
-
45
-
46
-
47
-
48
-
49
-
50
-
51
-
52
-
53
-
54
-
55
-
56
-
57
-
58
-
59
-
60
-
61
-
62
-
63
-
64
-
65
-
66
-
67
-
68
-
69
-
70
-
71
-
72
-
73
-
74
-
75
-
76
-
77
-
78
-
79
-
80
-
81
-
82
-
 83
83 -
 84
84 -
 85
85 -
 86
86 -
 87
87 -
 88
88 -
 89
89 -
 90
90 -
 91
91 -
 92
92 -
 93
93 -
94
-
95
-
96
 |
 |

iTag
Specification/Setup/Operation
Copyright © 2005~2007 Kyocera Mita America, Inc
Version 8.0
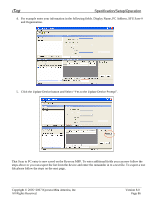
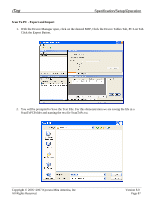
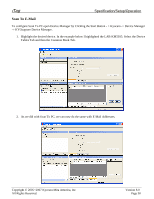
Scan To PC - Export and Import
1.
With the Device Manager open, click on the desired MFP, Click the Device Tables Tab, PC List Tab.
Click the Export Button.
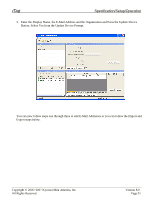
2.
You will be prompted to Save the Text File. For this demonstration we are saving the file in a
ScanToPCFolder and naming the text fie ScanToPc.txt.
All Rights Reserved
.
Page 87