Kyocera KM-3035 iTag Specification/Setup/Operation Guide Ver. 8.0 - Page 83
Enterprise Mode
 |
View all Kyocera KM-3035 manuals
Add to My Manuals
Save this manual to your list of manuals |
Page 83 highlights
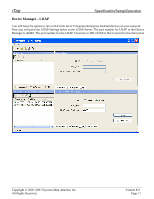
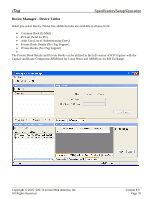
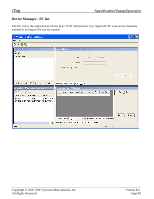
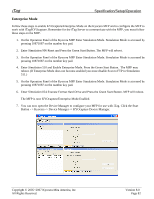
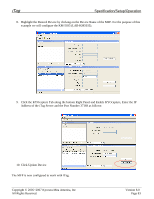
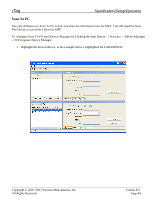
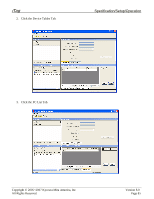
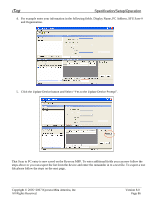
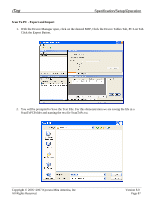
iTag Specification/Setup/Operation Enterprise Mode Follow these steps to enable KYOcapture\Enterprise Mode on the Kyocera MFP and to configure the MFP to work with iTag/KYOcapture. Remember for the iTag Server to communicate with the MFP, you must follow these steps on the MFP. 1. On the Operation Panel of the Kyocera MFP Enter Simulation Mode. Simulation Mode is accessed by pressing 10871087 on the number key pad. 2. Enter Simulation 906 Reset and Press the Green Start Button. The MFP will reboot. 3. On the Operation Panel of the Kyocera MFP Enter Simulation Mode. Simulation Mode is accessed by pressing 10871087 on the number key pad. 4. Enter Simulation 510 and Enable Enterprise Mode. Press the Green Start Button. The MFP may reboot. (If Enterprise Mode does not become enabled you must disable Scan to FTP in Simulation 511.) 5. On the Operation Panel of the Kyocera MFP Enter Simulation Mode. Simulation Mode is accessed by pressing 10871087 on the number key pad. 6. Enter Simulation 024 Execute Format Hard Drive and Press the Green Start Button. MFP will reboot. The MFP is now KYOcapture/Enterprise Mode Enabled. 7. You can now open the Device Manager to configure your MFP for use with iTag. Click the Start Button - > Kyocera -> Device Manager -> KYOcapture Device Manager. Copyright © 2005~2007 Kyocera Mita America, Inc All Rights Reserved. Version 8.0 Page 82
-
 1
1 -
2
-
3
-
4
-
5
-
6
-
7
-
8
-
9
-
10
-
11
-
12
-
13
-
14
-
15
-
16
-
17
-
18
-
19
-
20
-
21
-
22
-
23
-
24
-
25
-
26
-
27
-
28
-
29
-
30
-
31
-
32
-
33
-
34
-
35
-
36
-
37
-
38
-
39
-
40
-
41
-
42
-
43
-
44
-
45
-
46
-
47
-
48
-
49
-
50
-
51
-
52
-
53
-
54
-
55
-
56
-
57
-
58
-
59
-
60
-
61
-
62
-
63
-
64
-
65
-
66
-
67
-
68
-
69
-
70
-
71
-
72
-
73
-
74
-
75
-
76
-
77
-
 78
78 -
 79
79 -
 80
80 -
 81
81 -
 82
82 -
 83
83 -
 84
84 -
 85
85 -
 86
86 -
 87
87 -
 88
88 -
89
-
90
-
91
-
92
-
93
-
94
-
95
-
96
 |
 |
