Kyocera KM-3035 iTag Specification/Setup/Operation Guide Ver. 8.0 - Page 35
Configuring the Gray2Mono Process Component, Gray2Mono., How to Enable Color Scanning
 |
View all Kyocera KM-3035 manuals
Add to My Manuals
Save this manual to your list of manuals |
Page 35 highlights
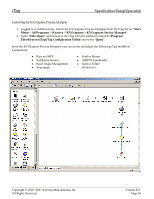
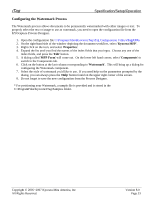
iTag Specification/Setup/Operation Configuring the Gray2Mono Process Component Normally KYOcapture will process monochrome images as gray scale and the color image as color. When scanning mixed originals which contain monochrome and color documents, considerably larger image files are produced. To help reduce the image files size, KYOcapture 4.6 has added a Process Component called Gray2Mono. Setting the MFP Color Setting to use the Auto Color Key (Scanner Default Settings), the MFP will automatically detect the difference between a color original and monochrome original, and the Gray2Mono Process Component will convert the resultant gray scale image back to monochrome to help accommodate a significantly smaller image file. NOTE: Auto Color Scan (ACS) - The Auto Color Key feature needs to be enabled on the MFP side (C2520/C3225/C3232/C2525E/C3225E/C3232E/C4035E), please see How to Enable Color Scanning on Page 51 of this document. 1. From the MFP Form within the KYOcapture Process Designe,r make sure that Auto Color Select is selected in the Color Type field and select the Components tab. 2. This will display the available components for the MFP Form. 3. Select Gray2Mono from the list of components, this will launch the Configure Gray2Mono dialogue box. 4. Select the Activate check box, and adjust the slider to set the Gray to Monochrome conversion threshold. 5. Click OK to lock in the setting. Copyright © 2005~2007 Kyocera Mita America, Inc All Rights Reserved. Version 8.0 Page 34
-
 1
1 -
2
-
3
-
4
-
5
-
6
-
7
-
8
-
9
-
10
-
11
-
12
-
13
-
14
-
15
-
16
-
17
-
18
-
19
-
20
-
21
-
22
-
23
-
24
-
25
-
26
-
27
-
28
-
29
-
 30
30 -
 31
31 -
 32
32 -
 33
33 -
 34
34 -
 35
35 -
 36
36 -
 37
37 -
 38
38 -
 39
39 -
 40
40 -
41
-
42
-
43
-
44
-
45
-
46
-
47
-
48
-
49
-
50
-
51
-
52
-
53
-
54
-
55
-
56
-
57
-
58
-
59
-
60
-
61
-
62
-
63
-
64
-
65
-
66
-
67
-
68
-
69
-
70
-
71
-
72
-
73
-
74
-
75
-
76
-
77
-
78
-
79
-
80
-
81
-
82
-
83
-
84
-
85
-
86
-
87
-
88
-
89
-
90
-
91
-
92
-
93
-
94
-
95
-
96
 |
 |
