Netgear FVS318 FVS318v3 Reference Manual - Page 110
FVS318v3 Scenario 2: FVS318v3 to FVS318v3 with RSA Certificates - upload trusted certificate
 |
UPC - 606449023381
View all Netgear FVS318 manuals
Add to My Manuals
Save this manual to your list of manuals |
Page 110 highlights
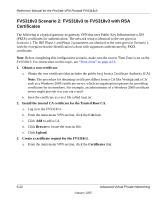
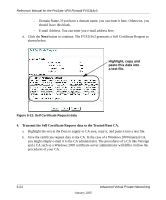
Reference Manual for the ProSafe VPN Firewall FVS318v3 FVS318v3 Scenario 2: FVS318v3 to FVS318v3 with RSA Certificates The following is a typical gateway-to-gateway VPN that uses Public Key Infrastructure x.509 (PKIX) certificates for authentication. The network setup is identical to the one given in Scenario 1. The IKE Phase 1 and Phase 2 parameters are identical to the ones given in Scenario 1, with the exception that the identification is done with signatures authenticated by PKIX certificates. Note: Before completing this configuration scenario, make sure the correct Time Zone is set on the FVS318v3. For instructions on this topic, see "Time Zone" on page 4-13. 1. Obtain a root certificate. a. Obtain the root certificate (that includes the public key) from a Certificate Authority (CA) Note: The procedure for obtaining certificates differs from a CA like Verisign and a CA such as a Windows 2000 certificate server, which an organization operates for providing certificates for its members. For example, an administrator of a Windows 2000 certificate server might provide it to you via e-mail. b. Save the certificate as a text file called trust.txt. 2. Install the trusted CA certificate for the Trusted Root CA. a. Log in to the FVS318v3. b. From the main menu VPN section, click the CAs link. c. Click Add to add a CA. d. Click Browse to locate the trust.txt file. e. Click Upload. 3. Create a certificate request for the FVS318v3. a. From the main menu VPN section, click the Certificates link. 6-22 January 2005 Advanced Virtual Private Networking
-
 1
1 -
2
-
3
-
4
-
5
-
6
-
7
-
8
-
9
-
10
-
11
-
12
-
13
-
14
-
15
-
16
-
17
-
18
-
19
-
20
-
21
-
22
-
23
-
24
-
25
-
26
-
27
-
28
-
29
-
30
-
31
-
32
-
33
-
34
-
35
-
36
-
37
-
38
-
39
-
40
-
41
-
42
-
43
-
44
-
45
-
46
-
47
-
48
-
49
-
50
-
51
-
52
-
53
-
54
-
55
-
56
-
57
-
58
-
59
-
60
-
61
-
62
-
63
-
64
-
65
-
66
-
67
-
68
-
69
-
70
-
71
-
72
-
73
-
74
-
75
-
76
-
77
-
78
-
79
-
80
-
81
-
82
-
83
-
84
-
85
-
86
-
87
-
88
-
89
-
90
-
91
-
92
-
93
-
94
-
95
-
96
-
97
-
98
-
99
-
100
-
101
-
102
-
103
-
104
-
 105
105 -
 106
106 -
 107
107 -
 108
108 -
 109
109 -
 110
110 -
 111
111 -
 112
112 -
 113
113 -
 114
114 -
 115
115 -
116
-
117
-
118
-
119
-
120
-
121
-
122
-
123
-
124
-
125
-
126
-
127
-
128
-
129
-
130
-
131
-
132
-
133
-
134
-
135
-
136
-
137
-
138
-
139
-
140
-
141
-
142
-
143
-
144
-
145
-
146
-
147
-
148
-
149
-
150
-
151
-
152
-
153
-
154
-
155
-
156
-
157
-
158
-
159
-
160
-
161
-
162
-
163
-
164
-
165
-
166
-
167
-
168
-
169
-
170
-
171
-
172
-
173
-
174
-
175
-
176
-
177
-
178
-
179
-
180
-
181
-
182
-
183
-
184
-
185
-
186
-
187
-
188
-
189
-
190
-
191
-
192
-
193
-
194
-
195
-
196
-
197
-
198
-
199
-
200
-
201
-
202
-
203
-
204
-
205
-
206
-
207
-
208
-
209
-
210
-
211
-
212
-
213
-
214
-
215
-
216
-
217
-
218
-
219
-
220
-
221
-
222
-
223
-
224
-
225
-
226
-
227
-
228
-
229
-
230
-
231
-
232
-
233
-
234
-
235
-
236
-
237
-
238
-
239
-
240
-
241
-
242
 |
 |
