Netgear FVS318 FVS318v3 Reference Manual - Page 74
Transferring a Security Policy to Another Client, Exporting a Security Policy, Step 1, Export
 |
UPC - 606449023381
View all Netgear FVS318 manuals
Add to My Manuals
Save this manual to your list of manuals |
Page 74 highlights
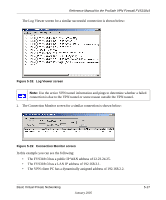
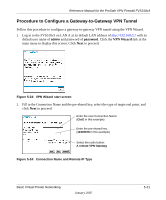
Reference Manual for the ProSafe VPN Firewall FVS318v3 While the connection is being established, the Connection Name field in this menu will say "SA" before the name of the connection. When the connection is successful, the "SA" will change to the yellow key symbol shown in the illustration above. Note: While your PC is connected to a remote LAN through a VPN, you might not have normal Internet access. If this is the case, you will need to close the VPN connection in order to have normal Internet access. Transferring a Security Policy to Another Client This section explains how to export and import a security policy as an .spd file so that an existing NETGEAR ProSafe VPN Client configuration can be copied to other PCs running the NETGEAR ProSafe VPN Client. Exporting a Security Policy The following procedure (Figure 5-20) enables you to export a security policy as an .spd file. Step 1: Select Export Security Policy from the File pulldown. Step 2: Click Export once you decide the name of the file and directory where you want to store the client policy. In this example, the exported policy is named policy.spd and is being stored on the C drive. Figure 5-20: Exporting a security policy 5-18 January 2005 Basic Virtual Private Networking
-
 1
1 -
2
-
3
-
4
-
5
-
6
-
7
-
8
-
9
-
10
-
11
-
12
-
13
-
14
-
15
-
16
-
17
-
18
-
19
-
20
-
21
-
22
-
23
-
24
-
25
-
26
-
27
-
28
-
29
-
30
-
31
-
32
-
33
-
34
-
35
-
36
-
37
-
38
-
39
-
40
-
41
-
42
-
43
-
44
-
45
-
46
-
47
-
48
-
49
-
50
-
51
-
52
-
53
-
54
-
55
-
56
-
57
-
58
-
59
-
60
-
61
-
62
-
63
-
64
-
65
-
66
-
67
-
68
-
 69
69 -
 70
70 -
 71
71 -
 72
72 -
 73
73 -
 74
74 -
 75
75 -
 76
76 -
 77
77 -
 78
78 -
 79
79 -
80
-
81
-
82
-
83
-
84
-
85
-
86
-
87
-
88
-
89
-
90
-
91
-
92
-
93
-
94
-
95
-
96
-
97
-
98
-
99
-
100
-
101
-
102
-
103
-
104
-
105
-
106
-
107
-
108
-
109
-
110
-
111
-
112
-
113
-
114
-
115
-
116
-
117
-
118
-
119
-
120
-
121
-
122
-
123
-
124
-
125
-
126
-
127
-
128
-
129
-
130
-
131
-
132
-
133
-
134
-
135
-
136
-
137
-
138
-
139
-
140
-
141
-
142
-
143
-
144
-
145
-
146
-
147
-
148
-
149
-
150
-
151
-
152
-
153
-
154
-
155
-
156
-
157
-
158
-
159
-
160
-
161
-
162
-
163
-
164
-
165
-
166
-
167
-
168
-
169
-
170
-
171
-
172
-
173
-
174
-
175
-
176
-
177
-
178
-
179
-
180
-
181
-
182
-
183
-
184
-
185
-
186
-
187
-
188
-
189
-
190
-
191
-
192
-
193
-
194
-
195
-
196
-
197
-
198
-
199
-
200
-
201
-
202
-
203
-
204
-
205
-
206
-
207
-
208
-
209
-
210
-
211
-
212
-
213
-
214
-
215
-
216
-
217
-
218
-
219
-
220
-
221
-
222
-
223
-
224
-
225
-
226
-
227
-
228
-
229
-
230
-
231
-
232
-
233
-
234
-
235
-
236
-
237
-
238
-
239
-
240
-
241
-
242
 |
 |
