Netgear FVS318 FVS318v3 Reference Manual - Page 132
Select the Turn Remote Management On check box., but rather use
 |
UPC - 606449023381
View all Netgear FVS318 manuals
Add to My Manuals
Save this manual to your list of manuals |
Page 132 highlights
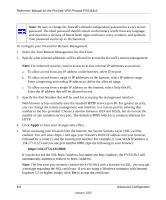
Reference Manual for the ProSafe VPN Firewall FVS318v3 Note: Be sure to change the firewall's default configuration password to a very secure password. The ideal password should contain no dictionary words from any language, and should be a mixture of letters (both upper and lower case), numbers, and symbols. Your password can be up to 30 characters. To configure your firewall for Remote Management: 1. Select the Turn Remote Management On check box. 2. Specify what external addresses will be allowed to access the firewall's remote management. Note: For enhanced security, restrict access to as few external IP addresses as practical. a. To allow access from any IP address on the Internet, select Everyone. b. To allow access from a range of IP addresses on the Internet, select IP address range. Enter a beginning and ending IP address to define the allowed range. c. To allow access from a single IP address on the Internet, select Only this PC. Enter the IP address that will be allowed access. 3. Specify the Port Number that will be used for accessing the management interface. Web browser access normally uses the standard HTTP service port 80. For greater security, you can change the remote management web interface to a custom port by entering that number in the box provided. Choose a number between 1024 and 65535, but do not use the number of any common service port. The default is 8080, which is a common alternate for HTTP. 4. Click Apply to have your changes take effect. 5. When accessing your firewall from the Internet, the Secure Sockets Layer (SSL) will be enabled. You will enter https:// and type your firewall's WAN IP address into your browser, followed by a colon (:) and the custom port number. For example, if your WAN IP address is 134.177.0.123 and you use port number 8080, type the following in your browser: https://134.177.0.123:8080 If you do not use the SSL https://address, but rather use http://address, the FVS318v3 will automatically attempt to redirect to https://address. Note: The first time you remotely connect the FVS318v3 with a browser via SSL, you may get a message regarding the SSL certificate. If you are using a Windows computer with Internet Explorer 5.5 or higher, simply click Yes to accept the certificate. 8-8 Advanced Configuration January 2005
-
 1
1 -
2
-
3
-
4
-
5
-
6
-
7
-
8
-
9
-
10
-
11
-
12
-
13
-
14
-
15
-
16
-
17
-
18
-
19
-
20
-
21
-
22
-
23
-
24
-
25
-
26
-
27
-
28
-
29
-
30
-
31
-
32
-
33
-
34
-
35
-
36
-
37
-
38
-
39
-
40
-
41
-
42
-
43
-
44
-
45
-
46
-
47
-
48
-
49
-
50
-
51
-
52
-
53
-
54
-
55
-
56
-
57
-
58
-
59
-
60
-
61
-
62
-
63
-
64
-
65
-
66
-
67
-
68
-
69
-
70
-
71
-
72
-
73
-
74
-
75
-
76
-
77
-
78
-
79
-
80
-
81
-
82
-
83
-
84
-
85
-
86
-
87
-
88
-
89
-
90
-
91
-
92
-
93
-
94
-
95
-
96
-
97
-
98
-
99
-
100
-
101
-
102
-
103
-
104
-
105
-
106
-
107
-
108
-
109
-
110
-
111
-
112
-
113
-
114
-
115
-
116
-
117
-
118
-
119
-
120
-
121
-
122
-
123
-
124
-
125
-
126
-
 127
127 -
 128
128 -
 129
129 -
 130
130 -
 131
131 -
 132
132 -
 133
133 -
 134
134 -
 135
135 -
 136
136 -
 137
137 -
138
-
139
-
140
-
141
-
142
-
143
-
144
-
145
-
146
-
147
-
148
-
149
-
150
-
151
-
152
-
153
-
154
-
155
-
156
-
157
-
158
-
159
-
160
-
161
-
162
-
163
-
164
-
165
-
166
-
167
-
168
-
169
-
170
-
171
-
172
-
173
-
174
-
175
-
176
-
177
-
178
-
179
-
180
-
181
-
182
-
183
-
184
-
185
-
186
-
187
-
188
-
189
-
190
-
191
-
192
-
193
-
194
-
195
-
196
-
197
-
198
-
199
-
200
-
201
-
202
-
203
-
204
-
205
-
206
-
207
-
208
-
209
-
210
-
211
-
212
-
213
-
214
-
215
-
216
-
217
-
218
-
219
-
220
-
221
-
222
-
223
-
224
-
225
-
226
-
227
-
228
-
229
-
230
-
231
-
232
-
233
-
234
-
235
-
236
-
237
-
238
-
239
-
240
-
241
-
242
 |
 |
