Netgear FVS318 FVS318v3 Reference Manual - Page 131
Static Route Example, Enabling Remote Management Access
 |
UPC - 606449023381
View all Netgear FVS318 manuals
Add to My Manuals
Save this manual to your list of manuals |
Page 131 highlights
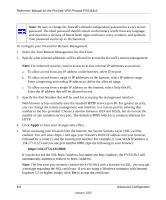
Reference Manual for the ProSafe VPN Firewall FVS318v3 8. Type a number between 1 and 15 as the Metric value. This represents the number of firewalls between your network and the destination. Usually, a setting of 2 or 3 works, but if this is a direct connection, set it to 1. 9. Click Apply to have the static route entered into the table. Static Route Example As an example of when a static route is needed, consider the following case: • Your primary Internet access is through a cable modem to an ISP. • You have an ISDN firewall on your home network for connecting to the company where you are employed. This firewall's address on your LAN is 192.168.0.100. • Your company's network is 134.177.0.0. When you first configured your firewall, two implicit static routes were created. A default route was created with your ISP as the gateway, and a second static route was created to your local network for all 192.168.0.x addresses. With this configuration, if you attempt to access a device on the 134.177.0.0 network, your firewall will forward your request to the ISP. The ISP forwards your request to the company where you are employed, and the request will likely be denied by the company's firewall. In this case you must define a static route, telling your firewall that 134.177.0.0 should be accessed through the ISDN firewall at 192.168.0.100. The static route would look like Figure 8-3. In this example: • The Destination IP Address and IP Subnet Mask fields specify that this static route applies to all 134.177.x.x addresses. • The Gateway IP Address fields specifies that all traffic for these addresses should be forwarded to the ISDN firewall at 192.168.0.100. • A Metric value of 1 will work since the ISDN firewall is on the LAN. • Private is selected only as a precautionary security measure in case RIP is activated. Enabling Remote Management Access Using the Remote Management page, you can allow a user or users on the Internet to configure, upgrade and check the status of your FVS318v3 VPN Firewall. Advanced Configuration 8-7 January 2005
-
 1
1 -
2
-
3
-
4
-
5
-
6
-
7
-
8
-
9
-
10
-
11
-
12
-
13
-
14
-
15
-
16
-
17
-
18
-
19
-
20
-
21
-
22
-
23
-
24
-
25
-
26
-
27
-
28
-
29
-
30
-
31
-
32
-
33
-
34
-
35
-
36
-
37
-
38
-
39
-
40
-
41
-
42
-
43
-
44
-
45
-
46
-
47
-
48
-
49
-
50
-
51
-
52
-
53
-
54
-
55
-
56
-
57
-
58
-
59
-
60
-
61
-
62
-
63
-
64
-
65
-
66
-
67
-
68
-
69
-
70
-
71
-
72
-
73
-
74
-
75
-
76
-
77
-
78
-
79
-
80
-
81
-
82
-
83
-
84
-
85
-
86
-
87
-
88
-
89
-
90
-
91
-
92
-
93
-
94
-
95
-
96
-
97
-
98
-
99
-
100
-
101
-
102
-
103
-
104
-
105
-
106
-
107
-
108
-
109
-
110
-
111
-
112
-
113
-
114
-
115
-
116
-
117
-
118
-
119
-
120
-
121
-
122
-
123
-
124
-
125
-
 126
126 -
 127
127 -
 128
128 -
 129
129 -
 130
130 -
 131
131 -
 132
132 -
 133
133 -
 134
134 -
 135
135 -
 136
136 -
137
-
138
-
139
-
140
-
141
-
142
-
143
-
144
-
145
-
146
-
147
-
148
-
149
-
150
-
151
-
152
-
153
-
154
-
155
-
156
-
157
-
158
-
159
-
160
-
161
-
162
-
163
-
164
-
165
-
166
-
167
-
168
-
169
-
170
-
171
-
172
-
173
-
174
-
175
-
176
-
177
-
178
-
179
-
180
-
181
-
182
-
183
-
184
-
185
-
186
-
187
-
188
-
189
-
190
-
191
-
192
-
193
-
194
-
195
-
196
-
197
-
198
-
199
-
200
-
201
-
202
-
203
-
204
-
205
-
206
-
207
-
208
-
209
-
210
-
211
-
212
-
213
-
214
-
215
-
216
-
217
-
218
-
219
-
220
-
221
-
222
-
223
-
224
-
225
-
226
-
227
-
228
-
229
-
230
-
231
-
232
-
233
-
234
-
235
-
236
-
237
-
238
-
239
-
240
-
241
-
242
 |
 |
