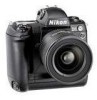
Nikon VAA109EA User Manual
Nikon VAA109EA - D1 Digital Camera SLR Manual
 |
View all Nikon VAA109EA manuals
Add to My Manuals
Save this manual to your list of manuals |
Nikon VAA109EA manual content summary:
- Nikon VAA109EA | User Manual - Page 1
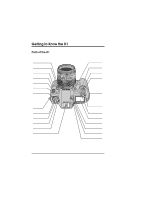
Self-timer lamp (pg. 63) Mode dial lock release (pg. 26) Eyelet for camera strap Auto bracketing button (pg. 53-55) Flash sync mode button (pg. 96 Power switch (pg. 4) Shutter-release button (pg. 20-21) Eyelet for camera strap Exposure compensation button (pg. 51-52) Exposure mode button (pg. 43- - Nikon VAA109EA | User Manual - Page 2
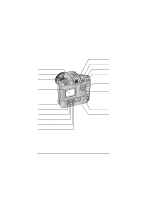
Eyepiece shutter lever (pg. 62) Delete button (pg. 81)/ Format button (pg. 13) Monitor button (pg. 59) LCD monitor (pg. vii) Battery pack latch (pg. 4) Command lock/ Menu button (pg. 43, 46) Custom setting button (pg. 66)/ Execute button (pg. 78) Image quality button (pg. 29)/ Select all button (pg. - Nikon VAA109EA | User Manual - Page 3
shooting) AF start (AF ON) button (vertical shooting) (pg. 33) Tripod socket Body cap BF-1A iv Cover for LCD monitor Video cable EG-D1 Camera strap AN-D1 Getting to Know the D1: Parts of the D1 - Nikon VAA109EA | User Manual - Page 4
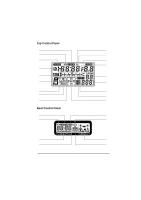
Top Control Panel Shutter-speed lock (pg. 44) Year/month indicator (pg. 8-9) Clock battery indicator (pg. 8-9) Exposure compensation indicator (pg. 51) Bracketing indicator (pg. 53) Exposure mode (pg. 43-47) Flexible program indicator (pg. 18) Flash sync mode (pg. 96) Electronic analog exposure - Nikon VAA109EA | User Manual - Page 5
Viewfinder Display 12mm (0.47˝) reference circle for center-weighted metering (pg. 41) Focus brackets (focus area) (pg. 36) Spot-metering targets (pg. 42) Aperture lock (pg. 45) Shutter-speed lock (pg. 44) Focus indicator (pg. 20) Metering system (pg. 41) Auto-exposure lock (pg. 49) Shutter speed ( - Nikon VAA109EA | User Manual - Page 6
LCD Monitor 1 100-6 1 Frame number 1 2 3 100NC_D1 /DSC_0006. JPG ɹɹɹɹ 6/18 2000 /01/26 01: 11: 20ɹɹɹ ɹNORMAL 4 5 67 1 Folder name 2 Filename 3 Frame number 4 Date of recording 5 Time of recording 6 Protected file 7 Image quality Note The LCD monitor and control panels may darken or turn - Nikon VAA109EA | User Manual - Page 7
desiccant loses its ability to absorb moisture after a period of time, and should be replaced at regular intervals. • To prevent mold or mildew, take the camera out at least once a month to turn it on and release the shutter a few times. • Store the battery in a cool, dry place. viii Caring for - Nikon VAA109EA | User Manual - Page 8
TFT LCD monitors and does not indicate a malfunction. Images recorded with the camera will not be affected. • Images in the monitor may be difficult to backlight. Should the monitor begin to dim or flicker, contact your Nikon service representative. • Do not apply pressure to the LCD monitor, as - Nikon VAA109EA | User Manual - Page 9
and, if not installed and used in accordance with the instructions, may cause harmful interference to radio communications. However, there is modifications made to this device that are not expressly approved by Nikon Corporation may void the user's authority to operate the equipment. Interface Cables - Nikon VAA109EA | User Manual - Page 10
or in part, of any of the manuals provided with your Nikon product requires prior permission from Nikon. • The information contained in this manual is subject to change without notice. • While Nikon makes every effort to produce perfect manuals, we appreciate any opportunity for improvement. Should - Nikon VAA109EA | User Manual - Page 11
Contents Getting to Know the D1 ii Caring for the Camera and Battery viii About This Manual 1 First Steps ...3 1 Insert the Battery 4 2 Attach the 20 6.13 Take a photograph 21 7 Play the Photograph Back 23 Camera Settings 25 The Mode Dial 26 Image Quality 28 Sensitivity (ISO Equivalency - Nikon VAA109EA | User Manual - Page 12
Custom Settings 65 Changing Custom Settings 66 Custom Settings Options 67 Quick Guide to Custom Settings Options 74 Two-Button Reset 76 Playback ...77 Playing the CCD 112 Optional Accessories 114 Troubleshooting 118 Specifications 123 Exposure Program (Programmed Auto 127 Index - Nikon VAA109EA | User Manual - Page 13
xiv - Nikon VAA109EA | User Manual - Page 14
ABOUT THIS MANUAL Thank you for your purchase of a Nikon D1 digital camera. This chapter describes the basic layout of this manual. 1 - Nikon VAA109EA | User Manual - Page 15
for the D1. Connections Describes how to connect your camera to a computer or television. Technical Notes Lists the accessories available for your camera, describes how to care for the camera's CCD, and provides troubleshooting tips. Tip When taking photographs on important occasions, take - Nikon VAA109EA | User Manual - Page 16
FIRST STEPS This chapter covers the steps you will take when using your camera for the first time, from inserting the battery to taking your first photograph. It describes the most commonly used settings for D-Type autofocus (AF) Nikkor - Nikon VAA109EA | User Manual - Page 17
battery The D1 uses rechargeable EN-4 Ni-MH battery packs (available separately). Be sure the battery is fully charged before inserting it in the camera. Batteries can be charged in about 90 minutes using the MH-16 Quick Charger (available separately). See the documentation provided with the MH-16 - Nikon VAA109EA | User Manual - Page 18
, and all indicators in the top control panel other than the exposure mode, battery indicator, and exposure counter, disappear six seconds after the camera is turned on (automatic meter switch-off). Tip Reactivating the display Lightly press (half-press) the shutter-release button to reactivate the - Nikon VAA109EA | User Manual - Page 19
attached, or if a non-CPU lens is attached (see "Technical Notes: Compatible Lenses"), F-- will appear in the top control panel and viewfinder when the camera is turned on (if the exposure mode is set to programmed auto or shutter-priority auto, the exposure mode indicator will also blink). 2.2 Set - Nikon VAA109EA | User Manual - Page 20
50 m ft 70 85 105 If you do not intend to set aperture manually using the lens aperture ring, lock the lens aperture (the aperture ring can viewfinder screen. This can be prevented by attaching the BF-1A body cap to the camera when no lens is in place (note that the BF-1 body cap can not be - Nikon VAA109EA | User Manual - Page 21
with a life of about ten years. When no charge remains, the clock-battery replacement indicator will appear in the control panel on top of the camera. Take the camera to a Nikon-authorized service center, where the clock battery can be replaced for a fee. 8 First Steps: Set the Time and Date - Nikon VAA109EA | User Manual - Page 22
button down for more than two seconds while pressing the exposure compensation button (A). The year indicator in the control panel on top of the camera will flash (B). Set the year using the main command dial. Pressing the exposure-compensation button will cause the month, day, hour, and minute to - Nikon VAA109EA | User Manual - Page 23
4 Choose a Language for the Menus Camera menus and messages can be displayed in English, German, French, or Holding the mode dial lock-release down, turn the mode dial to PLAY (playback mode). Turn the camera on and press the button (A) to display the playback menu (B). 4.2 Choose SET UP from the - Nikon VAA109EA | User Manual - Page 24
4.3 Choose a language from the LANGUAGE menu SET UP D1 FOLDERS OPTIONS 20S AUTO OFF E LANGUAGE N VIDEO OUTPUT CARDFORMAT SET LANGUAGE D DEUTSCH E ENGLISH F FRANÇAIS J SET Using the focus-area selector, highlight LANGUAGE and press the selector to the right to display the LANGUAGE menu. - Nikon VAA109EA | User Manual - Page 25
card in the camera's card slot. 5.1 Open the card slot After making sure the camera is off, open force when inserting the card. Either action could damage your camera. Fold the eject button over and close the cover (B). approved for use in the D1: • Nikon EC-CF CompactFlash memory cards • SanDisk - Nikon VAA109EA | User Manual - Page 26
to record photographs. When formatting memory cards, first make sure the camera is on, then hold the buttons down simultaneously for two seconds. formatted, the frame-number display in the control panel on top of the camera will show 1, and the number of exposures remaining will appear in both - Nikon VAA109EA | User Manual - Page 27
the mode dial lock-release down and turn the mode dial to S (single frame). See "Camera Settings: The Mode Dial" for more information. 6.2 Set image quality to NORM (normal) A B C After turning the camera on, hold the button down (A) and turn the main command dial (B). The image-quality display - Nikon VAA109EA | User Manual - Page 28
cycle through the sensitivity settings as shown below. Stop when the display shows 200 (ISO 200 equivalent). 200 400 800 1600 See "Camera Settings: Sensitivity" for more information. 6.4 Set white balance to A (auto) A B C Hold the button down (A) and turn the main command dial (B). The white - Nikon VAA109EA | User Manual - Page 29
pointing to S (single servo AF). For more information on focus settings, see "Camera Settings." 6.6 Set the AF area mode to single area AF A B C Hold AF). In single-servo AF, the shutter can only be released when the camera is in focus. Do not use the focus ring when autofocus is in effect - Nikon VAA109EA | User Manual - Page 30
right until the focus area display in the control panel on top of the camera shows center focus (B). The focus area can only be selected while the focus offers three metering modes: matrix, center-weighted, and spot (see "Camera Settings: Metering" for details). In matrix mode 3D color metering is - Nikon VAA109EA | User Manual - Page 31
mode The D1 offers a choice of four exposure modes: programmed auto, shutter-priority auto, aperture-priority auto, and manual. In programmed auto, the camera automatically adjusts exposure to produce the best results, as shown in "Technical Notes: Exposure Program (Programmed Auto)." Use this - Nikon VAA109EA | User Manual - Page 32
above, with your elbow propped lightly against your body for support. Hold the hand-grip with your right hand and cradle the camera or lens with your left. The shutter-release button for portrait photographs can be used when the camera is in vertical shooting mode (B). The recommended stance for - Nikon VAA109EA | User Manual - Page 33
the viewfinder. The subject is in focus. The camera is focused on an area between the camera and the subject. The camera is focused on an area behind the subject. The camera is unable to focus using autofocus. See "Camera Settings: Autofocus" for instructions. To focus on a subject that will not be - Nikon VAA109EA | User Manual - Page 34
-release button held halfway down, check the focus indicator in the viewfinder one final time (A) to confirm that the q indicator is showing and the camera is in focus (if your subject has moved since the photograph was composed, autofocus will automatically track the subject so that it stays in - Nikon VAA109EA | User Manual - Page 35
the Memory Card" in this chapter) before more photographs can be taken. Note The frame number shown in the control panel on top of the camera corresponds to the number of photographs in the current folder. When a new folder is created, the current frame number will return to 1. New folders are - Nikon VAA109EA | User Manual - Page 36
7 Play the Photograph Back Photographs taken with the D1 can be played back on the camera's LCD monitor. If desired, photographs can also be deleted. 7.1 Turn the monitor on A B C Press the button to turn the monitor on (A). The most recently taken - Nikon VAA109EA | User Manual - Page 37
in memory will be displayed. To return to playback without deleting the photograph, press any of the buttons on the rear of the camera except the and buttons. Press the button or lightly press the shutter-release button to end playback without deleting the photograph. For more information - Nikon VAA109EA | User Manual - Page 38
CAMERA SETTINGS This chapter details most of the camera settings you will use when taking photographs. Information on custom settings, playback, and flash photography are provided in separate chapters. 25 - Nikon VAA109EA | User Manual - Page 39
hold a maximum of twenty-one photographs. When this limit is reached, the camera will be unable to record more photographs until at least one of the images obtained at a temperature of 20°C (68°F) using continuous servo AF, manual exposure mode, a shutter speed faster than 1/250 sec., and an - Nikon VAA109EA | User Manual - Page 40
of consecutive photographs that can be taken before the buffer fills up is displayed in the viewfinder and the control panel on top of the camera (see above). Self timer: This mode is ideal for photographs in which the photographer wishes to appear (see "Self Timer Mode" in this chapter). Playback - Nikon VAA109EA | User Manual - Page 41
to the memory card. This file type can only be read using Nikon Capture software available separately from Nikon. The RAW data format is only available when "RAW data format available ). This file type can be read using Nikon View DX or Nikon Capture software. 28 Camera Settings: Image Quality - Nikon VAA109EA | User Manual - Page 42
RAW YCbCr TIFF RGB TIFF The approximate number of images that can be saved on 96 and 64 MB Nikon memory cards in each format are shown below. Format and file size Approx. number Approx. number of File size for black-and-white and color images is identical. Camera Settings: Image Quality 29 - Nikon VAA109EA | User Manual - Page 43
before shooting in this mode. At a setting of +1, the sensitivity display in the rear control panel shows HI-1; at a setting of +2, HI-2 is shown. 30 Camera Settings: Sensitivity (ISO Equivalency) - Nikon VAA109EA | User Manual - Page 44
under overcast skies, or indoors under incandescent or fluorescent lighting. A digital camera, in contrast, must adjust colors according to the lighting in order approximately 5200K (daylight). Flash: Use this setting with Nikon Speedlights. Color temperature is fixed at approximately 5400K. - Nikon VAA109EA | User Manual - Page 45
hold the button down for 2 seconds. The PRE indicator in the rear control panel will flash. 3 Using manual focus (see "Manual Focus," below) and auto exposure (exposure mode P, S, or A), focus the camera on the white object and press the shutter-release button. Note that the desired results may not - Nikon VAA109EA | User Manual - Page 46
button is half-pressed (B), or the button is held down (see below). A B S Single servo AF (focus priority): When the subject is at rest, the camera focuses when the shutter-release button is pressed half way. Focus remains locked as long as the shutter-release button is held in this position - Nikon VAA109EA | User Manual - Page 47
, when dynamic AF is used in combination with continuous servo AF, the camera first focuses on the subject in the selected focus area and then shifts the are shown in the viewfinder or in the control panel on top of the camera. This mode does not work well with telephoto lenses or poorly-lit subjects - Nikon VAA109EA | User Manual - Page 48
in viewfinder? Single area AF NA Manual Yes Single servo AF Dynamic area On (default) Automatic No AF Off (CSM 9) Manual Yes Single area AF NA Manual Yes Continuous servo AF Dynamic area Off (default) Manual Yes AF On (CSM 10) Automatic No Camera Settings: AF Area Mode 35 - Nikon VAA109EA | User Manual - Page 49
B C The selected focus area appears in the control panel on top of the camera (B) and is shown in red in the viewfinder (C). The focus area can be to the locked position. Note: The focus area can not be selected manually when closest subject priority is in effect. The focus area indicator is not - Nikon VAA109EA | User Manual - Page 50
the shutter-release button. Tip The button can be set to lock only focus, rather than both focus and exposure. See "Custom Settings," item 21. Camera Settings: Focus Lock 37 - Nikon VAA109EA | User Manual - Page 51
locked, recompose your photograph (A) and press the shutter-release button the rest of the way down to shoot (B). A B Do not change the distance between the camera and the subject while focus lock is in effect. If your subject moves, release focus lock and focus again at the new distance. Tip If - Nikon VAA109EA | User Manual - Page 52
use the AF-assist illuminator built into the Nikon SB-28DX Speedlight (available separately) and select is not dominated by regular geometrical patterns. For example, the camera may have difficulty focusing on a row of windows in pressed half way, focus manually or use focus lock to focus on another - Nikon VAA109EA | User Manual - Page 53
can be used in situations in which autofocus will not produce the expected results, or when the lens attached to the camera is not an AF Nikkor lens. A B To use manual focus, set the focus mode selector to M (A). Adjust focus using the lens focusing ring (B) until the image displayed on the clear - Nikon VAA109EA | User Manual - Page 54
-weighted metering is recommended when you use AE-lock (see "AE Lock") or exposure compensation (see "Exposure Compensation"). Center-weighted metering: The camera measures light in the entire frame, but assigns the greatest weight to a circular area in the center of the viewfinder 8mm (0.31˝) in - Nikon VAA109EA | User Manual - Page 55
Spot metering: The camera measures light only in a circle 4mm (0.15˝) in diameter and centered on the and rotate the metering selector to the desired setting. Tip Some lenses do not support one or more of the above metering systems. See "Technical Notes: Compatible Lenses" for more information. 42 - Nikon VAA109EA | User Manual - Page 56
and A will appear in the viewfinder. The aperture display in the viewfinder and the control panel on top of the camera will show F--, indicating that aperture must be set manually using the aperture ring on the lens. Noise may appear in photographs taken at slow shutter speeds (speeds of roughly one - Nikon VAA109EA | User Manual - Page 57
speed will be locked when you release the button, and lock indicators will appear in the viewfinder and the control panel on top of the camera (B). To release the lock, hold the button down and turn the main command dial. A B Tips The steps used in adjusting shutter speed and aperture can - Nikon VAA109EA | User Manual - Page 58
the main command dial until appears in the control panel on top of the camera. 2 Rotate the sub-command dial to choose an aperture between the minimum and and the control panel on top of the camera will show F-- to indicate that aperture must be set manually using the aperture ring. Custom Setting 22 - Nikon VAA109EA | User Manual - Page 59
aperture will be locked when you release the button, and lock indicators will appear in the viewfinder and the control panel on top of the camera (B). To release the lock, hold the button down and turn the sub- command dial. A B Tips The steps used in adjusting shutter speed and aperture can - Nikon VAA109EA | User Manual - Page 60
. Using the electronic analog exposure display in the viewfinder or the control panel on top of the camera, you can adjust exposure to suit your objective and shooting conditions. To use manual exposure: 1 Holding the MODE button down, rotate the main command dial until appears in the control panel - Nikon VAA109EA | User Manual - Page 61
exposure Underexposed by 2/3 EV Underexposed by 1 EV Overexposed by more than 2 EV Overexposed by more than 3 EV If the limits of the camera's metering system are exceeded, the electronic analog exposure display will flash. Note When using an AF Micro-Nikkor lens When setting aperture by means - Nikon VAA109EA | User Manual - Page 62
, shutter-priority auto, or aperture-priority auto, the camera determines exposure automatically with reference to lighting conditions in a that the in-focus indicator (q) is displayed in the viewfinder. If desired, camera settings can be changed so that only auto-exposure is locked when the button - Nikon VAA109EA | User Manual - Page 63
using auto-exposure lock. The adjusted values for shutter speed and aperture are displayed in the viewfinder and the control panel on top of the camera. Metering can not be changed while exposure lock is in effect. Any changes to metering will take effect only after the button is released. Tips - Nikon VAA109EA | User Manual - Page 64
of -5 EV. Viewfinder display -0.3 EV +2 EV At values other than 0, a indicator appears in the viewfinder and in the control panel on top of the camera. The electronic analog exposure display will show the amount of compensation, and the "0" indicator at the center of the display will blink to show - Nikon VAA109EA | User Manual - Page 65
restored by setting exposure compensation to a value of 0.0, or by performing a two-button reset (see, "Two-Button Reset"). Exposure compensation is not reset when the camera is turned off. 52 Camera Settings: Exposure Compensation - Nikon VAA109EA | User Manual - Page 66
to take a series of photographs of the same subject using a variety of exposure values that "bracket" optimum value as determined by the camera (or, in manual mode, by the photographer). This can be used to take multiple shots of the same subject at different exposure settings without stopping to - Nikon VAA109EA | User Manual - Page 67
(EVs) -2F1.0 2 (±0, -1.0) -2F0.5 +2F1.0 2 (±0, -0.5) 2 (±0, +1.0) +2F0.5 2 (±0, +0.5) -3F1.0 -3F0.5 3 (-1.0, -2.0, ±0) 3 (-0.5, -1.0, ±0) +3F1.0 3 (+1.0, ±0, +2.0) +3F0.5 3 (+0.5, ±0, +1.0) 3F1.0 3F0.5 3 (±0, -1.0, +1.0) 3 (±0, -0.5, +0.5) 54 Camera Settings: Auto Bracketing - Nikon VAA109EA | User Manual - Page 68
with exposure compensation (see "Exposure Compensation"). This can be used to achieve exposure compensations of more than +2.0 or less than -2.0 during bracketing. If the camera is turned off before you have taken all the photographs in the sequence, you can continue from where you left off when the - Nikon VAA109EA | User Manual - Page 69
the menu option to "1" ("capture-preview mode enabled"). When you release the control panel. button, CUSTOM will be displayed in the rear 3 Set the camera to single-frame shooting or self-timer mode. Photographs taken at these settings will be displayed in the LCD monitor before they are saved - Nikon VAA109EA | User Manual - Page 70
the monitor is turned on. Notes Capture preview is only available in single-frame shooting or self-timer modes. Photographs are not displayed when the camera is set to continuous shooting or PC mode. If, after the monitor has been turned off, another photograph is taken while the monitor indicator - Nikon VAA109EA | User Manual - Page 71
the menu option to "2" ("record-and-review mode enabled"). When you release the control panel. button, CUSTOM will be displayed in the rear 3 Set the camera to single-frame shooting or self-timer mode. Photographs taken at these settings will be displayed in the LCD monitor. If the - Nikon VAA109EA | User Manual - Page 72
monitor is turned on. Notes Record-and-review is only available in single-frame shooting or self-timer modes. Photographs are not displayed when the camera is set to continuous shooting or PC mode. If, after the monitor has been turned off, another photograph is taken while the monitor indicator is - Nikon VAA109EA | User Manual - Page 73
timer modes. To play photographs back: 1 Press the shutter-release button half way to wake the camera up. 2 Press the monitor button. The most recent photograph in memory will be displayed. If the camera has been set to display the histogram and image highlights (see "Playback"), these will be shown - Nikon VAA109EA | User Manual - Page 74
again to delete the photograph. To return to single-image playback without deleting the photograph, press any of the buttons on the rear of the camera except the and buttons. To view other photographs in memory Press the focus area selector up (v) or down (w). To view information on the current - Nikon VAA109EA | User Manual - Page 75
AF, check that the in-focus indicator (q) appears in the viewfinder. Photographs can not be taken when the camera is not focused. 3 In exposure modes other than manual (M), you should close the viewfinder eyepiece shutter (A) to prevent light entering via the eyepiece from affecting the results - Nikon VAA109EA | User Manual - Page 76
eye when operating the diopter dial. LCD Illuminator The rear control panel and the control panel on top of the camera are equipped with an illuminator so that you can view camera settings in the dark. To turn the illuminator on, rotate the power switch to . The illuminator will remain on while - Nikon VAA109EA | User Manual - Page 77
preview button. The lens will be stopped down to the aperture selected by the camera in programmed-auto or shutter-priority auto exposure modes, or to the value selected by the user in aperture-priority auto or manual modes. The view through the viewfinder will give you an approximate idea of the - Nikon VAA109EA | User Manual - Page 78
CUSTOM SETTINGS Custom settings are available for a variety of camera functions. Settings can be changed singly or in combination according to your preferences and the task at hand. 65 - Nikon VAA109EA | User Manual - Page 79
Changing Custom Settings To make changes to custom settings: 1 Select the desired item by rotating the main command dial while holding down the button. The rear control panel will show the item number and the option currently selected for that item (e.g., "1-0" for "Item 1, option 0"). The D1 - Nikon VAA109EA | User Manual - Page 80
either of these sets. Any changes to settings apply to the current set. Option: A Custom Set A (default) b Custom Set B 1. Image Status The camera offers a choice of capture modes for single-frame shooting and self-timer modes: "capture preview" (photographs are displayed in the monitor before being - Nikon VAA109EA | User Manual - Page 81
Shock Has Subsided) By default, the image is captured at the same time the shutter is released. To minimize mirror shock, you can set the camera to capture the image after the shutter is released. Option: 0 No delay (default) 1 Release delay in effect 6. Focus Area Selection At default settings, the - Nikon VAA109EA | User Manual - Page 82
, when a Speedlight is used with auto bracketing (see "Camera Settings: Auto Bracketing), flash exposure bracketing and auto-exposure bracketing auto or shutter-priority auto) or main command dial (aperture-priority auto or manual). If the roles of the main command and sub-command dials are switched - Nikon VAA109EA | User Manual - Page 83
15. Time Delay for Auto Meter-Switch-Off By default, exposure indicators are displayed in the control panel on top of the camera for six seconds after the camera is turned on. This can be changed to four, eight, or sixteen seconds. Option: 4 Four-second delay 6 Six-second delay (default) 8 Eight - Nikon VAA109EA | User Manual - Page 84
distance. By default, the aperture set using the sub-command dial in aperture-priority or manual exposure modes is preserved as either focal length or lens-to-film distance changes. Using this item, the camera can be set to maintain aperture a constant number of steps from the maximum aperture for - Nikon VAA109EA | User Manual - Page 85
without adjustment), you can choose from auto, normal, low-contrast, and high-contrast settings. You can also use custom curves created and downloaded to the camera using Nikon Capture software for the D1 (available separately). The default custom curve is linear. Option: 0 Auto (default - Nikon VAA109EA | User Manual - Page 86
Mode This item determines the number of photographs that can be stored in the temporary memory buffer in continuous shooting mode (see "Camera Settings: The Mode Dial"). Option: 21 Twenty-one standard photographs, ten photographs in RAW format (default) 1-20 Specified number of photographs, from - Nikon VAA109EA | User Manual - Page 87
shows HI-1) 2 Sensitivity set to +2 (sensitivity display in rear control panel shows HI-2) Quick Guide to Custom Settings Options Copy the following table and keep it with your camera for reference. Custom Setting 0: Custom settings 1: Image status 2: EV steps for exposure control 3: Bracketing - Nikon VAA109EA | User Manual - Page 88
Custom Setting Option Meaning 14: Center-weighted metering area 6, 8, 10, 13, A Diameter of metering area in mm ("A" is average for entire frame) 15: Time delay for auto meterswitch-off 4, 6, 8, 16 Delay in seconds 16: Self-timer duration 2, 5, 10, 20 Duration in seconds 17: LCD - Nikon VAA109EA | User Manual - Page 89
Default Normal (color) ISO 200 equivalent A (auto white balance; manual white balance adustment set to 0) Single area AF Center Programmed auto while the indicator is blinking and then press the buttons again. Both camera settings and custom settings for the current custom set will be restored - Nikon VAA109EA | User Manual - Page 90
PLAYBACK This chapter describes the D1's playback options, including viewing photographs and photograph information, deleting photographs, and the playback menu. 77 - Nikon VAA109EA | User Manual - Page 91
Playing Photographs Back Playback Controls The buttons next to the rear control panel and the button have two functions, one for changing camera settings and another in playback mode. Button Name in playback mode Menu Thumbnail Execute Select All Multiple Select Cancel Function in playback - Nikon VAA109EA | User Manual - Page 92
to thumbnails in the center of the LCD monitor for rapid display, with the frame number appearing at the bottom of each photograph. The camera will scroll quickly through photographs while the focus area selector is held down. Release the selector when the desired frame is reached. To display - Nikon VAA109EA | User Manual - Page 93
Thumbnail Playback The D1 can display the photographs stored in the flash memory card as thumbnail images. In this mode, up to nine images can be displayed at a time. 1 Holding down the mode dial lock release, turn the mode dial (A) to PLAY (playback mode) and press the button (B) to display a menu - Nikon VAA109EA | User Manual - Page 94
button again to delete the selected photograph. To return to playback without deleting the photograph, press any of the buttons on the rear of the camera except the and buttons. Notes If there are no photographs in the current folder, the message, "card contains no image data" will be displayed - Nikon VAA109EA | User Manual - Page 95
protecting photographs from deletion, and hiding photographs during playback. It also includes options for setting up photos for printing at print services or on printers that support the Digital Print Order Format (DPOF). To use the playback menu: 1 Holding down the mode dial lock release, turn the - Nikon VAA109EA | User Manual - Page 96
4 To select the currently highlighted item, press the focus area selector to the right. button or press the SLIDE SHOW START FRAME INTVL SET A submenu of options for the currently selected item will be displayed. To return to the playback menu without making any changes to settings, press the - Nikon VAA109EA | User Manual - Page 97
Delete The DELETE submenu contains the following op- tions: SELECTED: Delete multiple selected pho- tographs ALL: Delete all photographs in the current folder PRINT SET: Delete print-order files created using the PRINT option DELETE SELECTED ALL PRINT SET SET SELECTED When this option is - Nikon VAA109EA | User Manual - Page 98
a slide show FRAME INTVL: Select the time each image will be displayed SLIDE SHOW START FRAME INTVL START SET When this option is selected, the camera will display the photographs in memory one at a time in the order they were taken (photographs hidden using the HIDE IMAGE option will not be - Nikon VAA109EA | User Manual - Page 99
Protect The PROTECT option in the playback menu allows you to change the protected status of selected images. Images can be chosen from a thumbnail menu, where protected images are marked with a icon. Protected images can not be deleted (although they are erased when the memory card is formatted), - Nikon VAA109EA | User Manual - Page 100
Print Setup The PRINT SET option in the playback menu allows images to be selected for printing using a printer or print service that supports the Digital Print Order Format, or DPOF. Data concerning the images and other information to be printed are saved in print order files on the - Nikon VAA109EA | User Manual - Page 101
monitor turns off automatically in playback mode. LANGUAGE: Choose a language for the menus and messages dis- played by the camera. VIDEO OUTPUT: Select the video format used when the camera is con- nected to a television set or VCR. CARDFORMAT: Format memory cards for use in the D1. These - Nikon VAA109EA | User Manual - Page 102
D1 NC_D1: Select for playback all folders FOLDERS NEW DCF ALL: created by the D1 (default) Select all folders conforming to the Design Rule for Camera File D1 NC_D1 DCF ALL 100 NC_D1 Systems (DCF) for playback. SET nnn NC_D1: Select only the current folder for playback (the number of the - Nikon VAA109EA | User Manual - Page 103
Options The OPTIONS submenu contains the following items: HISTOGRAM: When this item is checked, a histogram is displayed when images are played back. HIGHLIGHT: When this item is checked, highlights are indicated by a blinking display when images are played back. OPTIONS HISTOGRAM HIGHLIGHT SET To - Nikon VAA109EA | User Manual - Page 104
or right. Both histogram and highlights can be displayed simultaneously. Auto Off The AUTO OFF submenu is used to set the length of time the camera will remain on in playback mode if no operations are performed. Highlight your choice using the focus-area selector, then press the button to put - Nikon VAA109EA | User Manual - Page 105
a television or VCR that complies with the NTSC PAL PAL: NTSC standard Select PAL when connecting SET the camera to a television or VCR that complies with the PAL standard Card format The CARDFORMAT option in the setup menu can be used to format memory - Nikon VAA109EA | User Manual - Page 106
FLASH PHOTOGRAPHY The D1 can be used with the SB-28DX (available separately) for sophisticated flash photographs using the D1's unique 3D multi-sensor balanced fill-flash control. 93 - Nikon VAA109EA | User Manual - Page 107
fill-flash). Center-weighted fill-flash for D1 This mode is used with non-CPU lenses. When a non-CPU lens is attached, the camera automatically chooses center-weighted metering, and consequently flash output is roughly balanced with ambient lighting for the main subject and background. If the frame - Nikon VAA109EA | User Manual - Page 108
shoe is equipped with a safety lock that keeps the Speedlight affixed to the camera when Speedlights provided with a locking pin (the SB-28DX, SB-28, SB SB-29) are attached. Sync terminal A sync cable can be attached to the camera's sync terminal. Flash-ready indicator When the SB-28DX, SB-28, SB-27 - Nikon VAA109EA | User Manual - Page 109
to programmed auto or aperture-priority auto. Notes To prevent blurring caused by camera shake, use of a tripod is recommended with slow sync or red-eye button and the shutter being released. Be careful not to move the camera or to let your subject move during this time. Red-eye reduction - Nikon VAA109EA | User Manual - Page 110
set the flash sync mode, hold down the flash mode button while turning the main command dial. The camera will cycle through the available flash modes in the order shown below. Programmed auto or aperture priority auto Shutter-priority auto or manual exposure Flash Photography: Flash Sync Modes 97 - Nikon VAA109EA | User Manual - Page 111
-22, SB-20, SB-16B, - - ✔ SB-15 (cordless) SB-118, SB-14 - - ✔ Flash mode M Manual FP highspeed sync Repeating flash REAR Rearcurtain sync ✔ ✔ ✔ ✔ ✔ ✔ ✔ ✔ ✔ - - ✔ ✔ ✔ ✔ ✔ ✔ ✔ ✔ ✔ ✔ - ✔ ✔ ✔ - ✔ ✔ ✔ - - ✔ ✔ - - ✔ Red-eye reduction - - 1 Can only - Nikon VAA109EA | User Manual - Page 112
the internal circuitry of the camera or flash. Before using a Nikon Speedlight other than listed above, contact a Nikon-authorized service representative for more information. Notes Refer to your Speedlight manual for detailed instructions. In the table of different camera types given in the SB - Nikon VAA109EA | User Manual - Page 113
1/500 sec. and thirty seconds. If speed faster than 1/500 sec. is chosen, the camera will automatically lower shutter speed to 1/500 sec. When using slow sync or slow sync with range and try again. Read all instructions in the Speedlight manual thoroughly. 100 Flash Photography: Using a Speedlight - Nikon VAA109EA | User Manual - Page 114
CONNECTIONS This chapter describes how to connect the D1 to a computer, television set, or VCR. 101 - Nikon VAA109EA | User Manual - Page 115
dial is set to PLAY (playback). In other modes, the television will continue to display images even when the LCD monitor is off. When the camera is powered by the EH-4 AC adapter (available separately), the monitor will turn off if no operations are performed for ten minutes. Images will continue - Nikon VAA109EA | User Manual - Page 116
directly to a computer via its IEEE 1394 interface, when images can be transferred to the computer using Nikon View DX or Nikon Capture software (available separately). Using Nikon Capture, you can control your camera from your computer for advanced studio photography. 1 After checking that the - Nikon VAA109EA | User Manual - Page 117
displayed in the control panel on top of the camera ("PC" is not displayed when Nikon View DX is running). Refer to your software manual for information concerning the operations that can be performed while the camera is connected to a computer. If the camera is not connected to a computer, or if it - Nikon VAA109EA | User Manual - Page 118
card can be viewed on a computer by removing the memory card from the camera and reading it using a CompactFlash (CF) card reader or PC card adapter. Type III card slot, an EC-AD1 PC-card adapter (available separately from Nikon). Using a CF Card Reader The steps involved in connecting a CF card - Nikon VAA109EA | User Manual - Page 119
Insert the adapter into the PC card slot as instructed in the documentation provided with your computer or PC camera is connected to your computer directly. See the Nikon View DX reference manual for details. The D1 can read and play back only those images that conform to the Design Rule for Camera - Nikon VAA109EA | User Manual - Page 120
TECHNICAL NOTES This chapter contains information on optional accessories, camera care, troubleshooting, and camera specifications. 107 - Nikon VAA109EA | User Manual - Page 121
focusing screen. To change focusing screens: 1 After turning the camera off, remove the lens from the camera body (A) and, using the tweezers supplied with the focusing it clicks into place. Notes Do not touch the camera mirror or the surface of the focusing screens. Use only screens designated for use in the - Nikon VAA109EA | User Manual - Page 122
in CPU: Choose center-weighted or spot metering, and an exposure mode of aperture-priority auto or manual. When an exposure mode of programmed auto or shutter-priority auto is selected, the camera will automatically be set to aperture-priority auto with centerweighted metering, and the exposure-mode - Nikon VAA109EA | User Manual - Page 123
to selected focus area (see "Camera Settings: Metering"). 2 Without shifting and/or tilting. 3 The camera's exposure metering and flash control system . 10 Exposure compensation required with some lenses (refer to instruction manual provided with teleconverter). 11 Auto Extension Ring PK-11A, - Nikon VAA109EA | User Manual - Page 124
A B Lens Focal Length and Picture Angle The size of the area exposed with a 35mm camera is 24 × 36mm. In the case of the D1, however, it is 15.6 × the lens by 1.5. The following chart shows some examples: Picture angle 35mm camera D1 17 25.5 Focal length (mm) in 35mm format modified for picture - Nikon VAA109EA | User Manual - Page 125
the filter may, depending on shooting conditions, appear in photographs taken with the camera. In this case you will need to clean the filter. The low- or lines, you will need to have the filter cleaned at a Nikon-authorized service center or clean it yourself as described below. How to tell when - Nikon VAA109EA | User Manual - Page 126
AC adapter (available separately) is required to perform this operation; if you do not have an AC adapter, you will need to take the camera to a Nikon-authorized service center for cleaning. 2 Remove dirt and dust from the filter with a blower. Do not use a blower-brush, as the brush bristles can - Nikon VAA109EA | User Manual - Page 127
are available for the D1. In addition, the CompactFlash memory cards listed below have been tested and approved for use in the COOLPIX 950 digital camera. Operation is not guaranteed with other CompactFlash memory cards. • SanDisk SDCFB-4, SDCFB-8, SDCFB-15, SDCFB-30, SDCFB-40, SDCFB-48, SDCFB-64 - Nikon VAA109EA | User Manual - Page 128
the viewfinder from above. The DK-7 is used when attaching the DR-3 Right-Angle Viewing Attachment or the DG-2 Eyepiece Magnifier to the D1. Filters Nikon filters can be divided into three types: screw-in, drop-in and rearinterchange. With the exception of the R60, exposure compensation need not be - Nikon VAA109EA | User Manual - Page 129
22 22 50 70 85 105 Nikon SB-28DX Speedlight This Speedlight has a guide number of 36 (manual mode, 35mm zoomhead position, ISO : MC-20 Remote Cord (80cm/2.6´): Remote shutter release; can be used to reduce camera shake. It is equipped with time-exposure and timer features, emitting a beep once - Nikon VAA109EA | User Manual - Page 130
Software Two software packages are available for the D1: Nikon View DX, which allows you to browse the contents of the camera's memory when the camera is connected to the computer via its IEEE 1394 interface, and Nikon Capture, which offers remote control and image enhancement features. Both - Nikon VAA109EA | User Manual - Page 131
pg. to A or M and adjust 109 aperture with lens aper- ture ring. (blinking) Camera can not focus. Focus manually. pg. 20 pg. 40 † Indicators in viewfinder turn off when no button is pressed. †† Indicators in viewfinder and rear control panel turn off. 118 Technical Notes: Troubleshooting - Nikon VAA109EA | User Manual - Page 132
Indication Control panel Viewfinder Problem Solution See also Subject too than CPU Nikkor in place. Attach Nikkor lens with built-in CPU or select manual or aperturepriority auto. pg. 6 pp. 45 -48 Shutter speed faster Shutter speed and try again. Technical Notes: Troubleshooting 119 - Nikon VAA109EA | User Manual - Page 133
camera to Nikon-autho- rized service center for inspection. Red-eye reduction or slow sync with red-eye reduction selected with flash that does not support red-eye reduction. Choose different sync mode or use flash that supports red-eye reduction. pg. 98 120 Technical Notes: Troubleshooting - Nikon VAA109EA | User Manual - Page 134
problem with the flash-memory card or with the camera's Nikon-authorized memory card. CARD IS NOT FORMATTED CARD CONTAINS NO IMAGES The card has not been formatted for use in the D1. Format the card as instructed camera will function normally in other respects. Technical Notes: Troubleshooting 121 - Nikon VAA109EA | User Manual - Page 135
"Playback" or reformat the card (see "First Steps: Insert the Memory Card") after backing up all photographs you would like to keep. 122 Technical Notes: Troubleshooting - Nikon VAA109EA | User Manual - Page 136
be specified by user) PLAY (playback mode with playback menu) PC (data transfer mode; camera can be controlled from computer) White balance: Auto (TTL control with 1,005-pixel CCD) Six manual modes, adjustable from -3 to +3 in 7 steps Preset LCD monitor: 2-inch, low temperature polysilicon TFT - Nikon VAA109EA | User Manual - Page 137
S (shutter-priority auto) A (aperture-priority auto) M (manual) 24 × 36 mm Nikon F mount (with AF coupling and AF contacts) Type-D AF Nikkor lenses (excluding IX Nikkor)-all functions supported Other type-D Nikkor lenses-all functions except autofocus supported Other AF Nikkor lenses (excluding F3AF - Nikon VAA109EA | User Manual - Page 138
Nikkor lens, balanced TTL flash for the D1 can be used with center-weighted metering. (2) Auto aperture (AA) flash: supported with SB-28DX and CPU Nikkor lenses (3) Non-TTL auto flash: supported with SB-28, SB-27, and SB- 22s Speedlights Flash sync modes: Front curtain (normal) sync, red-eye - Nikon VAA109EA | User Manual - Page 139
batteries Accessories: EG-D1 video cable, BF-1A body cap, monitor cover, AN-D1 camera strap Options: EN-4 Ni-MH Battery Pack, MH-16 Quick Charger, EH-4 AC 1394 cable, DK-14 Antifog Finder Eyepiece, Nikon View DX browser software, Nikon Capture control software (standard accessories may differ - Nikon VAA109EA | User Manual - Page 140
Exposure Program (Programmed Auto) The following chart shows the exposure program used when the exposure mode is set to programmed auto. (ISO 200, lens with maximum aperture of f/1.4 and a minimum aperture of f/16 (e.g., AF 50 mm f/1.4D) Metering Range: EV 1-22 [ EV] -4 -3 -2 -1 0 1 2 3 4 5 6 7 - Nikon VAA109EA | User Manual - Page 141
File Systems DELETE 84 Deleting photographs ...... 24, 82, 84 Depth of field 45 Depth-of-field preview 64 Design Rule for Camera File Systems 104, 106 Digital Print Order Format 82 Distance information ........ 17, 41, 94 Diopter adjustment. See Viewfinder diopter DPOF. See Digital Print Order - Nikon VAA109EA | User Manual - Page 142
76 Exposure mode 18, 42, 109 aperture priority auto ........ 45, 100 manual 43, 100 programmed auto ..... 18, 127, 100 shutter-priority auto .......... 37, 71 Focus mode 16, 33, 109 continuous servo AF .... 26, 72, 73 manual 39, 40, 109 single servo AF 16, 33, 68 Focus tracking 33 FOLDERS 89 - Nikon VAA109EA | User Manual - Page 143
. See Exposure mode Manual focus. See Focus mode Matrix metering. See Metering Memory card 12-13, 114 formatting 13, 92 Metering 17, 41-42, 109 3D color matrix 17, - Nikon VAA109EA | User Manual - Page 144
T Thumbnail mode 80 Time exposure. See Long time exposure Tone compensation 72 Two-button reset 76 V VIDEO OUTPUT 92 Viewfinder diopter 63 W White balance 15, 31-32 Y YCbCr. See Image quality YCbCr-TIFF 29 Index 131
-
 1
1 -
 2
2 -
 3
3 -
 4
4 -
 5
5 -
 6
6 -
 7
7 -
8
-
9
-
10
-
11
-
12
-
13
-
14
-
15
-
16
-
17
-
18
-
19
-
20
-
21
-
22
-
23
-
24
-
25
-
26
-
27
-
28
-
29
-
30
-
31
-
32
-
33
-
34
-
35
-
36
-
37
-
38
-
39
-
40
-
41
-
42
-
43
-
44
-
45
-
46
-
47
-
48
-
49
-
50
-
51
-
52
-
53
-
54
-
55
-
56
-
57
-
58
-
59
-
60
-
61
-
62
-
63
-
64
-
65
-
66
-
67
-
68
-
69
-
70
-
71
-
72
-
73
-
74
-
75
-
76
-
77
-
78
-
79
-
80
-
81
-
82
-
83
-
84
-
85
-
86
-
87
-
88
-
89
-
90
-
91
-
92
-
93
-
94
-
95
-
96
-
97
-
98
-
99
-
100
-
101
-
102
-
103
-
104
-
105
-
106
-
107
-
108
-
109
-
110
-
111
-
112
-
113
-
114
-
115
-
116
-
117
-
118
-
119
-
120
-
121
-
122
-
123
-
124
-
125
-
126
-
127
-
128
-
129
-
130
-
131
-
132
-
133
-
134
-
135
-
136
-
137
-
138
-
139
-
140
-
141
-
142
-
143
-
144
 |
 |
ii
Getting to Know the D1
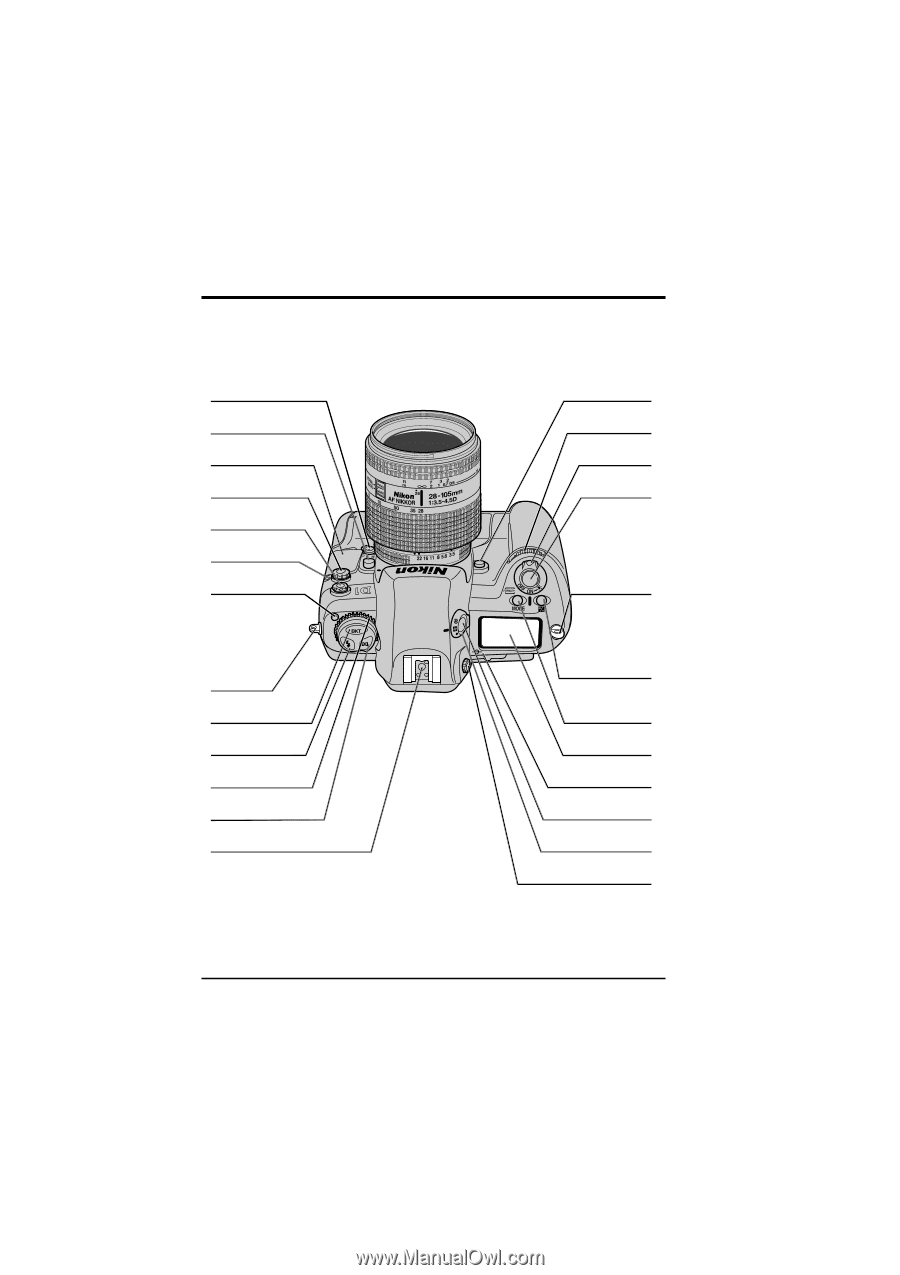
Parts of the D1
Focus mode
selector dial (pg. 33)
Lens release
button (pg. 6)
DC in, video out
connector cover (pg. 102)
10-pin remote
terminal (pg. 116)
Sync terminal for
external flash (pg. 95)
Self-timer
lamp (pg. 63)
Mode dial lock
release (pg. 26)
Eyelet for
camera strap
Auto bracketing
button (pg. 53–55)
Flash sync
mode button (pg. 96)
Mode dial (pg. 26)
AF area mode
button (pg. 34–35)
Accessory shoe (pg. 95)
Depth-of-field preview
button (pg. 64)
Sub-command
dial
Power switch
(pg. 4)
Eyelet for
camera strap
Shutter-release
button (pg. 20–21)
Exposure mode button
(pg. 43–48)/ Format
button (pg. 13)
Exposure
compensation
button (pg. 51–52)
Top control
panel (pg. v)
Focal plane
indicator (pg. 64)
Metering selector
lock button (pg. 41–42)
Metering selector
(pg. 41–42)
Diopter adjustment
knob (pg. 63)
Getting to Know the D1: Parts of the D1