Nikon VAA109EA User Manual - Page 31
Set the exposure mode to programmed auto
 |
View all Nikon VAA109EA manuals
Add to My Manuals
Save this manual to your list of manuals |
Page 31 highlights
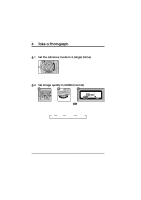
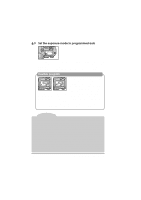
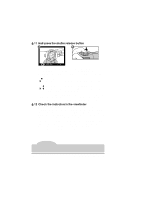
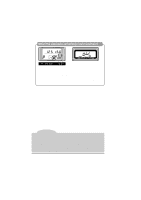
6.9 Set the exposure mode to programmed auto Hold the MODE button down and turn the main command dial until the exposure-mode indicator in control panel on top of the camera shows P (programmed auto). When the shutter-release button is half-pressed, aperture and shutter-speed will be shown in the control panel. Flexible program When the exposure mode is set to programmed auto, the main command dial can be rotated to select new combinations of aperture and shutter speed. This makes it possible to approximate the effects of aperture-priority auto or shutter-priority auto in programmed mode. While flexible program is in effect, an asterisk will appear next to the exposure mode indicator (P) in the top control panel. Flexible program can be cancelled by: rotating the command dial until the asterisk disappears, changing the exposure mode, turning the power off, or performing a two-button reset (see "Custom Settings: Two-Button Reset"). Exposure mode The D1 offers a choice of four exposure modes: programmed auto, shutter-priority auto, aperture-priority auto, and manual. In programmed auto, the camera automatically adjusts exposure to produce the best results, as shown in "Technical Notes: Exposure Program (Programmed Auto)." Use this mode in combination with flexible program, exposure compensation (see "Camera Settings: Exposure Compensation"), or auto bracketing (see "Camera Settings: Auto Bracketing") for programmed photography that is at once sophisticated and simple. Other exposure modes can be selected according to your subject and shooting conditions, allowing you to adjust depth of field, or blur or freeze moving objects. See "Camera Settings: Exposure Mode" for details. When a non-CPU lens is in use, the exposure mode will automatically be set to A (aperture-priority auto; see "Camera Settings: Exposure Mode"). The exposure-mode indicator in the control panel on top of the camera will show a flashing P, the exposuremode indicator in the viewfinder, A. The aperture display in the control panel and viewfinder will show F--. Aperture must be set manually using the aperture ring on the lens. 18 First Steps: Take a Photograph
-
 1
1 -
2
-
3
-
4
-
5
-
6
-
7
-
8
-
9
-
10
-
11
-
12
-
13
-
14
-
15
-
16
-
17
-
18
-
19
-
20
-
21
-
22
-
23
-
24
-
25
-
 26
26 -
 27
27 -
 28
28 -
 29
29 -
 30
30 -
 31
31 -
 32
32 -
 33
33 -
 34
34 -
 35
35 -
 36
36 -
37
-
38
-
39
-
40
-
41
-
42
-
43
-
44
-
45
-
46
-
47
-
48
-
49
-
50
-
51
-
52
-
53
-
54
-
55
-
56
-
57
-
58
-
59
-
60
-
61
-
62
-
63
-
64
-
65
-
66
-
67
-
68
-
69
-
70
-
71
-
72
-
73
-
74
-
75
-
76
-
77
-
78
-
79
-
80
-
81
-
82
-
83
-
84
-
85
-
86
-
87
-
88
-
89
-
90
-
91
-
92
-
93
-
94
-
95
-
96
-
97
-
98
-
99
-
100
-
101
-
102
-
103
-
104
-
105
-
106
-
107
-
108
-
109
-
110
-
111
-
112
-
113
-
114
-
115
-
116
-
117
-
118
-
119
-
120
-
121
-
122
-
123
-
124
-
125
-
126
-
127
-
128
-
129
-
130
-
131
-
132
-
133
-
134
-
135
-
136
-
137
-
138
-
139
-
140
-
141
-
142
-
143
-
144
 |
 |
