Nikon VAA109EA User Manual - Page 87
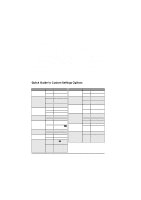
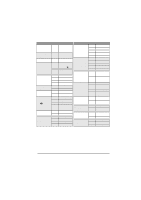
Quick Guide to Custom Settings Options
 |
View all Nikon VAA109EA manuals
Add to My Manuals
Save this manual to your list of manuals |
Page 87 highlights
31. Sensitivity Up By default, sensitivity can be set to a values equivalent to ISO 200, 400, 800, or 1,600. Sensitivity up can be used to increase sensitivity by a factor of +1 or +2 over ISO 1600. These settings can be used to achieve high shutter speeds at night-time sporting events, or to achieve optimal exposure when taking photographs of poorly-lit subjects. Note, however, that high sensitivity settings increase the amount of noise that appears in the final photograph. It is recommended that you take a trial photograph to check the results when shooting at high sensitivity settings. Option: 0 Sensitivity can be set to values equivalent to 200, 400, 800, or 1,600 (default) 1 Sensitivity set to +1 (sensitivity display in rear control panel shows HI-1) 2 Sensitivity set to +2 (sensitivity display in rear control panel shows HI-2) Quick Guide to Custom Settings Options Copy the following table and keep it with your camera for reference. Custom Setting 0: Custom settings 1: Image status 2: EV steps for exposure control 3: Bracketing order 4: Autofocus activation 5: Anti-vibration mode 6: Focus area selection Option A b 0 1 2 3 2 1 0 1 0 1 0 1 0 1 Meaning Custom Set A Custom Set B Disabled Capture Preview Mode Record-and-Review Mode 1/3 1/2 1 Default Negative-to-positive Shutter-release button activates AF AF activated by button only Disabled Enabled Default Wrap-around 7: AE lock 0 Only button locks AE AE locks when 1 shutter-release button pressed half way Custom Setting 8: Mirror up 9: Dynamic AF mode (singleservo AF) 10: Dynamic AF mode (continuous-servo AF) 11: Auto exposure/ flash exposure bracketing 12: Command dial functions 13: Exposure compensation settings Option 0 1 0 1 0 1 AS AE Sb 0 1 0 1 Meaning Mirror down Mirror up Closest subject priority enabled Closest subject priority disabled Closest subject priority disabled Closest subject priority enabled Flash and auto exposure Auto exposure only Flash exposure only Default Roles of main and sub command dials reversed Default Exposure compensation set by turning main or sub command dial 74 Custom Settings: Custom Settings Options
-
 1
1 -
2
-
3
-
4
-
5
-
6
-
7
-
8
-
9
-
10
-
11
-
12
-
13
-
14
-
15
-
16
-
17
-
18
-
19
-
20
-
21
-
22
-
23
-
24
-
25
-
26
-
27
-
28
-
29
-
30
-
31
-
32
-
33
-
34
-
35
-
36
-
37
-
38
-
39
-
40
-
41
-
42
-
43
-
44
-
45
-
46
-
47
-
48
-
49
-
50
-
51
-
52
-
53
-
54
-
55
-
56
-
57
-
58
-
59
-
60
-
61
-
62
-
63
-
64
-
65
-
66
-
67
-
68
-
69
-
70
-
71
-
72
-
73
-
74
-
75
-
76
-
77
-
78
-
79
-
80
-
81
-
 82
82 -
 83
83 -
 84
84 -
 85
85 -
 86
86 -
 87
87 -
 88
88 -
 89
89 -
 90
90 -
 91
91 -
 92
92 -
93
-
94
-
95
-
96
-
97
-
98
-
99
-
100
-
101
-
102
-
103
-
104
-
105
-
106
-
107
-
108
-
109
-
110
-
111
-
112
-
113
-
114
-
115
-
116
-
117
-
118
-
119
-
120
-
121
-
122
-
123
-
124
-
125
-
126
-
127
-
128
-
129
-
130
-
131
-
132
-
133
-
134
-
135
-
136
-
137
-
138
-
139
-
140
-
141
-
142
-
143
-
144
 |
 |