Nikon VAA109EA User Manual - Page 64
Exposure Compensation
 |
View all Nikon VAA109EA manuals
Add to My Manuals
Save this manual to your list of manuals |
Page 64 highlights
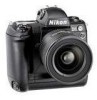
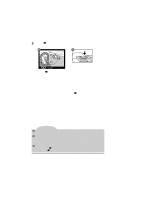
Exposure Compensation Exposure compensation is used to deliberately change exposure from the optimum value as determined by the camera. This can be used, for example, to shoot subjects containing sharp lighting contrasts at a variety of different exposures. Exposure compensation is possible in any exposure mode. 1 Press the button and rotate the main command dial. Exposure compensation adjusted in increments of 1/3 EV, to a maximum of +5 EV or a minimum of -5 EV. Viewfinder display -0.3 EV +2 EV At values other than 0, a indicator appears in the viewfinder and in the control panel on top of the camera. The electronic analog exposure display will show the amount of compensation, and the "0" indicator at the center of the display will blink to show that exposure compensation is in effect. Tips To display exposure compensation as a numerical value, press the button. The current exposure compensation will appear next to the indicator. In general, the best results are achieved using a positive value for exposure compensation when your principal subject is darker than the background, and a negative value when the subject is brighter than the background. Exposure compensation can be set to change in increments of 1/2 EV or 1 EV. See "Custom Settings," item 2. Camera settings can be changed so that exposure compensation can be adjusted by turning the main or sub-command dial, even when the button is not pressed. See "Custom Settings," item 13. Camera Settings: Exposure Compensation 51
-
 1
1 -
2
-
3
-
4
-
5
-
6
-
7
-
8
-
9
-
10
-
11
-
12
-
13
-
14
-
15
-
16
-
17
-
18
-
19
-
20
-
21
-
22
-
23
-
24
-
25
-
26
-
27
-
28
-
29
-
30
-
31
-
32
-
33
-
34
-
35
-
36
-
37
-
38
-
39
-
40
-
41
-
42
-
43
-
44
-
45
-
46
-
47
-
48
-
49
-
50
-
51
-
52
-
53
-
54
-
55
-
56
-
57
-
58
-
 59
59 -
 60
60 -
 61
61 -
 62
62 -
 63
63 -
 64
64 -
 65
65 -
 66
66 -
 67
67 -
 68
68 -
 69
69 -
70
-
71
-
72
-
73
-
74
-
75
-
76
-
77
-
78
-
79
-
80
-
81
-
82
-
83
-
84
-
85
-
86
-
87
-
88
-
89
-
90
-
91
-
92
-
93
-
94
-
95
-
96
-
97
-
98
-
99
-
100
-
101
-
102
-
103
-
104
-
105
-
106
-
107
-
108
-
109
-
110
-
111
-
112
-
113
-
114
-
115
-
116
-
117
-
118
-
119
-
120
-
121
-
122
-
123
-
124
-
125
-
126
-
127
-
128
-
129
-
130
-
131
-
132
-
133
-
134
-
135
-
136
-
137
-
138
-
139
-
140
-
141
-
142
-
143
-
144
 |
 |