Nikon VAA109EA User Manual - Page 63
Camera Settings: Auto-Exposure Lock
 |
View all Nikon VAA109EA manuals
Add to My Manuals
Save this manual to your list of manuals |
Page 63 highlights
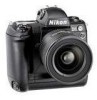
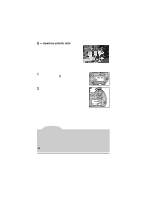
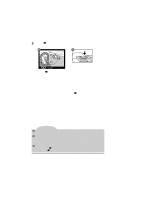
3 With the (B). A button held down, recompose your photograph (A) and shoot B While the button is held down, you can adjust shutter speed (when shutter-priority auto is selected as the exposure mode), aperture (aperturepriority auto), or flexible program (programmed auto). The aperture (in shutter-priority auto), shutter speed (aperture priority auto), or flexible program are automatically adjusted to produce the exposure set using auto-exposure lock. The adjusted values for shutter speed and aperture are displayed in the viewfinder and the control panel on top of the camera. Metering can not be changed while exposure lock is in effect. Any changes to metering will take effect only after the button is released. Tips Camera settings can be changed so that auto-exposure locks when the shutterrelease button is pressed half way. See "Custom Settings," item 7. The size of the area given the greatest weight in center-weighted metering can be set to 6mm (0.24˝), 10mm (0.39˝), or 13mm (0.51˝) (see "Custom Settings," item 14). Alternatively, you can set center-weighted metering to use the average of the entire frame. The default setting is 8mm. Camera settings can be changed so that auto-exposure lock remains in effect after you release the button. In this case, normal auto-exposure will be restored the next time the button is pressed. See "Custom Settings," item 21. 50 Camera Settings: Auto-Exposure Lock
-
 1
1 -
2
-
3
-
4
-
5
-
6
-
7
-
8
-
9
-
10
-
11
-
12
-
13
-
14
-
15
-
16
-
17
-
18
-
19
-
20
-
21
-
22
-
23
-
24
-
25
-
26
-
27
-
28
-
29
-
30
-
31
-
32
-
33
-
34
-
35
-
36
-
37
-
38
-
39
-
40
-
41
-
42
-
43
-
44
-
45
-
46
-
47
-
48
-
49
-
50
-
51
-
52
-
53
-
54
-
55
-
56
-
57
-
 58
58 -
 59
59 -
 60
60 -
 61
61 -
 62
62 -
 63
63 -
 64
64 -
 65
65 -
 66
66 -
 67
67 -
 68
68 -
69
-
70
-
71
-
72
-
73
-
74
-
75
-
76
-
77
-
78
-
79
-
80
-
81
-
82
-
83
-
84
-
85
-
86
-
87
-
88
-
89
-
90
-
91
-
92
-
93
-
94
-
95
-
96
-
97
-
98
-
99
-
100
-
101
-
102
-
103
-
104
-
105
-
106
-
107
-
108
-
109
-
110
-
111
-
112
-
113
-
114
-
115
-
116
-
117
-
118
-
119
-
120
-
121
-
122
-
123
-
124
-
125
-
126
-
127
-
128
-
129
-
130
-
131
-
132
-
133
-
134
-
135
-
136
-
137
-
138
-
139
-
140
-
141
-
142
-
143
-
144
 |
 |