Nokia IP1220 Installation Guide - Page 34
Before You Begin, To ground the IP1200 Series
 |
View all Nokia IP1220 manuals
Add to My Manuals
Save this manual to your list of manuals |
Page 34 highlights
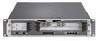
2 Installing the Nokia IP1200 Series Appliance Figure 9 Rack-Mounting Screw Locations 00307a.3 Rack-mounting screw locations Two rack-mounting positions allow you to mount the appliance either flush with the rack, or four inches forward of the equipment rack. If the space behind the rack is insufficient, the rack mounting brackets can be attached further back on the side of the appliance. Caution During installation, do not block any ventilation openings. Doing so might result in damage to the appliance when it is turned on. Before You Begin To rack-mount the appliance, you need: „ Phillips-head screwdriver „ Disposable grounding wrist strap „ Suitable, grounded work surface on which to place the chassis tray assembly Before you rack mount the appliance, you can ground it by using the grounding lugs provided. To ground the IP1200 Series 1. Locate and remove from the package the #6 ring tongue lugs and kep nuts. 2. Attach a 10 or 12 AWG insulated grounding cable to the lugs. 3. Locate the two threaded grounding studs protruding from the rear panel of the appliance, as shown in Figure 6 on page 26. 4. Slide the grounding lug loops over each of the studs. 5. Secure the grounding lugs by threading the nuts onto each of the studs until they are tight. You can use an adjustable wrench or similar tool to finish tightening the nut onto the stud. Do not over tighten the nuts. 6. Attach the grounding cable to an earth ground or other grounding point to meet the specifications of your installation site. 34 IP1220 and IP1260 Security Platforms Installation Guide
-
 1
1 -
2
-
3
-
4
-
5
-
6
-
7
-
8
-
9
-
10
-
11
-
12
-
13
-
14
-
15
-
16
-
17
-
18
-
19
-
20
-
21
-
22
-
23
-
24
-
25
-
26
-
27
-
28
-
 29
29 -
 30
30 -
 31
31 -
 32
32 -
 33
33 -
 34
34 -
 35
35 -
 36
36 -
 37
37 -
 38
38 -
 39
39 -
40
-
41
-
42
-
43
-
44
-
45
-
46
-
47
-
48
-
49
-
50
-
51
-
52
-
53
-
54
-
55
-
56
-
57
-
58
-
59
-
60
-
61
-
62
-
63
-
64
-
65
-
66
-
67
-
68
-
69
-
70
-
71
-
72
-
73
-
74
-
75
-
76
-
77
-
78
-
79
-
80
-
81
-
82
-
83
-
84
-
85
-
86
-
87
-
88
-
89
-
90
-
91
-
92
-
93
-
94
-
95
-
96
-
97
-
98
-
99
-
100
-
101
-
102
-
103
-
104
-
105
-
106
-
107
-
108
-
109
-
110
-
111
-
112
-
113
-
114
-
115
-
116
-
117
-
118
-
119
-
120
-
121
-
122
-
123
-
124
-
125
-
126
-
127
-
128
 |
 |
