Nokia IP1220 Installation Guide - Page 37
the mounting brackets.
 |
View all Nokia IP1220 manuals
Add to My Manuals
Save this manual to your list of manuals |
Page 37 highlights
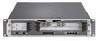
Before You Begin chassis grounding point. If you do not have a grounding wrist strap, make sure you are properly grounded before you touch any electronic component. a. Loosen the four chassis tray assembly retaining screws from the front panel of the appliance. 00307a.3 Chassis tray assembly retaining screws b. Slide the chassis tray assembly forward and pull it entirely out of the appliance. 00326a.2 c. Place the chassis tray assembly on a properly grounded surface. 5. Adjust the mounting brackets on the side of the appliance if necessary. 6. Mount the appliance into a standard 19-inch rack by using the mounting screws located on the mounting brackets. 7. Slide the chassis tray assembly back into the appliance until it clicks into place, and resecure the four chassis tray assembly retaining screws. 8. Reinstall the fan unit into the rear of the appliance. 9. Reinstall the power supplies. IP1220 and IP1260 Security Platforms Installation Guide 37
-
 1
1 -
2
-
3
-
4
-
5
-
6
-
7
-
8
-
9
-
10
-
11
-
12
-
13
-
14
-
15
-
16
-
17
-
18
-
19
-
20
-
21
-
22
-
23
-
24
-
25
-
26
-
27
-
28
-
29
-
30
-
31
-
 32
32 -
 33
33 -
 34
34 -
 35
35 -
 36
36 -
 37
37 -
 38
38 -
 39
39 -
 40
40 -
 41
41 -
 42
42 -
43
-
44
-
45
-
46
-
47
-
48
-
49
-
50
-
51
-
52
-
53
-
54
-
55
-
56
-
57
-
58
-
59
-
60
-
61
-
62
-
63
-
64
-
65
-
66
-
67
-
68
-
69
-
70
-
71
-
72
-
73
-
74
-
75
-
76
-
77
-
78
-
79
-
80
-
81
-
82
-
83
-
84
-
85
-
86
-
87
-
88
-
89
-
90
-
91
-
92
-
93
-
94
-
95
-
96
-
97
-
98
-
99
-
100
-
101
-
102
-
103
-
104
-
105
-
106
-
107
-
108
-
109
-
110
-
111
-
112
-
113
-
114
-
115
-
116
-
117
-
118
-
119
-
120
-
121
-
122
-
123
-
124
-
125
-
126
-
127
-
128
 |
 |
