Oki ML490 Maintenance Manual - Page 135
Local Test
 |
View all Oki ML490 manuals
Add to My Manuals
Save this manual to your list of manuals |
Page 135 highlights
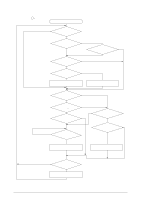
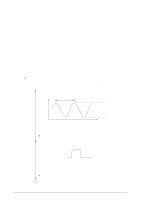
3.3 Local Test 3.3.1 Circuit test mode 3.3.1.1 Setting (1) Diagnostic test (set by menu) (2) Test connector Connect the test connector shown in Figure C-9 to the interface connector Equivalent to Cannon DB-25P TD 2 RD 3 RTS 4 CTS 5 CD 8 SSD 11 DTR 20 DSR 6 Figure C-9 Test Connector Connection Diagram 3.3.1.2 Function After the settings outlined in Section 3.3.1.1 are completed and power is turned on, the serial interface checks the message buffer memory and interface driver/receiver circuit. It then prints characters. To start and stop this test, push the SEL switch on the front of the printer. Details of this test are explained on below. (1) The program revision using two numerical characters is printed. (2) "LOOP TEST" is printed. (3) Memory is checked for the message buffer. (4) Prints "OK" is printed if the memory check is OK and "BAD" is printed if the memory check fails. (5) Output level to DTR, RTS, and SSD signals is dropped low. If DSR, CTS, or CD signals is High, "IF BAD" is printed. If DSR, CTS, and CD signals are all Low, "IF OK" is printed. (6) Output level to DTR, RTS, and SSD signals is raised high. If DSR, CTS, or CD signals is Low, "IF BAD" is printed. If DSR, CTS, and CD signals are all High, "IF OK" is printed. (7) Transmits characters codes from 20H to 7FH is transmitted by SD signal. At the same time, characters are received by the RD signal and stored in the message buffer. (8) The characters that were stored in the message buffer as indicated in (7) are printed. (9) Steps (1) through (8) are repeated until test is interrrupted. 42114101 Rev.1 135 / 135
-
 1
1 -
2
-
3
-
4
-
5
-
6
-
7
-
8
-
9
-
10
-
11
-
12
-
13
-
14
-
15
-
16
-
17
-
18
-
19
-
20
-
21
-
22
-
23
-
24
-
25
-
26
-
27
-
28
-
29
-
30
-
31
-
32
-
33
-
34
-
35
-
36
-
37
-
38
-
39
-
40
-
41
-
42
-
43
-
44
-
45
-
46
-
47
-
48
-
49
-
50
-
51
-
52
-
53
-
54
-
55
-
56
-
57
-
58
-
59
-
60
-
61
-
62
-
63
-
64
-
65
-
66
-
67
-
68
-
69
-
70
-
71
-
72
-
73
-
74
-
75
-
76
-
77
-
78
-
79
-
80
-
81
-
82
-
83
-
84
-
85
-
86
-
87
-
88
-
89
-
90
-
91
-
92
-
93
-
94
-
95
-
96
-
97
-
98
-
99
-
100
-
101
-
102
-
103
-
104
-
105
-
106
-
107
-
108
-
109
-
110
-
111
-
112
-
113
-
114
-
115
-
116
-
117
-
118
-
119
-
120
-
121
-
122
-
123
-
124
-
125
-
126
-
127
-
128
-
129
-
 130
130 -
 131
131 -
 132
132 -
 133
133 -
 134
134 -
 135
135
 |
 |
