Pentax OPTIOWP Operation Manual - Page 103
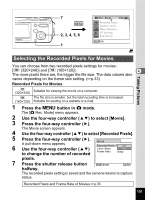
Selecting the Recorded Pixels for Movies, to select [Movie].
 |
UPC - 027075110694
View all Pentax OPTIOWP manuals
Add to My Manuals
Save this manual to your list of manuals |
Page 103 highlights
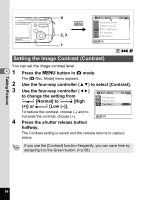
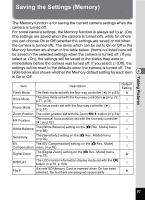
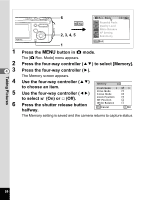
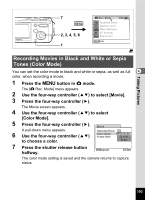
7 MENU 2, 3, 4, 5, 6 1 Rec. Mode 1/3 5M Recorded Pixels Quality Level AWB White Balance AF AF Setting ISO AUTO Sensitivity MENU Exit C Selecting the Recorded Pixels for Movies Taking Pictures You can choose from two recorded pixels settings for movies: [D (320×240)] and [E (160×120)]. 4 The more pixels there are, the bigger the file size. The data volume also varies depending on the frame rate setting. (1p.33) Recorded Pixels for Movies D (320×240) Suitable for viewing the movie on a computer. E The file size is smaller, but the total recording time is increased. (160×120) Suitable for posting on a website or e-mail. 1 Press the 3 button in A mode. The [A Rec. Mode] menu appears. 2 Use the four-way controller (23) to select [Movie]. 3 Press the four-way controller (5). The Movie screen appears. 4 Use the four-way controller (23) to select [Recorded Pixels]. 5 Press the four-way controller (5). Movie A pull-down menu appears. 6 Use the four-way controller (23) Recorded Pixels Color Mode 320 160 to change the number of recorded Frame Rate 30fps pixels. 7 Press the shutter release button MENU Cancel OK OK halfway. The recorded pixels setting is saved and the camera returns to capture status. Recorded Pixels and Frame Rate of Movies 1p.33 101
-
 1
1 -
2
-
3
-
4
-
5
-
6
-
7
-
8
-
9
-
10
-
11
-
12
-
13
-
14
-
15
-
16
-
17
-
18
-
19
-
20
-
21
-
22
-
23
-
24
-
25
-
26
-
27
-
28
-
29
-
30
-
31
-
32
-
33
-
34
-
35
-
36
-
37
-
38
-
39
-
40
-
41
-
42
-
43
-
44
-
45
-
46
-
47
-
48
-
49
-
50
-
51
-
52
-
53
-
54
-
55
-
56
-
57
-
58
-
59
-
60
-
61
-
62
-
63
-
64
-
65
-
66
-
67
-
68
-
69
-
70
-
71
-
72
-
73
-
74
-
75
-
76
-
77
-
78
-
79
-
80
-
81
-
82
-
83
-
84
-
85
-
86
-
87
-
88
-
89
-
90
-
91
-
92
-
93
-
94
-
95
-
96
-
97
-
 98
98 -
 99
99 -
 100
100 -
 101
101 -
 102
102 -
 103
103 -
 104
104 -
 105
105 -
 106
106 -
 107
107 -
 108
108 -
109
-
110
-
111
-
112
-
113
-
114
-
115
-
116
-
117
-
118
-
119
-
120
-
121
-
122
-
123
-
124
-
125
-
126
-
127
-
128
-
129
-
130
-
131
-
132
-
133
-
134
-
135
-
136
-
137
-
138
-
139
-
140
-
141
-
142
-
143
-
144
-
145
-
146
-
147
-
148
-
149
-
150
-
151
-
152
-
153
-
154
-
155
-
156
-
157
-
158
-
159
-
160
-
161
-
162
-
163
-
164
-
165
-
166
-
167
-
168
-
169
-
170
-
171
-
172
-
173
-
174
-
175
-
176
-
177
-
178
-
179
-
180
-
181
-
182
-
183
-
184
-
185
-
186
-
187
-
188
 |
 |
