Pentax W80 Gunmetal Gray Optio W80 - Azure Blue Optio W80 Manual - Page 117
Selecting the Quality Level of Still Pictures, Press the, button in, mode.
 |
UPC - 027075154452
View all Pentax W80 Gunmetal Gray manuals
Add to My Manuals
Save this manual to your list of manuals |
Page 117 highlights
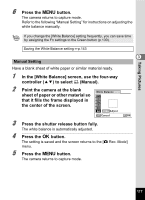
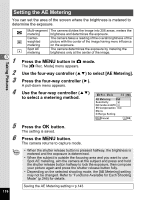
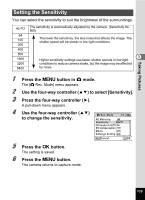
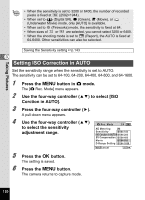
Taking Pictures Selecting the Quality Level of Still Pictures Select the quality (data compression ratio) for still images according to how the images will be used. The more stars (E), the higher the quality of the image, but the file size increases. The selected Recorded Pixels setting also affects the size of the image file (1p.113). Quality Level C Best D Better E Good Lowest compression ratio. Suitable for photo prints. Standard compression ratio. Suitable for viewing the image 3 on a computer screen. (default setting) Highest compression ratio. Suitable for attaching to e-mails or creating websites. 1 Press the 3 button in A mode. The [A Rec. Mode] menu appears. 2 Use the four-way controller (23) to select [Quality Level]. 3 Press the four-way controller (5). The pull-down menu appears. 4 Use the four-way controller (23) Recordable Image No. 12 to change the quality level. Image Tone Bright The maximum number of pictures you can take is displayed at the top of the screen Pixel Track SR Recorded Pixels 12M Quality Level when you select a quality level. White Balance AF Setting MENU Cancel OK OK 5 Press the 4 button. The setting is saved. 6 Press the 3 button. The camera is ready for taking pictures. In 9 (Green) mode, the quality level is fixed at D (Better). 115
-
 1
1 -
2
-
3
-
4
-
5
-
6
-
7
-
8
-
9
-
10
-
11
-
12
-
13
-
14
-
15
-
16
-
17
-
18
-
19
-
20
-
21
-
22
-
23
-
24
-
25
-
26
-
27
-
28
-
29
-
30
-
31
-
32
-
33
-
34
-
35
-
36
-
37
-
38
-
39
-
40
-
41
-
42
-
43
-
44
-
45
-
46
-
47
-
48
-
49
-
50
-
51
-
52
-
53
-
54
-
55
-
56
-
57
-
58
-
59
-
60
-
61
-
62
-
63
-
64
-
65
-
66
-
67
-
68
-
69
-
70
-
71
-
72
-
73
-
74
-
75
-
76
-
77
-
78
-
79
-
80
-
81
-
82
-
83
-
84
-
85
-
86
-
87
-
88
-
89
-
90
-
91
-
92
-
93
-
94
-
95
-
96
-
97
-
98
-
99
-
100
-
101
-
102
-
103
-
104
-
105
-
106
-
107
-
108
-
109
-
110
-
111
-
 112
112 -
 113
113 -
 114
114 -
 115
115 -
 116
116 -
 117
117 -
 118
118 -
 119
119 -
 120
120 -
 121
121 -
 122
122 -
123
-
124
-
125
-
126
-
127
-
128
-
129
-
130
-
131
-
132
-
133
-
134
-
135
-
136
-
137
-
138
-
139
-
140
-
141
-
142
-
143
-
144
-
145
-
146
-
147
-
148
-
149
-
150
-
151
-
152
-
153
-
154
-
155
-
156
-
157
-
158
-
159
-
160
-
161
-
162
-
163
-
164
-
165
-
166
-
167
-
168
-
169
-
170
-
171
-
172
-
173
-
174
-
175
-
176
-
177
-
178
-
179
-
180
-
181
-
182
-
183
-
184
-
185
-
186
-
187
-
188
-
189
-
190
-
191
-
192
-
193
-
194
-
195
-
196
-
197
-
198
-
199
-
200
-
201
-
202
-
203
-
204
-
205
-
206
-
207
-
208
-
209
-
210
-
211
-
212
-
213
-
214
-
215
-
216
-
217
-
218
-
219
-
220
-
221
-
222
-
223
-
224
-
225
-
226
-
227
-
228
-
229
-
230
-
231
-
232
-
233
-
234
-
235
-
236
-
237
-
238
-
239
-
240
-
241
-
242
-
243
-
244
-
245
-
246
-
247
-
248
-
249
-
250
-
251
-
252
-
253
-
254
-
255
-
256
-
257
-
258
-
259
-
260
-
261
-
262
-
263
-
264
-
265
-
266
-
267
-
268
-
269
-
270
-
271
-
272
-
273
-
274
-
275
-
276
-
277
-
278
-
279
-
280
 |
 |