Polaroid LDTV152 Owners Guide - Page 14
Initial TV Setup, Setting Up TV Inputs
 |
UPC - 082400028051
View all Polaroid LDTV152 manuals
Add to My Manuals
Save this manual to your list of manuals |
Page 14 highlights
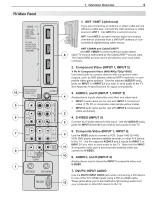
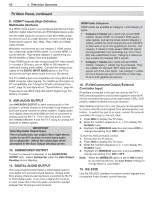
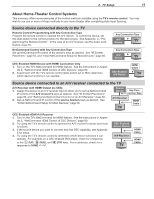
14 2. TV Setup Initial TV Setup Use the Setup menu for basic TV setup options. 1. Press MENU to open the Main menu. 2. Press to highlight the Setup icon and display the Setup menu. Memorizing Channels For ANT 1 and ANT 2 Note: If using a CableCARD, the TV will automatically acquire the complete list of available channels from the service provider. Perform channel memorization for ANT 1 CableCARD service only if you need to reacquire the channel list. To start channel memorization 1. Connect the incoming cable to ANT 1 or ANT 2. This is the cable from an antenna or a cable service without a cable box. 2. With the Setup menu displayed, press to high- light the Scan icon. Start channel memorization from the Setup menu. 3. Press to highlight an input selection based on your connections: Input Condition Ant 1 Air Ant 2 Air When connected to an indoor or outdoor antenna Ant 1 Cable When connected to direct cable (no Ant 2 Cable cable box) 4. Press to highlight the on-screen START button. 5. Press ENTER to start automatic channel memoriza- tion. To stop channel memorization before completion, press CANCEL. 6. When memorization is complete you can: • Press MENU once to return to the top row of icons. • Press MENU again to return to the Main menu. • Press EXIT to watch TV. After channels have been memorized: • To tune to memorized channels, press CH / while watching TV on the ANT 1 or ANT 2 input. • Use the Setup > Edit menu (page 45) for additional channel options, such as adding or deleting channels from memory, naming channels, and saving favorite channels in custom memory banks. See chapter 5, "TV Menu Settings," to: • Set the TV clock (page 46) • Set the TV Timer (page 47) to have the TV power on at a preset time. • Select an Energy Mode to manage power use while the TV is off (page 48). Setting Up TV Inputs When You First Connect a Device The TV's Easy Connect™ Auto Input Sensing feature detects most connections automatically. Note: For connection and setup of a personal computer, see the information on page 18. Auto Input Sensing for Most Devices When you first connect a device, the TV will: a. Detect the connection and automatically switch to the input b. Prompt you to identify the device type (if not recognized automatically) c. Prompt you to perform NetCommand set-up for the device, if available d. Repeat these steps for any additional newly detected devices See below for connections which trigger Auto Input Sensing. Auto Input Sensing Available Y/VIDEO (detected as composite video) Y/VIDEO plus Pb (detected as component video) S-VIDEO HDMI * USB (USB photo port) INPUT 4 AUDIO (with video plug, see page 28. Auto Output Sensing Available DIGITAL AUDIO OUTPUT (orange jack) AVR AUDIO OUTPUT (red jack) AVR AUDIO OUTPUT/ SUBWOOFER OUTPUT (red jack) No Auto Sensing ANT 1 and ANT 2 * If the device is powered off when connected, detec- tion occurs when the device is next powered on.
-
 1
1 -
2
-
3
-
4
-
5
-
6
-
7
-
8
-
 9
9 -
 10
10 -
 11
11 -
 12
12 -
 13
13 -
 14
14 -
 15
15 -
 16
16 -
 17
17 -
 18
18 -
 19
19 -
20
-
21
-
22
-
23
-
24
-
25
-
26
-
27
-
28
-
29
-
30
-
31
-
32
-
33
-
34
-
35
-
36
-
37
-
38
-
39
-
40
-
41
-
42
-
43
-
44
-
45
-
46
-
47
-
48
-
49
-
50
-
51
-
52
-
53
-
54
-
55
-
56
-
57
-
58
-
59
-
60
-
61
-
62
-
63
-
64
-
65
-
66
-
67
-
68
-
69
-
70
-
71
-
72
-
73
-
74
-
75
-
76
-
77
-
78
-
79
-
80
-
81
-
82
-
83
-
84
-
85
-
86
-
87
-
88
-
89
-
90
-
91
-
92
-
93
-
94
-
95
-
96
 |
 |
