Polaroid LDTV152 Owners Guide - Page 65
NetCommand IR Control, Device, Connected to an A/V Receiver
 |
UPC - 082400028051
View all Polaroid LDTV152 manuals
Add to My Manuals
Save this manual to your list of manuals |
Page 65 highlights
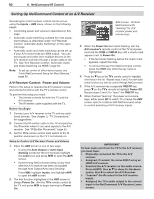
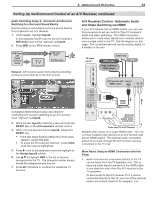
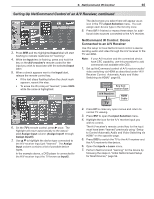
6. NetCommand IR Control 65 Setting Up NetCommand Control of an A/V Receiver, continued The device type you select here will appear as an icon in the TV's Input Selection menu. You can assign each device type in the list only once. 8. Press EXIT if finished or repeat these steps for addi- tional video sources connected to the A/V receiver. 3. Press ENTER and the highlighted Input label will start flashing to indicate readiness for "learning." 4. While the Input text is flashing, press and hold the key on the A/V receiver's remote control for the input you wish to associate with the selected Input label. 5. When a check appears next to the Input label, release the remote control key. • If the text stops flashing before the check mark appears, repeat this step. • To erase the IR code just "learned," press CANCEL while the name is highlighted. 6. On the TV's remote control, press once. The highlight will move automatically to the associated Assign Input column (Assign Input1 through Assign Input5). 7. Use to highlight the device type connected to the A/V receiver input just "learned." The Assign Input column contains a list of possible device types. In the example above, a DVD player is connected to the A/V receiver input the TV knows as Input2. NetCommand IR Control: Device Connected to an A/V Receiver Use this setup to have NetCommand control a device sending audio and video through the A/V receiver to the TV via HDMI. Note: If your A/V receiver and the connected device have CEC capability, use this procedure to add commands not available with CEC. 1. Set up NetCommand control of A/V receiver audio/ video switching via HDMI as described under "A/V Receiver Control: Automatic Audio and Video Switching via HDMI," page 63. Source Device Any Connection Type A/V Receiver TV HDMI Cable 2. Press EXIT to close any open menus and return to normal TV viewing. 3. Press INPUT to open the Input Selection menu. 4. Highlight the icon for the A/V receiver input you wish to control. The A/V receiver's remote control key for the input must have been "learned" previously using "Setup to Control Automatic Audio and Video Switching via HDMI" on the opposite page. 5. Press ENTER to switch the TV to the A/V receiver and the A/V receiver to the device. 6. Open the Inputs > Learn menu. 7. Perform NetCommand "learning" for the device by following the steps in "Initial NetCommand Setup for Most Devices," page 56.
-
 1
1 -
2
-
3
-
4
-
5
-
6
-
7
-
8
-
9
-
10
-
11
-
12
-
13
-
14
-
15
-
16
-
17
-
18
-
19
-
20
-
21
-
22
-
23
-
24
-
25
-
26
-
27
-
28
-
29
-
30
-
31
-
32
-
33
-
34
-
35
-
36
-
37
-
38
-
39
-
40
-
41
-
42
-
43
-
44
-
45
-
46
-
47
-
48
-
49
-
50
-
51
-
52
-
53
-
54
-
55
-
56
-
57
-
58
-
59
-
 60
60 -
 61
61 -
 62
62 -
 63
63 -
 64
64 -
 65
65 -
 66
66 -
 67
67 -
 68
68 -
 69
69 -
 70
70 -
71
-
72
-
73
-
74
-
75
-
76
-
77
-
78
-
79
-
80
-
81
-
82
-
83
-
84
-
85
-
86
-
87
-
88
-
89
-
90
-
91
-
92
-
93
-
94
-
95
-
96
 |
 |
