Polaroid LDTV152 Owners Guide - Page 81
Appendix E, NetCommand HDMI Control of CEC Devices, continued
 |
UPC - 082400028051
View all Polaroid LDTV152 manuals
Add to My Manuals
Save this manual to your list of manuals |
Page 81 highlights
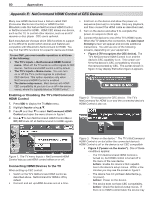
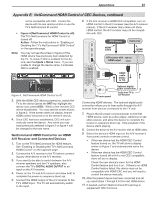
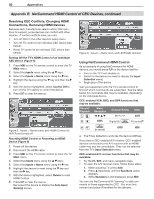
Appendices 81 Appendix E: NetCommand HDMI Control of CEC Devices, continued not be compatible with CEC. Control the device with its own remote control or use the TV's NetCommand IR control. • Figure 4 (NetCommand HDMI Control is off). The TV's NetCommand for HDMI Control is turned off. Action: Follow the instructions in "Enabling or Disabling the TV's NetCommand HDMI Control" on the opposite page. Note: You may not see the screen in figure 2 if the HDMI device has previously been detected by the TV. To check if CEC is enabled for the device, see the Inputs > Name menu. If you are unable to change the device name, it indicates CEC is enabled. Figure 4. NetCommand HDMI Control is off. 3. With the HDMI CEC device powered on, switch the TV to the device (press the INPUT key, highlight the device icon, press ENTER). Within a few minutes CEC will be established. You may see the screen shown in figure 2. If the screen does not display, ensure HDMI control is turned on in the device's menus. 4. Once CEC has been established, CEC will auto- matically name the device. Any name you may have previously selected in figure 3 or figure 4 will be changed to the new name. NetCommand HDMI Control for an HDMI A/V Receiver and Connected Devices 1. Turn on the TV's NetCommand for HDMI feature. See "Enabling or Disabling the TV's NetCommand HDMI Control" on the opposite page. 2. Connect the A/V receiver to the TV before connect- ing any other device to the A/V receiver. 3. If you want to be able to switch between the A/V receiver speakers and the TV speakers, also connect the TV's DIGITAL AUDIO OUTPUT to an input on the A/V receiver. 4. Power on the TV and A/V receiver and allow both to complete the power-on sequence (boot up). 5. Connect the HDMI output of the A/V receiver to the TV's HDMI input. The TV will automatically switch to the input. 6. If the A/V receiver is HDMI CEC compatible, turn on HDMI control in the A/V receiver (see the A/V receiver menus). If the A/V receiver menu does not show HDMI control, the A/V receiver may not be compatible with CEC. DVD player Cable box HDMI 4 HDMI 3 Cable HDMI Cable 2 DIGITAL A/V receiver with HDMI OUT AUDIO INPUT 1 HDMI output IR- NetCommand Output / External Controller Input INPUT3 (480i / 480p / 720p / 1080i) Pr VIDEO L Pb AUDIO R DVI/PC L Y Y / VIDEO L AUDIO AUDIO R R INPUT2 INPUT1 L R AVR AUDIO OUTPUT DIGITAL AUDIO OUTPUT ANT2/AUX ANT1/MAIN DIGITAL AUDIO OUTPUT TV main panel HDMI cable (Video to TV) Optional digital audio connection Audio from TV to A/V Receiver Connecting HDMI devices. The optional digital audio connection allows you to hear audio through the A/V receiver from devices connected to the TV only. 7. Plug in the AC power cord and power on the first HDMI device, such as a disc player, cable box or satellite receiver, and allow the device to complete the power-on sequence (boot up). Stop playback if the device starts playing. 8. Connect the device to the A/V receiver with an HDMI cable. 9. Select the device's HDMI input on the A/V receiver's front panel controls or remote control. • If the new device has the HDMI CEC Control feature turned on, the TV will show a display similar to Figure 2 and automatically name the device. • If the new device has the HDMI CEC Control feature turned off or if it is not CEC compatible, there will be no display. Check the new device's menu for the HDMI Control feature and turn it on. If there is no HDMI Control feature listed, this device may not be compatible with HDMI CEC and you will need to control the device manually. 10. After the present device has been connected and set up, repeat steps 7 through 9 for the next HDMI device. 11. If desired, perform NetCommand IR Learning to supplement CEC functions.
-
 1
1 -
2
-
3
-
4
-
5
-
6
-
7
-
8
-
9
-
10
-
11
-
12
-
13
-
14
-
15
-
16
-
17
-
18
-
19
-
20
-
21
-
22
-
23
-
24
-
25
-
26
-
27
-
28
-
29
-
30
-
31
-
32
-
33
-
34
-
35
-
36
-
37
-
38
-
39
-
40
-
41
-
42
-
43
-
44
-
45
-
46
-
47
-
48
-
49
-
50
-
51
-
52
-
53
-
54
-
55
-
56
-
57
-
58
-
59
-
60
-
61
-
62
-
63
-
64
-
65
-
66
-
67
-
68
-
69
-
70
-
71
-
72
-
73
-
74
-
75
-
 76
76 -
 77
77 -
 78
78 -
 79
79 -
 80
80 -
 81
81 -
 82
82 -
 83
83 -
 84
84 -
 85
85 -
 86
86 -
87
-
88
-
89
-
90
-
91
-
92
-
93
-
94
-
95
-
96
 |
 |
