Polaroid LDTV152 Owners Guide - Page 49
Getting Started with GalleryPlayer
 |
UPC - 082400028051
View all Polaroid LDTV152 manuals
Add to My Manuals
Save this manual to your list of manuals |
Page 49 highlights
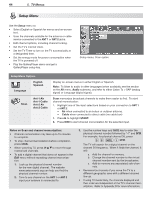
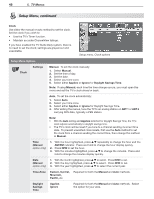
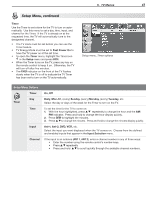
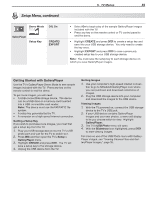
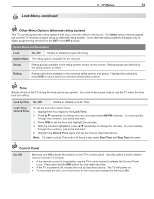
Setup Menu, continued Demo Mode Off, On GalleryPlayer Setup Key CREATE/ EXPORT 5. TV Menus 49 • Select On to begin play of the sample GalleryPlayer images included with the TV. • Press any key on the remote control or TV control panel to end the demo. • Highlight CREATE and press ENTER to create a setup key and save it to your USB storage device. You only need to create the key once. • Highlight EXPORT and press ENTER to save a previously created setup key to your USB storage device. Note: You must save the setup key to each storage device on which you save GalleryPlayer images. Getting Started with GalleryPlayer Use the TV's GalleryPlayer Demo Mode to see sample images included with the TV. Press any key on the remote control to end the demo. To get more images, you will need: • A USB-connectible storage device. The device can be a USB drive or a memory card inserted into a USB-connectible card reader. Note: The device must use the FAT/FAT32 file system. • A setup key generated by the TV. • A computer on a high-speed internet connection. Getting a Setup Key If you wish to purchase more images, you must first get a setup key from the TV. 1. Plug your USB storage device into the TV's USB photo port and wait for the TV to switch to it. 2. Press MENU and then open the TV's Setup > GalleryPlayer menu. 3. Highlight CREATE and press ENTER. The TV will save a setup key to the storage device. 4. Unplug the USB device from the TV. Getting Images 1. Use your computer's high-speed internet connec- tion to go to Mitsubishi.GalleryPlayer.com where you can purchase and download collections of images. 2. Plug the USB storage device into your computer and download the images to the USB device. Viewing Images 1. With the TV powered on, connect the USB storage device to the TV's USB jack. 2. If your USB device contains GalleryPlayer images and your own photos, a menu will display to let you choose which to view. Highlight GalleryPlayer. 3. The TV's USB Photo menu will open. 4. With the Slideshow icon highlighted, press ENTER to start viewing images. For more on use of the USB Photo menu with GalleryPlayer images, see "Viewing Camera Files and GalleryPlayer Images," page 35.
-
 1
1 -
2
-
3
-
4
-
5
-
6
-
7
-
8
-
9
-
10
-
11
-
12
-
13
-
14
-
15
-
16
-
17
-
18
-
19
-
20
-
21
-
22
-
23
-
24
-
25
-
26
-
27
-
28
-
29
-
30
-
31
-
32
-
33
-
34
-
35
-
36
-
37
-
38
-
39
-
40
-
41
-
42
-
43
-
 44
44 -
 45
45 -
 46
46 -
 47
47 -
 48
48 -
 49
49 -
 50
50 -
 51
51 -
 52
52 -
 53
53 -
 54
54 -
55
-
56
-
57
-
58
-
59
-
60
-
61
-
62
-
63
-
64
-
65
-
66
-
67
-
68
-
69
-
70
-
71
-
72
-
73
-
74
-
75
-
76
-
77
-
78
-
79
-
80
-
81
-
82
-
83
-
84
-
85
-
86
-
87
-
88
-
89
-
90
-
91
-
92
-
93
-
94
-
95
-
96
 |
 |
