Polaroid LDTV152 Owners Guide - Page 64
Setup to Control Switching to the TV's Audio Output
 |
UPC - 082400028051
View all Polaroid LDTV152 manuals
Add to My Manuals
Save this manual to your list of manuals |
Page 64 highlights
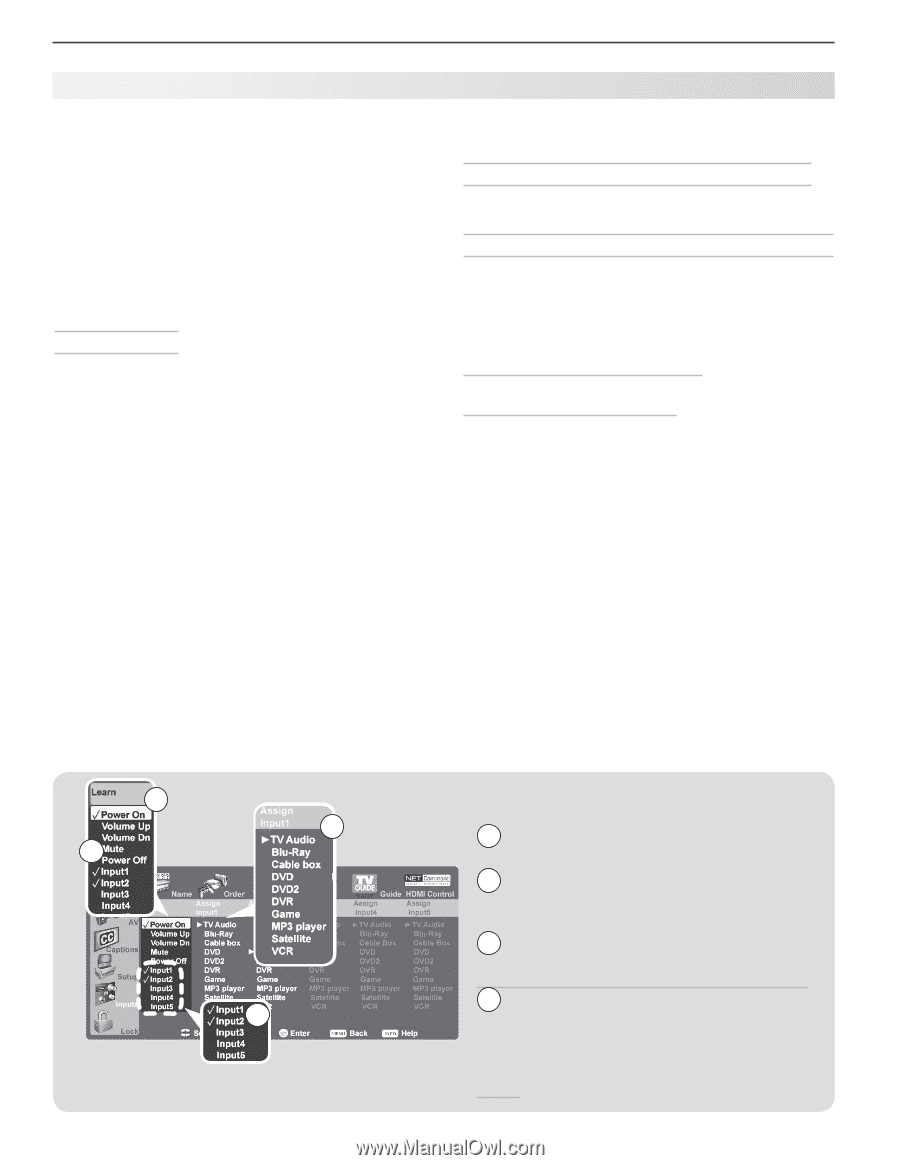
64 6. NetCommand IR Control Setting Up NetCommand Control of an A/V Receiver, continued example, use an optional audio connection if you wish to use the A/V receiver speakers to hear audio from: - The ANT 1 or ANT 2 inputs - A device connected to the convenience input (INPUT 4), such as a game or camcorder. • In some circumstances, audio from a device connected to the A/V receiver may not be passed over the HDMI cable to the TV speakers. You must use the A/V receiver speakers to hear audio in these cases. Before You Begin To complete these steps you will need: • The remote controls for both the TV and the A/V receiver. • The IR emitter cable supplied with the TV. • An HDMI-to-HDMI cable to connect the A/V receiver to the TV and cables necessary to connect devices to the A/V receiver. 1. Connect your audio/video devices to the A/V receiver. Note the name of the device connected to each A/V receiver input. This information will be needed later to set up NetCommand's automatic input switching. 2. Connect the A/V receiver to the TV with an HDMI- to-HDMI cable. 3. Connect the IR emitter cable to the TV and position the IR emitter where it can send signals to the A/V receiver. See "IR Emitter Placement," page 55. 4. Power on the A/V receiver. 5. Set the TV's remote control slide switch to the TV position and power on the TV if needed. 1 4 3 6. When the Auto Input Sensing screen displays, select device name AVR. Setup to Control A/V Receiver Power and Volume Perform the steps under "A/V Receiver Control: Power and Volume," page 60. Setup to Control Switching to the TV's Audio Output If you have used one of the optional audio connections to the TV's AVR AUDIO OUTPUT or DIGITAL AUDIO OUTPUT jacks, set up NetCommand to control switching to the TV audio input. Perform the steps under "Audio Switching Setup 1: Automatic A/V Receiver Switching to the TV Audio Input," page 62. Setup to Control Automatic Audio and Video Switching via HDMI Follow these steps if you wish NetCommand to control switching of A/V receiver video as well as audio inputs. When this setup is complete, you can use the TV's Input Selection menu to select a video device connected to the A/V receiver. You can also perform additional NetCommand setup to control devices connected to the A/V receiver. 1. Display the Inputs > AVR menu. Note: The labels Input1 through Input5 in the Learn column are names used by the TV to uniquely identify A/V receiver inputs. 2. With the highlight in the Learn column, highlight one of the Input labels Input2 through Input5; it is recommended you leave Input1 reserved for TV Audio. AVR menu for audio and video switching with HDMI output 1 The Learn column lists "learnable" keys from the A/V receiver's remote control. 2 Input1 through Input5 are arbitrary names used by the TV to uniquely identify "learnable" A/V receiver inputs. 3 A check mark next to a key name indicates it has been "learned" by NetCommand. 4 The Assign Input column provides a list 2 of possible device types. Use this list to select the device type connected to the associated A/V receiver input. The assigned device name will appear in the Input Selection menu.
-
 1
1 -
2
-
3
-
4
-
5
-
6
-
7
-
8
-
9
-
10
-
11
-
12
-
13
-
14
-
15
-
16
-
17
-
18
-
19
-
20
-
21
-
22
-
23
-
24
-
25
-
26
-
27
-
28
-
29
-
30
-
31
-
32
-
33
-
34
-
35
-
36
-
37
-
38
-
39
-
40
-
41
-
42
-
43
-
44
-
45
-
46
-
47
-
48
-
49
-
50
-
51
-
52
-
53
-
54
-
55
-
56
-
57
-
58
-
 59
59 -
 60
60 -
 61
61 -
 62
62 -
 63
63 -
 64
64 -
 65
65 -
 66
66 -
 67
67 -
 68
68 -
 69
69 -
70
-
71
-
72
-
73
-
74
-
75
-
76
-
77
-
78
-
79
-
80
-
81
-
82
-
83
-
84
-
85
-
86
-
87
-
88
-
89
-
90
-
91
-
92
-
93
-
94
-
95
-
96
 |
 |