Samsung SCD5000 User Manual (ENGLISH) - Page 105
Delayed Recording – Self Timer, PROGRAM, A, S, M, SCENE or
 |
UPC - 036725301085
View all Samsung SCD5000 manuals
Add to My Manuals
Save this manual to your list of manuals |
Page 105 highlights
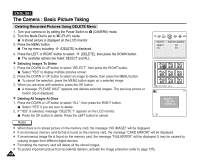
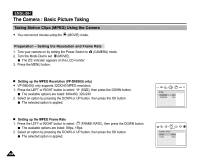
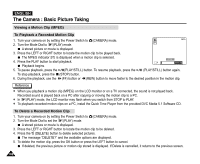
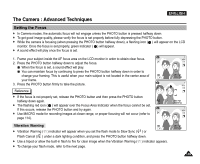
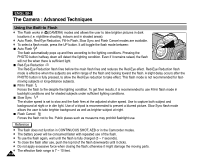
The Camera : Basic Picture Taking Delayed Recording - Self Timer ✤ Using the remote control, delaying the shutter release (in order to take self-photography and various other camera uses) is available. 1. Turn your camera on by setting the Power Switch to (CAMERA) mode. 2. Turn the Mode Dial to set (PROGRAM), A, S, M, SCENE or (MOVIE) mode. 3. Press the MENU button. The top menu including (SELF TIMER) is displayed. 4. Press the LEFT or RIGHT button to select (SELF TIMER), then press the DOWN button. The available options of OFF, 2s SELF and 10s SELF are listed. 5. Select an option by pressing the DOWN or UP button, then press the OK or MENU button. The selected option is applied and the corresponding indicator appears on the LCD monitor. You can also set the SELF TIMER by pressing the SELF TIMER button on the Remote Control until the desired option is displayed on the LCD monitor. : Delays the shutter release by 2 seconds. : Delays the shutter release by 10 seconds. 6. Frame your subject. 7. Press the PHOTO button on the Remote Control or on the Camera to start the timer. For motion clips, press the START/STOP button on the Remote Control or on the Camera. A beep sound will play and after the time indicated, recording starts. Reference ✤ Do not obstruct the remote control sensor by putting obstacles between the remote control and camera. ✤ The remote control range is 4 ~ 5m (13 ~ 17 ft). ✤ The effective remote control angle is up to 30 degrees left / right from the center line. ✤ Using a tripod is recommended for delayed recording. ENGLISH 105
-
 1
1 -
2
-
3
-
4
-
5
-
6
-
7
-
8
-
9
-
10
-
11
-
12
-
13
-
14
-
15
-
16
-
17
-
18
-
19
-
20
-
21
-
22
-
23
-
24
-
25
-
26
-
27
-
28
-
29
-
30
-
31
-
32
-
33
-
34
-
35
-
36
-
37
-
38
-
39
-
40
-
41
-
42
-
43
-
44
-
45
-
46
-
47
-
48
-
49
-
50
-
51
-
52
-
53
-
54
-
55
-
56
-
57
-
58
-
59
-
60
-
61
-
62
-
63
-
64
-
65
-
66
-
67
-
68
-
69
-
70
-
71
-
72
-
73
-
74
-
75
-
76
-
77
-
78
-
79
-
80
-
81
-
82
-
83
-
84
-
85
-
86
-
87
-
88
-
89
-
90
-
91
-
92
-
93
-
94
-
95
-
96
-
97
-
98
-
99
-
 100
100 -
 101
101 -
 102
102 -
 103
103 -
 104
104 -
 105
105 -
 106
106 -
 107
107 -
 108
108 -
 109
109 -
 110
110 -
111
-
112
-
113
-
114
-
115
-
116
-
117
-
118
-
119
-
120
-
121
-
122
-
123
-
124
-
125
-
126
-
127
-
128
-
129
-
130
-
131
-
132
-
133
-
134
-
135
-
136
-
137
-
138
-
139
-
140
-
141
-
142
-
143
-
144
-
145
-
146
-
147
-
148
-
149
-
150
-
151
-
152
-
153
-
154
-
155
-
156
-
157
-
158
-
159
-
160
-
161
-
162
-
163
-
164
-
165
-
166
 |
 |
