Samsung SCD5000 User Manual (ENGLISH) - Page 91
Setting the Clock, Available formats: 'YY/MM/DD, MM/DD/'YY, DD/MM/'YY
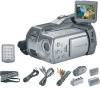 |
UPC - 036725301085
View all Samsung SCD5000 manuals
Add to My Manuals
Save this manual to your list of manuals |
Page 91 highlights
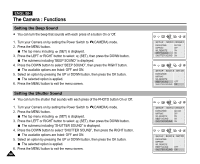
The Camera : Functions Setting the Clock ✤ A built-in clock for Camera mode creates the Time Stamp. For further information on Time Stamp Imprinting, refer to the next page. 1. Turn your Camera on by setting the Power Switch to (CAMERA) mode. 2. Press the MENU button. The top menu including (SET) is displayed. 3. Press the LEFT or RIGHT button to select (SET), then press the DOWN button. The submenu including "DATE & TIME" is displayed. 4. Press the DOWN button to select "DATE & TIME", then press the RIGHT button. The adjustable fields of Stamp Format, Date and Time are displayed while the YEAR field is selected. 5. Press the DOWN or UP button to set the value. Move to next field by pressing the RIGHT button. 6. Repeat Step 5 for the MONTH, DATE and TIME fields. 7. Press the DOWN or UP button to select the Stamp Format. Available formats: 'YY/MM/DD, MM/DD/'YY, DD/MM/'YY 8. Press the OK button to apply your selection. Press the MENU button to exit the menu screen. Reference ✤ If you remove the batteries from the camera for an extended period of time, or the batteries become run out, you may need to reset the clock. ENGLISH 91
-
 1
1 -
2
-
3
-
4
-
5
-
6
-
7
-
8
-
9
-
10
-
11
-
12
-
13
-
14
-
15
-
16
-
17
-
18
-
19
-
20
-
21
-
22
-
23
-
24
-
25
-
26
-
27
-
28
-
29
-
30
-
31
-
32
-
33
-
34
-
35
-
36
-
37
-
38
-
39
-
40
-
41
-
42
-
43
-
44
-
45
-
46
-
47
-
48
-
49
-
50
-
51
-
52
-
53
-
54
-
55
-
56
-
57
-
58
-
59
-
60
-
61
-
62
-
63
-
64
-
65
-
66
-
67
-
68
-
69
-
70
-
71
-
72
-
73
-
74
-
75
-
76
-
77
-
78
-
79
-
80
-
81
-
82
-
83
-
84
-
85
-
 86
86 -
 87
87 -
 88
88 -
 89
89 -
 90
90 -
 91
91 -
 92
92 -
 93
93 -
 94
94 -
 95
95 -
 96
96 -
97
-
98
-
99
-
100
-
101
-
102
-
103
-
104
-
105
-
106
-
107
-
108
-
109
-
110
-
111
-
112
-
113
-
114
-
115
-
116
-
117
-
118
-
119
-
120
-
121
-
122
-
123
-
124
-
125
-
126
-
127
-
128
-
129
-
130
-
131
-
132
-
133
-
134
-
135
-
136
-
137
-
138
-
139
-
140
-
141
-
142
-
143
-
144
-
145
-
146
-
147
-
148
-
149
-
150
-
151
-
152
-
153
-
154
-
155
-
156
-
157
-
158
-
159
-
160
-
161
-
162
-
163
-
164
-
165
-
166
 |
 |
