Samsung SCD5000 User Manual (ENGLISH) - Page 107
Recording a Motion Clip onto a Memory Card, Turn the Mode Dial
 |
UPC - 036725301085
View all Samsung SCD5000 manuals
Add to My Manuals
Save this manual to your list of manuals |
Page 107 highlights
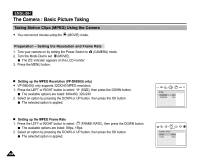
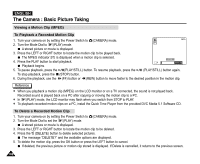
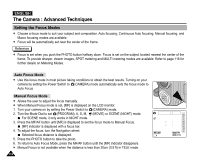
The Camera : Basic Picture Taking ENGLISH Recording a Motion Clip onto a Memory Card ✤ You can record movies using the (MOVIE) mode. ✤ Before recording a motion clip, insert a Memory Card (refer to page 83). 1. Turn your camera on by setting the Power Switch to (CAMERA) mode. 2. Turn the Mode Dial to (Movie). Movie mode indicator is displayed and it is ready for recording. Recordable time using the memory card is displayed. 3. Frame your subject, then press the START/STOP button to start recording. The Time Counter starts counting and begins the recording. The Memory Card indicator will blink during recording. Zooming is not available during a motion clip recording. Zoom in or out before recording. 4. To pause the recording for a while, press the START/STOP button. To resume recording, press the START/STOP button again. You can use the Remote Control for Motion Clip recording. 1. Follow Steps 1 ~ 2 above for the normal recording of Motion Clips. 2. Frame your subject, then press the START/STOP button on the Remote Control. The Time Counter starts counting and the recording begins. 3. To stop recording, press the START/STOP button. Reference ✤ To use an external microphone, connect a microphone to the MIC jack on the right front side of your camera. ✤ It is recommended to use a tripod for Motion Clip recordings with the Remote Control. It is also handy for self recordings. ✤ When recording MPEG4 motion clips, LCD monitor may display black bars on its bottom, it is normal. Playing back recorded MPEG4 motion clip on the unit and PC shows full screen. ✤ The recorded MPEG motion clip is saved in MOV format. To playback an MPEG having its extension of ".MOV", you will need a Q.Time player that can be installed from the DVC Media 5.1 Software CD provided or from the internet sites. Refer to page 153 and 154 for further details on software installation. 107
-
 1
1 -
2
-
3
-
4
-
5
-
6
-
7
-
8
-
9
-
10
-
11
-
12
-
13
-
14
-
15
-
16
-
17
-
18
-
19
-
20
-
21
-
22
-
23
-
24
-
25
-
26
-
27
-
28
-
29
-
30
-
31
-
32
-
33
-
34
-
35
-
36
-
37
-
38
-
39
-
40
-
41
-
42
-
43
-
44
-
45
-
46
-
47
-
48
-
49
-
50
-
51
-
52
-
53
-
54
-
55
-
56
-
57
-
58
-
59
-
60
-
61
-
62
-
63
-
64
-
65
-
66
-
67
-
68
-
69
-
70
-
71
-
72
-
73
-
74
-
75
-
76
-
77
-
78
-
79
-
80
-
81
-
82
-
83
-
84
-
85
-
86
-
87
-
88
-
89
-
90
-
91
-
92
-
93
-
94
-
95
-
96
-
97
-
98
-
99
-
100
-
101
-
 102
102 -
 103
103 -
 104
104 -
 105
105 -
 106
106 -
 107
107 -
 108
108 -
 109
109 -
 110
110 -
 111
111 -
 112
112 -
113
-
114
-
115
-
116
-
117
-
118
-
119
-
120
-
121
-
122
-
123
-
124
-
125
-
126
-
127
-
128
-
129
-
130
-
131
-
132
-
133
-
134
-
135
-
136
-
137
-
138
-
139
-
140
-
141
-
142
-
143
-
144
-
145
-
146
-
147
-
148
-
149
-
150
-
151
-
152
-
153
-
154
-
155
-
156
-
157
-
158
-
159
-
160
-
161
-
162
-
163
-
164
-
165
-
166
 |
 |
