Sony BVME251 Operation Guide
Sony BVME251 Manual
 |
View all Sony BVME251 manuals
Add to My Manuals
Save this manual to your list of manuals |
Sony BVME251 manual content summary:
- Sony BVME251 | Operation Guide - Page 1
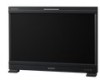
4-688-645-12(1) Professional Video Monitor Operating Instructions Before operating the unit, please read this manual thoroughly and retain it for future reference. BVM-E251 BVM-E171 Software Version 1.1 © 2016 Sony Corporation - Sony BVME251 | Operation Guide - Page 2
a risk of electric shock to persons. This symbol is intended to alert the user to the presence of important operating and maintenance (servicing) instructions in the literature accompanying the appliance. CAUTION The unit is not disconnected from the AC power source (mains) as long as it is - Sony BVME251 | Operation Guide - Page 3
both. To reduce the risk of fire or electric shock, refer servicing to qualified service personnel. WARNING: THIS WARNING IS APPLICABLE FOR OTHER COUNTRIES. 1. Use if not installed and used in accordance with the instruction manual, may cause harmful interference to radio communications. Operation - Sony BVME251 | Operation Guide - Page 4
to conserve natural resources. For more detailed information about recycling of this product, please contact your local civic office, your household waste disposal service provider or the store where you made the purchase. You may contact our company's toll free number in India for assistance. Toll - Sony BVME251 | Operation Guide - Page 5
Key 79 Obtaining the Install Key File 80 Activating the Optional License for HDR- compatibility 82 Connecting the SDI Signals 83 Troubleshooting 84 Specifications 85 BVM-E251 85 BVM-E171 86 Available Signal Formats 88 Aperture Modification Frequency 93 Picture Display Size 94 Picture - Sony BVME251 | Operation Guide - Page 6
of space above the unit is recommended in consideration of service operation. BVM-E171 When the unit is installed in such "stuck" pixels may appear spontaneously. These problems are not a malfunction. Do not High Dynamic Range). In this manual, this status is described as "HDR display." For details - Sony BVME251 | Operation Guide - Page 7
in the OLED panel, permanent burn-in or reduction in brightness may occur. These problems are not a malfunction. Images that may cause burn-in Still images in the connected equipment accordingly. For details, refer to the operation manual of the connected equipment. Do not display static images - Sony BVME251 | Operation Guide - Page 8
in magenta on the front panel for fan error indication, turn off the power and contact an authorized Sony dealer. About this manual The instructions in this manual are for the following two models: BVM-E251 BVM-E171 The illustration of BVM-E251 is used for the explanations. Any differences - Sony BVME251 | Operation Guide - Page 9
Location and Function of Parts and Controls Front Panel Tally lamp With factory settings, the tally lamp lights when pins No. 5 and No. 8 of the PARALLEL REMOTE connector on the rear panel are shorted. By changing the setting in the [Parallel Remote] menu (page 61) of the [System Configuration] - Sony BVME251 | Operation Guide - Page 10
The OVER RANGE indicator may indicate an error or warning. For details, see "About error/warning signals of the indicator" (page 10). STATUS indicator Slowly flashes in yellow when the screen saver is activated, and quickly flashes in yellow when a warning during startup occurs. Lights in blue in - Sony BVME251 | Operation Guide - Page 11
Input Signals and Adjustable/Setting Items Item CONTRAST BRIGHT CHROMA 15) PHASE 15) Picture Auto Adjust NTSC Setup Level Position Adj Gamut Error Display Scan Mode Native Scan (×1, ×2) 2) Native Scan (Aspect Correction) 16:9 H Delay V Delay Char Off Color Temp Status Aperture 10) Mono Blue Only R - Sony BVME251 | Operation Guide - Page 12
Item Blending Error Notify Clear Audio Level Meter 11) ALM Hold Reset 11) Time Code Flicker Free 16) Closed Caption × : : Adjustable/can be set Not adjustable/cannot be set Input signal Analog SDI Composite SD 3G/HD YCbCr YCbCr RGB XYZ × 1) × × - Sony BVME251 | Operation Guide - Page 13
may be distorted. HDMI IN (HDMI input) connector Input connector for HDMI 1) signals. HDMI (High-Definition Multimedia Interface) is an interface that supports both video and audio on a single digital connection, allowing you to enjoy high quality digital picture and sound. The HDMI specification - Sony BVME251 | Operation Guide - Page 14
separately). CAUTION For safety, do not connect the connector for peripheral device wiring that might have excessive voltage to this port. Follow the instructions for this port. When you connect the LAN cable of the unit to peripheral device, use a shielded-type cable to prevent malfunction due - Sony BVME251 | Operation Guide - Page 15
Preventing Falling of the Monitor (BVM-E251) 1 Tie a piece of stout string (commercially available) to the left and right handles of the monitor. Mounting the Unit in a Rack (BVM-E171) To mount the unit in an EIA standard 19-inch rack, use the supplied rack mount brackets and screws. 1 Remove the - Sony BVME251 | Operation Guide - Page 16
(BVM-E171) 1 Remove the 2 screws on the top side. Connecting the Controller (BKM-17R) Note When you connect the BKM-16R, refer to the operating instructions of BKM-16R. NETWORK switch: Set to PEER TO PEER. Note Keep the removed screws in a safe place to prevent them from being lost. 2 Attach - Sony BVME251 | Operation Guide - Page 17
one monitor in single mode. Notes The controller cannot control monitors in another subnetwork. When you connect the BKM-16R, refer to the operating instructions of BKM-16R. NETWORK switch: Set to LAN. NETWORK switch: Set to LAN. LAN (10/100) connector LAN (10/100) connector Switching hub - Sony BVME251 | Operation Guide - Page 18
2 Connect to the network by using a 10BASE-T/ 100BASE-TX cable (shielded-type, sold separately). Note We recommend to use an optional switching hub with auto selection function (AUTO MDI/MDI-X) of a straight/cross cable. 3 Connect the output cable on the AC adaptor supplied with the controller to - Sony BVME251 | Operation Guide - Page 19
Connecting the Power Cord Turning on the Monitor Press the power switch on the rear panel to turn on the power. You can operate the monitor with AC or DC power supply. To connect the AC power cord 1 Plug the AC power cord into the AC IN connector on the rear panel then attach the AC plug holder ( - Sony BVME251 | Operation Guide - Page 20
Initial settings When you turn on the monitor for the first time after purchasing it, select the area where you intend to use this monitor from among the options. When the area is selected, the menu item settings suitable for the selected area are applied. Default value for each area ENTER button - Sony BVME251 | Operation Guide - Page 21
NTSC area PAL area [Setup Level] ([NTSC Setup Level]: page 37) [Color Profile] (page 39) Customers who will use this monitor in the shaded areas shown in the map below should select [NTSC Area]. Other customers should select [PAL Area]. Then press the ENTER (Ent) button. 3 Confirm the - Sony BVME251 | Operation Guide - Page 22
Setting for the LAN to Connect Multiple Units You can control the multiple monitors using the controller (BKM-17R, sold separately) connected via each LAN (10/100) connector. You can also control a specific monitor or monitor group. Set an IP address to the monitors and controller and a monitor ID - Sony BVME251 | Operation Guide - Page 23
Selecting the Monitor (Designation of the Monitor or Group ID Number) When the multiple monitors are connected by network connections, you can remotely connect the monitors from the controller by designating the set monitor ID number or group ID number. 3 Press the ENTER (Ent) button to confirm the - Sony BVME251 | Operation Guide - Page 24
Using the Menu Menu Operation Buttons The menu is operated using the menu operation buttons on the controller (BKM-17R, sold separately) You can also operate the unit using the BKM-16R in the same way. Controller (BKM-17R) The functions of the menu operation buttons are described below. UP / - Sony BVME251 | Operation Guide - Page 25
Notes The menu disappears automatically if not operated for about one minute. Menu items displayed in gray cannot be selected. This menu is not displayed when [Pixel Zoom] is set to on. 2 Using the UP or DOWN button or PHASE knob, select the desired item. (Example: select the [Channel - Sony BVME251 | Operation Guide - Page 26
Display example Cursor Display example 2 Using the UP or DOWN button or PHASE knob, select the setting value. 3 Press the ENTER or Ent button. The setting is confirmed and the cursor returns to the item. When selecting from the setting list 1 Using the UP or DOWN button or PHASE knob, select the - Sony BVME251 | Operation Guide - Page 27
Capital letters (A B Y Z) Lower-case letters (a b y z) Numbers (0 1 8 9) Marks Capital letters... When you press the DOWN button or turn the PHASE knob counterclockwise, the characters and symbols appear in the reverse sequence described above. The usable symbols are limited - Sony BVME251 | Operation Guide - Page 28
Adj] [Auto] [Auto Adjust] [Color Bar] [Restore Factory Data] [Status] [Format] [Matrix] [Manual Adjust] [Copy From] [Preset Value] [Other Monitor] [External Memory] [Color Temp Adj] [Manual] [Manual Adjust] [Original Value] [Signal] [Contrast/Bright Hold] [Copy From] [Preset Value] [Other Monitor - Sony BVME251 | Operation Guide - Page 29
[Matrix] [HD] [SD] [Color Profile] [Color Space] [Gamma] [HDMI Auto] [Marker Preset] [H Shift Offset] [Channel Name] [NTSC Setup Level] [RGB/YCC Range] [RGB Range] [HD] [DC 2048×1080] [HDMI] [YCC Range] [HDMI] [HDMI Auto] [1080I/PsF] [24PsF] [25PsF/50I] [30PsF/60I] [Film Cadence] [Copy From] [Other - Sony BVME251 | Operation Guide - Page 30
[Input Information] [Format] [Position] [CH No] [Position] [CH Name] [Position] [Scan Mode] [Position] [Closed Caption] [Closed Caption] [Type] [Service 708] [Service 608] [OSD Level] [Audio Level Meter] [Audio CH] [Position] [Transparency] [Peak Hold] [Time Code] [VITC/LTC] [Position] [Level] [Over - Sony BVME251 | Operation Guide - Page 31
as well as the chroma, phase and matrix adjustment. When you make a further adjustment on the chroma and phase after [Auto Adjust], adjust them manually. This menu is not selectable when the internal signal or captured frame is displayed. Submenu [Auto Adjust] [Color Bar] [Restore Factory Data - Sony BVME251 | Operation Guide - Page 32
to 2500 (Default value: [1000] (for [Preset1] to [Preset5]), Default value: [0480] (for [Preset(DCI)])) To display no characters on the screen while adjusting manually Set the CHAR OFF button to on. The characters disappear. To display characters, set the CHAR OFF button to off. To reset the setting - Sony BVME251 | Operation Guide - Page 33
To adjust [Blue] (blue): PHASE knob To adjust brightness ([Red], [Green] and [Blue] together): CONTRAST knob To hide the characters on the monitor during manual adjustment Set the CHAR OFF button of the controller to on. As the characters on the display are hidden, it becomes easy to adjust the - Sony BVME251 | Operation Guide - Page 34
Submenu [Original Value] [Signal] Setting Sets the initial value. Except for the XYZ format signal You can select from [D93], [D65], [D61], [D55], [DCI], [User1], [User2], [User3], [User4], or [User5]. When [D93], [D65], [D61], [D55], or [DCI] data is changed, they are displayed as [D93*], [D65*], - Sony BVME251 | Operation Guide - Page 35
Submenu [External Memory] Setting For the XYZ format signal When the ID number is entered, you can select from the following: [DCI XYZ]: Copies the color temperature of DCI XYZ. [User XYZ1] to [User XYZ5]: Copies the color temperature of User XYZ1 to User XYZ5. When [DCI XYZ] data is changed, - Sony BVME251 | Operation Guide - Page 36
The current channel is displayed. Perform the input setting for the selected channel. Before setting Set the input signal for each channel. A channel number (1 to 30) is entered with the numeric buttons (page 27). Note This menu is not selectable in the following cases: When [Side by Side] is set - Sony BVME251 | Operation Guide - Page 37
Submenu [Picture Preset] [Matrix/Color Profile] [Marker Preset] [H Shift Offset] [Channel Name] [NTSC Setup Level] [RGB/YCC Range] Setting Sets the picture adjustment preset. Select from the following: [Preset1] to [Preset5] [Preset(DCI)] Sets [Matrix] data (transmission matrix) and [Color - Sony BVME251 | Operation Guide - Page 38
input signal. It is recommended that a particular format be selected if it is determined. [NTSC] [PAL] [PAL-M] Sets the HDMI signal format. In this manual, the 800 × 600, 1024 × 768, 1280 × 960, 1280 × 1024, and 1400 × 1050 signals are referred to as the HDMI computer signals. For the signal - Sony BVME251 | Operation Guide - Page 39
Submenu [HD] [SD] Setting Sets Matrix of the HD signal. [ITU-R BT.709]: Select when the signal of the ITU-R BT.709 standard format is input. [ITU-R BT.601]: Select when the signal of the ITU-R BT.601 standard format is input. [SMPTE 240M]: Select when the signal of the SMPTE-240M standard - Sony BVME251 | Operation Guide - Page 40
Submenu Setting Color Profile data [BVM SMPTE-C]: Displays with the color space and gamma of BVM SMPTE-C phosphor CRT. [BVM EBU]: Displays with the color space and gamma of BVM EBU phosphor CRT. [ITU-R BT.709]: Displays with the color space of three primary color chromaticity points provided - Sony BVME251 | Operation Guide - Page 41
Submenu Setting Color Profile data [BVM SMPTE-C]: Displays with the color space and gamma of BVM SMPTE-C phosphor CRT. [BVM EBU]: Displays with the color space and gamma of BVM EBU phosphor CRT. [ITU-R BT.709]: Displays with the color space of three primary color chromaticity points provided - Sony BVME251 | Operation Guide - Page 42
Submenu [Color Space] Setting Select the color space when [User CH01] to [User CH30] is selected in the [Color Profile] menu. [SMPTE-C]: Color space of three primary color chromaticity points provided by the SMPTE-C standard [EBU]: Color space of three primary color chromaticity points provided - Sony BVME251 | Operation Guide - Page 43
Submenu Setting [Gamma] (When HDR is enabled on the BVME171) Select the gamma when [User CH01] to [User CH30] is selected in the [Color Profile] menu. [CRT BVM]: Gamma curve of the BVM-D or BVM-A series [2.2]: Gamma curve 2.2 [2.4]: Monitor gamma provided by ITU-R BT.1886 [2.6]: Gamma - Sony BVME251 | Operation Guide - Page 44
(12bit) to 235 (8bit)/940 (10bit)/ 3760 (12bit) Cb/Cr: 16 (8bit)/64 (10bit)/256 (12bit) to 240 (8bit)/960 (10bit)/ 3840 (12bit) Sets the manual or automatic setting for the quantization range of the HDMI signal. [Off]: Select to use the quantization range set in the [HDMI] menu. [On]: Select - Sony BVME251 | Operation Guide - Page 45
Submenu Setting [Copy from External Copies data in the USB memory stick, Memory] etc. Note Use the USB memory stick, etc. with data stored by the BVM-E251/BVME171 to use the [Copy from External Memory] function. When the item is selected, the file names in the source USB memory stick, etc. are - Sony BVME251 | Operation Guide - Page 46
H size (1920) by sliding the picture with the PHASE knob of the controller. You can restore the display position to the center by pressing the MANUAL button of PHASE on the controller. Displayed the whole picture of the H direction by sliding the picture with the PHASE knob of the controller. UP - Sony BVME251 | Operation Guide - Page 47
To hide the characters on the monitor during setting Set the CHAR OFF button of the controller to on. As the characters on the display are hidden, it becomes easy to adjust the picture. To display the characters, set the CHAR OFF button to off. [Aspect Marker] Sets the aspect marker display. - Sony BVME251 | Operation Guide - Page 48
Submenu [Mode] Setting Sets the shape of the area marker 1. You can select from [Shape A], [Shape B], or [Shape C]. [Shape A] [Shape B] [Shape C] Note The size of the area is as follows depending on the [Aspect Mode] and [16:9] [On]/[Off] setting. Example: [Area Size] [80%], [Aspect Mode] - Sony BVME251 | Operation Guide - Page 49
Submenu [External Memory] Setting Copies data in the USB memory stick, etc. Note Use the USB memory stick, etc. with data stored by the BVM-E251/BVME171 to use the [External Memory] function. When the item is selected, the file names in the source USB memory stick, etc. are displayed. When the - Sony BVME251 | Operation Guide - Page 50
Submenu [Position] Setting Sets the position of the boundary line. Set from -100 (leftward) to +100 (rightward). (Default value: [000]) [Butterfly] Sets the butterfly display. Submenu [Line Display] [Line Color] [Line Bright] [Position] Setting Sets display mode of the boundary line. [Off]: - Sony BVME251 | Operation Guide - Page 51
When signal A and signal B are not the same signal format and signal system, the pictures may not be displayed correctly. The input of signal A is not changed in the multi display. The internal signal is not displayed in the multi display. The captured picture data is not used to display as - Sony BVME251 | Operation Guide - Page 52
[On]). [OSD Notification Reset] Sets the method to reset the error detection mode. [Auto]: Resets automatically after detecting the error. [Manual]: Resets manually. To reset the error detection, select [Error Notify Clear] (page 58) in the [Function Switch] menu of the [Function Setting] menu - Sony BVME251 | Operation Guide - Page 53
Submenu Setting [SDI RGB 10bit] [Upper Limit] (upper limit) [G]: 0000 to 1023 (Default value: [0983]) [B]: 0000 to 1023 (Default value: [0983]) [R]: 0000 to 1023 (Default value: [0983]) [Lower Limit] (lower limit) [G]: 0000 to 1023 (Default value: [0020]) [B]: 0000 to 1023 (Default - Sony BVME251 | Operation Guide - Page 54
. For details on the USB memory stick, see "Inserting/ Ejecting the USB memory stick" on page 100. For the memory stick, see the operating instructions of BKM16R. 2 Display the picture and press the CAPTURE button of the controller at the point on the picture to be captured. The captured still - Sony BVME251 | Operation Guide - Page 55
The file of the captured frame is automatically named and the file name is displayed on the screen during file saving. Note The monitor is not operated until the saving is completed. To load the captured frame Press the CAPTURE LOAD button of the controller or select [Load] in the [Capture] menu ( - Sony BVME251 | Operation Guide - Page 56
Submenu [V Delay] [Flicker Free] [Aperture] [Mono] Setting Sets whether or not to display in V delay ([Off] or [On]). Note The picture is not displayed in V delay in the following cases: When the input signal has no sync signal When the internal signal is displayed When [Format] of the [ - Sony BVME251 | Operation Guide - Page 57
Submenu [Aspect Marker] [Area Marker 1] [Area Marker 2] Setting Sets whether or not to display the aspect marker ([Off] or [On]). Notes The aspect marker is not displayed in the following cases: - When the input signal has no sync signal - When the internal signal is displayed - When the HDMI - Sony BVME251 | Operation Guide - Page 58
Submenu [Aspect BlankingHalf ] [Aspect BlankingBlack] [Side by Side] Setting Sets whether or not to set the Aspect Blanking (the blanking outside the area of the aspect marker) to half blanking ([Off] or [On]). Notes The Aspect Blanking is not set to half blanking in the following cases: - When - Sony BVME251 | Operation Guide - Page 59
Submenu [ALM Hold Reset] Setting When the item is selected, the peak hold of the audio level meter is canceled. [Time Code] Note The [ALM Hold Reset] is not selected in the following cases: When [Format] of the [Channel Configuration] menu is set to [Composite] or [HDMI] When [Audio Level - Sony BVME251 | Operation Guide - Page 60
To set to the native scan mode Set [Native Scan] to [On]. To select the scan mode 1 Set [Native Scan] to [Off]. 2 Select [Scan Mode], then select scan mode from the following. [Normal Scan]: Normal mode [Under Scan]: Under mode [Over Scan]: Over mode Note The scan mode is not selectable in the - Sony BVME251 | Operation Guide - Page 61
Submenu [IP Address] Setting Sets the IP address. (Default value: [192.168.000.001]) [Subnet Mask] Note When the NETWORK switch is set to PEER TO PEER, the IP address is set to "192.168.0.1" regardless of the display. When the NETWORK switch is set to LAN, the IP address is set to the displayed - Sony BVME251 | Operation Guide - Page 62
Submenu [1 Pin] - [8 Pin] Setting Assigns the function to each pin of the PARALLEL REMOTE connector when [Parallel Remote] is set to [On]. The default assignment of functions is as follows: 1 Pin: [CH01] 2 Pin: [CH02] 3 Pin: [Marker] 4 Pin: [Mono] 6 Pin: unused 7 Pin: unused 8 Pin: [ - Sony BVME251 | Operation Guide - Page 63
caption cannot be displayed. Submenu [Closed Caption] Setting Sets whether or not to display closed caption signal ([Off] or [On]). Submenu [Type] [Service 708] [Service 608] [OSD Level] Setting Sets the closed caption type. [Auto1]: Select to set to 608(VBI) when the SD-SDI signal is input - Sony BVME251 | Operation Guide - Page 64
level meter. [Off]: The peak hold does not function. [Auto]: The peak hold is automatically released after about 1 second. [Manual Reset]: The peak hold is released manually. To release the peak hold, select [ALM Hold Reset] (page 59) in the [Function Switch] menu of the [Function Setting - Sony BVME251 | Operation Guide - Page 65
1 Input the SDI signal. 2 Select the channel. 3 Set the time code in the [Time Code] menu (page 64) of the [On Screen Set] menu in the [System Configuration] menu. 4 Set [Time Code] (page 59) to [On] in the [Function Switch] menu of the [Function Setting] menu or by pressing the TIME CODE button of - Sony BVME251 | Operation Guide - Page 66
Note The screen saver function is automatically set to [On] during manual adjustment of the color temperature, contrast, brightness, chroma, and phase, FPGA data of the monitor. [Maintenance] The menu for the Sony service representative is displayed. [File Management] Menu The system data is saved - Sony BVME251 | Operation Guide - Page 67
controller. For details on the USB memory stick, see "Inserting/ Ejecting the USB memory stick" on page 100. For the memory stick, see the operating instructions of BKM-16R. 2 Select [External Memory] in the [Save To] menu (page 66) of the [File Management] menu, and then select [New Name] or the - Sony BVME251 | Operation Guide - Page 68
Submenu [External Memory] Setting Selects the data in the source USB memory stick, etc. Note Use the USB memory stick, etc. with data stored by the BVM-E251/BVME171 to use the [External Memory] function. When the item is selected, the file names in the USB memory stick, etc. are displayed. When - Sony BVME251 | Operation Guide - Page 69
Submenu [CH Status] Setting Displays the information on the used channels. The information of the internal signal assigned to the channel number is displayed on the channels 91 to 97. [CH]: Channel number [Inp]: Input connector number [Format]: Input signal format [Name]: Channel name For - Sony BVME251 | Operation Guide - Page 70
Submenu [HDMI Status] Setting Displays the signal information of the HDMI signal. When the following information is not decoded, [Unknown] is displayed. [Pixel Encoding]: [RGB 4:4:4] / [YCbCr 4:4:4] / [YCbCr 4:2:2] [Color Depth]: [8bit] / [10bit] / [12bit] [Colorimetry]: [ITU-R BT.601] / [ITU - Sony BVME251 | Operation Guide - Page 71
-pass filter is selected. When the displayed signal is NTSC, PAL, or PAL-M, this functions. [Char Off]: The characters on the monitor screen hide during manual adjustment. [Color Temp]: You can directly access the [Manual Adjust] menu of the [Color Temp Adj] menu. 71 Adjustment Using the Menus - Sony BVME251 | Operation Guide - Page 72
Submenu Setting [Status]: Various status information regarding the monitor are displayed on a single page. For details on the display, see "Displaying the Monitor Status Page" (page 74). [Aperture]: When the function is set to on, the frequency response can be modified. The degree of - Sony BVME251 | Operation Guide - Page 73
Assignable functions [Scan Mode Skip], [Native Scan], [16:9], [H Delay], [V Delay], [External Sync], [Comb], [Char Off], [Color Temp], [STATUS], [Aperture], [Mono], [Blue Only], [R Off], [G Off], [B Off], [Chroma Up], [Interlace], [Pixel Zoom], [Capture Load], [Marker], [Aspect Marker], [Area Marker - Sony BVME251 | Operation Guide - Page 74
Submenu [Key Protect] Setting Sets the key protection. [On]: The button on the controller (except the menu operation buttons and monitor selection buttons) and the parallel remote do not function and other settings are not changeable. [Off]: Release the lock. Displaying the Monitor Status Page - Sony BVME251 | Operation Guide - Page 75
[RGB Range]: Displays [RGB Range] set in the [Channel Configuration] menu. [1080I/PsF]: Displays [1080I/PsF] set in the [Channel Configuration] menu. [Scan Mode]: Displays the selected scan mode. [Aspect Mode]: Displays the selected aspect ratio. [Interlace Display]: Displays On/Off of the interlace - Sony BVME251 | Operation Guide - Page 76
[RGB/YCC Range] 2): [Limit] / [Full] [EOTF] 3): [SDR Gamma] / [HDR Gamma] / [SMPTE ST2084(HDR)] / [ITU-R BT.2100(HLG)] 1) The [Colorimetry] status is displayed when [HDMI Auto] is set to [On] in the [Matrix/Color Profile] menu of the [Channel Configuration] menu, and the YCbCr signal is input. 2) It - Sony BVME251 | Operation Guide - Page 77
To confirm saving the data correctly (when the software version of the monitor is earlier than 1.1) Double-click on the file including checksum.bat in the file name. BVM-E251 MSSONY/MONITOR/BVM_E1/UPDATES/SOFT/ BVM_E251/checksum_soft.bat MSSONY/MONITOR/BVM_E1/UPDATES/ KERNEL/BVM_E251/ - Sony BVME251 | Operation Guide - Page 78
flashing during upgrade, but the data are being upgraded correctly. Notes Do not remove the USB memory stick, etc. from the controller during upgrading or disconnect the LAN cable between the monitor and controller. Do not turn off the power of the monitor and controller during upgrade. Do not - Sony BVME251 | Operation Guide - Page 79
If an HDMI EDID error occurs, disconnect the HDMI cable from the monitor, and then turn off and on the power of the monitor. For details of the error/warning display on the indicators, see page 10. After completion of upgrade, the system is restarted. The network between the monitor and controller - Sony BVME251 | Operation Guide - Page 80
ID]. 6 Enter the access code, and click [Login]. 2 Access the following website to complete the user registration according to the on-screen instructions: "eCSite" at https://www.ecspert.sony.biz If you have already completed the registration, go to step 5. 3 Select [User Registration] on the - Sony BVME251 | Operation Guide - Page 81
10 Check the purchase key displayed on the screen, and click ">" on the left. 11 Click [Install-Key Issue] on the right of the last line on the screen. Notes Enter the unique device ID and download the install key file on the [Install-Key] window. Leave [Issue Qty] set to "1." Make sure to - Sony BVME251 | Operation Guide - Page 82
Activating the Optional License for HDR-compatibility HDR function is enabled by using the install key file on the menu screen of the BVM-E171. Notes The unit automatically restarts after the install key file enables the HDR function. Make sure to enable the HDR function when restarting the unit - Sony BVME251 | Operation Guide - Page 83
Connecting the SDI Signals Single Link 3G/HD-SDI and Dual Link HD-SDI signals can be input to the SDI 1 IN and SDI 2 IN connectors of this unit. Signals up to 2-channel Single Link 3G/HD-SDI signals or 1-channel Dual Link HD-SDI signals can be input to the SDI 1 IN connector and the SDI 2 IN - Sony BVME251 | Operation Guide - Page 84
Troubleshooting This section may help you isolate the cause of a problem and as a result, eliminate the need to contact technical support. . A gamut error is detected or [OSD Notification Reset] is set to [Manual] and the detected error information is remained. Perform the following. - Set [Gamut - Sony BVME251 | Operation Guide - Page 85
Specifications BVM-E251 Picture performance Panel OLED panel Picture size (diagonal) 623.4 mm (24 5/8 inches) Effective picture size (H × V) 543.4 × 305.6 mm (21 1/2 × 12 1/8 inches) Resolution (H × V) 1920 × 1080 pixels (Full HD) Aspect 16:9 Pixel efficiency 99.99% Panel drive RGB 10- - Sony BVME251 | Operation Guide - Page 86
Output SDI BNC (×2) (monitor output) Output signal amplitude: 800 mVp- p±10% Output impedance: 75 ohms unbalanced Transmission distance: 3G-SDI: 70 m max. 1) HD-SDI: 100 m max. 1) SD-SDI: 200 m max. 2) Composite output BNC type (×1) Loop-through 3), with 75 ohms automatic terminal function - Sony BVME251 | Operation Guide - Page 87
Warm-up time Approx. 30 minutes To provide stable picture quality, turn on the power of the monitor and leave it in this state for more than 30 minutes. 1) 48 Hz and 60 Hz are compatible with a frame rate of 1/ 1.001. 2) DCI: x=0.314 y=0.351 3) Chromaticity points of SMPTE RP 431-2, ITU-R BT.2020, - Sony BVME251 | Operation Guide - Page 88
. SONY WILL NOT BE LIABLE FOR THE TERMINATION OR DISCONTINUATION OF ANY SERVICES RELATED TO THIS UNIT THAT MAY RESULT DUE TO CIRCUMSTANCES OF ANY KIND. UNAVOIDABLE DATA LEAKS RESULTING FROM TRANSMISSION SPECIFICATIONS, OR SECURITY PROBLEMS OF ANY KIND. Depending on the operating environment, - Sony BVME251 | Operation Guide - Page 89
HD-SDI Single Link Signal System 1920 × 1080/50/I 1920 × 1080/60 1) /I 1280 × 720/50/P 1280 × 720/60 1) /P 1920 × 1080/24 1) /PsF 1920 × 1080/24 1) /P 1920 × 1080/25/PsF 1920 × 1080/25/P 1920 × 1080/30 1) /PsF 1920 × 1080/30 1) /P 1280 × 720/24 1) /P 1280 × 720/25/P 1280 × 720/30 1) /P HD-SDI Dual - Sony BVME251 | Operation Guide - Page 90
Signal System 1920 × 1080/30 1) /PsF 1920 × 1080/30 1) /P 3G-SDI Signal System 1920 × 1080/50/I 1920 × 1080/60 1) /I 1280 × 720/50/P 1280 × 720/60 1) /P 1920 × 1080/50/P 1920 × 1080/60 1) /P 1920 × 1080/24 1) /PsF 1920 × 1080/24 1) /P 1920 × 1080/25/PsF 1920 × 1080/25/P 1920 × 1080/30 1) /PsF 90 - Sony BVME251 | Operation Guide - Page 91
Signal System 1920 × 1080/30 1) /P 1280 × 720/24 1) /P 1280 × 720/25/P 1280 × 720/30 1) /P HD-SDI Single Link (2K) Signal System 2048 × 1080/24 1) /PsF 2048 × 1080/24 1) /P 2048 × 1080/25/PsF 2048 × 1080/25/P 2048 × 1080/30 1) /PsF 2048 × 1080/30 1) /P HD-SDI Dual Link (2K) Signal System 2048 × 1080 - Sony BVME251 | Operation Guide - Page 92
3G-SDI Single Link (2K) Signal System 2048 × 1080/24 1) /PsF 2048 × 1080/24 1) /P 2048 × 1080/25/PsF 2048 × 1080/25/P 2048 × 1080/30 1) /PsF 2048 × 1080/30 1) /P HDMI Signal System 640 × 480/60 1) /P 720 × 480/60 1) /P 1280 × 720/60 1) /P 1920 × 1080/60 1) /I 720 × 480/60 1) /I 720 × 576/50/P 1280 × - Sony BVME251 | Operation Guide - Page 93
Signal System 1280 × 960/60/P 1280 × 1024/60/P 1400 × 1050/60/P 1) Also compatible with the frame rate 1/1.001. 2) Displayed as masked when blanking SMPTE ST170 (480/59.94i) and ITU-R BT.470 (576/50i) horizontally. Quantization 3) Limited / Full Limited / Full Limited / Full 3) Limited / Full can - Sony BVME251 | Operation Guide - Page 94
Signal system 1280 × 720/50P 1920 × 1080/50i 720 (1440) 2) × 576/50i 1920 × 1080/60 1) P 1920 × 1080/50P 1920 × 1080/24 1) P 1920 × 1080/25P 1920 × 1080/30 1) P 2048 × 1080/24 1) P 2048 × 1080/25P 2048 × 1080/30 1) P 2048 × 1080/60 1) P 2048 × 1080/50P 2048 × 1080/48 1) P Serial digital input SD- - Sony BVME251 | Operation Guide - Page 95
Signal system Aspect ratio Native Scan ×1 Native Scan ×2 Native Scan Aspect Correction (H) × (V) (H) × (V) (H) × (V) Normal Scan (H) × (V) Under Scan Over Scan Side by Side (H) × (V) (H) × (V) (H) × (V) 1920 × 1080/60 1) i 16:9 1920 × 1080 2.39:1 1920 × 1080 1862 × 1048 1829 × 1029 960 × - Sony BVME251 | Operation Guide - Page 96
scan portion in the normal scan is masked. Native Scan Aspect Correction: The area over the H size (1920) is not displayed. The aspect ratio is manually set when the [HDMI Auto] menu (page 38) of the [Screen Aspect] menu is set to [Off]. 96 Specifications - Sony BVME251 | Operation Guide - Page 97
Picture Frame Display SDI/composite input Signal system 720 × 576/50i 720 × 487/59.94i 1920 × 1080/24 1) PsF 1920 × 1080/25PsF 1920 × 1080/30 1) PsF 1920 × 1080/24 1) P 1920 × 1080/25P 1920 × 1080/30 1) P 1920 × 1080/50i 1920 × 1080/60 1) i 1920 × 1080/50P 1920 × 1080/60 1) P 1280 × 720/24 1) P - Sony BVME251 | Operation Guide - Page 98
Signal system 1920 × 1080/50P 1920 × 1080/24 1) P 1920 × 1080/25P 1920 × 1080/30 1) P 2048 × 1080/24 1) P 2048 × 1080/25P 2048 × 1080/30 1) P 2048 × 1080/60 1) P 2048 × 1080/50P 2048 × 1080/48 1) P 800 × 600/60P (SVGA) 1024 × 768/60P (XGA) 1280 × 960/60P (SXGA) 1280 × 1024/60P (SXGA) 1400 × 1050/60P - Sony BVME251 | Operation Guide - Page 99
Scan Mode Image Example: Scan images of available signal systems when a signal is input from the SDI input or composite input For details of the picture display size, see "Picture Display Size" (page 94). For setting of the [Native Scan Mode] menu, see [Native Scan Mode] (page 45) of the [ - Sony BVME251 | Operation Guide - Page 100
stick. Notes on USB memory sticks The USB 3.0 memory sticks up to 8 GB have been tested with this product. Note This does not guarantee complete support of all USB memory sticks. Note on data read/write speed Data read/write speed may vary depending on the combination of the USB memory - Sony BVME251 | Operation Guide - Page 101
Do not disassemble or modify the USB memory stick. Do not allow the USB memory stick to get wet. Do not use or store the USB memory stick in a location that is: - Extremely hot, such as in a car parked in the sun - Under direct sunlight - Very humid or subject to corrosive substances The USB - Sony BVME251 | Operation Guide - Page 102
Dimensions BVM-E251 Front Rear Unit: mm (inches) Side 1) When using this hole, use a screw which can be inserted into the monitor to a depth of 6 to 8 mm (1/4 to 11/32 inches). When the controller is attached with the BKM-37H When the tilt unit is removed from the BKM-37H Front 1) When using - Sony BVME251 | Operation Guide - Page 103
Side Side Bottom Bottom When the tilt unit is attached to the BKM-37H Front When the controller is attached with the BKM-38H Front Dimensions 103 - Sony BVME251 | Operation Guide - Page 104
Side Side Bottom BVM-E171 Front 1) When using this hole, use a screw which can be inserted into the monitor to a depth of 6 to 8 mm (1/4 to 11/32 inches). Rear Unit: mm (inches) 1) When using this hole, use a screw which can be inserted into the monitor to a depth of 6 to 8 mm (1/4 to 11/32 - Sony BVME251 | Operation Guide - Page 105
When the controller is attached with the BKM-39H Front Side Top Dimensions 105 - Sony BVME251 | Operation Guide - Page 106
Sony Corporation
-
 1
1 -
 2
2 -
 3
3 -
 4
4 -
 5
5 -
 6
6 -
 7
7 -
8
-
9
-
10
-
11
-
12
-
13
-
14
-
15
-
16
-
17
-
18
-
19
-
20
-
21
-
22
-
23
-
24
-
25
-
26
-
27
-
28
-
29
-
30
-
31
-
32
-
33
-
34
-
35
-
36
-
37
-
38
-
39
-
40
-
41
-
42
-
43
-
44
-
45
-
46
-
47
-
48
-
49
-
50
-
51
-
52
-
53
-
54
-
55
-
56
-
57
-
58
-
59
-
60
-
61
-
62
-
63
-
64
-
65
-
66
-
67
-
68
-
69
-
70
-
71
-
72
-
73
-
74
-
75
-
76
-
77
-
78
-
79
-
80
-
81
-
82
-
83
-
84
-
85
-
86
-
87
-
88
-
89
-
90
-
91
-
92
-
93
-
94
-
95
-
96
-
97
-
98
-
99
-
100
-
101
-
102
-
103
-
104
-
105
-
106
 |
 |

4-688-645-
12
(1)
Professional
Video Monitor
Operating Instructions
Before operating the unit, please read this manual thoroughly
and retain it for future reference.
BVM-E251
BVM-E171
Software Version 1.1
© 2016 Sony Corporation