Sony RDR-VX525 Operating Instructions - Page 17
If your TV has component video input jacks, Hookups and Settings - dvd recorder vcr
 |
UPC - 027242716056
View all Sony RDR-VX525 manuals
Add to My Manuals
Save this manual to your list of manuals |
Page 17 highlights
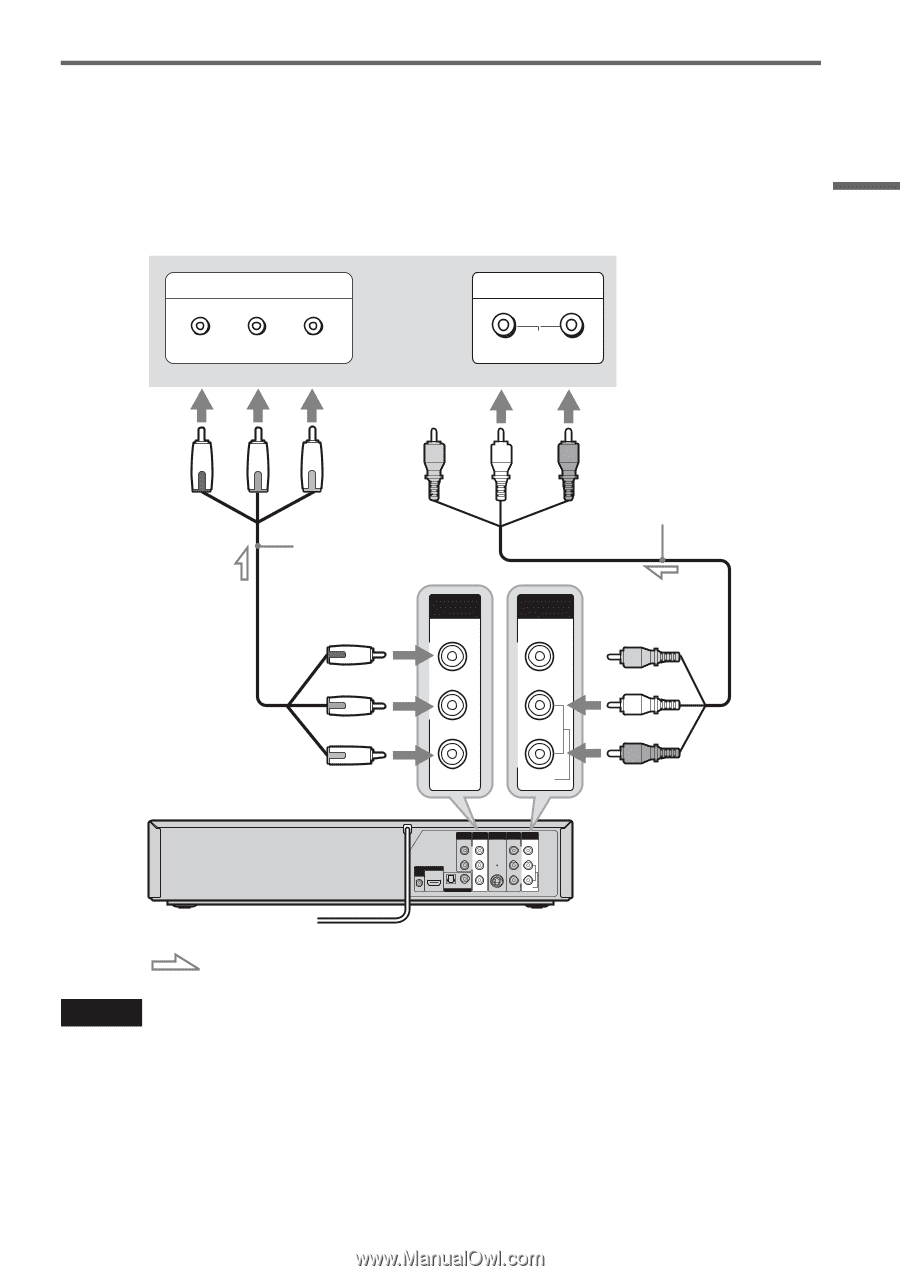
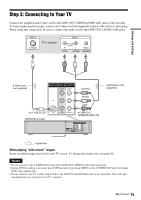
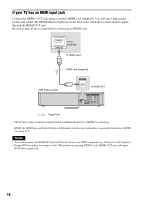
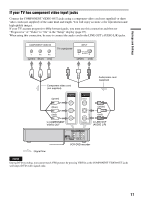
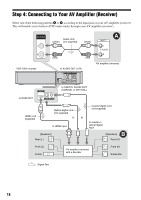
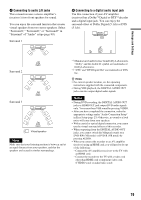
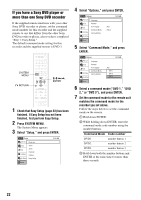
Hookups and Settings If your TV has component video input jacks Connect the COMPONENT VIDEO OUT jacks using a component video cord (not supplied) or three video cords (not supplied) of the same kind and length. You will enjoy accurate color reproduction and high quality images. If your TV accepts progressive 480p format signals, you must use this connection and then set "Progressive" of "Video" to "On" in the "Setup" display (page 97). When using this connection, be sure to connect the audio cord to the LINE OUT (AUDIO L/R) jacks. COMPONENT VIDEO IN Y PB (green) (blue) PR (red) TV or projector INPUT L AUDIO R (white) (red) Component video cord (not supplied) (green) COMPONENT VIDEO OUT Y (blue) PB (red) PR to COMPONENT VIDEO OUT Audio/video cord (supplied) LINE OUT VIDEO L R AUDIO (white) (red) to LINE OUT (AUDIO L/R) AUDIO OUT COMPONENT VIDEO OUT S VIDEO OUT LINE 1 IN LINE OUT VIDEO VIDEO L Y R PB SETTOP HDMI OUT BOX CONTROL PR OPTICAL COAXIAL DIGITAL AUDIO OUT L R AUDIO AUDIO VCR-DVD recorder : Signal flow Note During DVD recording, you cannot watch VHS pictures by pressing VIDEO, as the COMPONENT VIDEO OUT jacks will output DVD video signals only. 17
-
 1
1 -
2
-
3
-
4
-
5
-
6
-
7
-
8
-
9
-
10
-
11
-
 12
12 -
 13
13 -
 14
14 -
 15
15 -
 16
16 -
 17
17 -
 18
18 -
 19
19 -
 20
20 -
 21
21 -
 22
22 -
23
-
24
-
25
-
26
-
27
-
28
-
29
-
30
-
31
-
32
-
33
-
34
-
35
-
36
-
37
-
38
-
39
-
40
-
41
-
42
-
43
-
44
-
45
-
46
-
47
-
48
-
49
-
50
-
51
-
52
-
53
-
54
-
55
-
56
-
57
-
58
-
59
-
60
-
61
-
62
-
63
-
64
-
65
-
66
-
67
-
68
-
69
-
70
-
71
-
72
-
73
-
74
-
75
-
76
-
77
-
78
-
79
-
80
-
81
-
82
-
83
-
84
-
85
-
86
-
87
-
88
-
89
-
90
-
91
-
92
-
93
-
94
-
95
-
96
-
97
-
98
-
99
-
100
-
101
-
102
-
103
-
104
-
105
-
106
-
107
-
108
-
109
-
110
-
111
-
112
-
113
-
114
-
115
-
116
-
117
-
118
-
119
-
120
-
121
-
122
-
123
-
124
-
125
-
126
-
127
-
128
-
129
-
130
-
131
-
132
-
133
-
134
-
135
-
136
-
137
-
138
-
139
-
140
-
141
-
142
-
143
-
144
-
145
-
146
-
147
-
148
-
149
-
150
-
151
-
152
-
153
-
154
-
155
-
156
-
157
-
158
-
159
-
160
 |
 |