Sony RDR-VX525 Operating Instructions - Page 48
Recording using the Quick Timer, One-touch Timer Recording, To cancel the Quick Timer - power
 |
UPC - 027242716056
View all Sony RDR-VX525 manuals
Add to My Manuals
Save this manual to your list of manuals |
Page 48 highlights
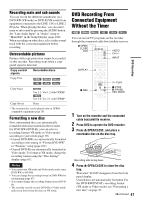
5 Press CH +/- or INPUT repeatedly to select the channel or input source you want to record. • When using the cable box/satellite receiver control, select the channel by pressing CH +/- on this recorder's remote. The recorder's input is switched to the connected input (LINE1 or LINE2). You can also use the number buttons. • When not using the cable box/satellite receiver control, select the connected input (LINE1 or LINE2) by pressing INPUT, and then select the channel on the cable box/ satellite receiver's side. 6 Press REC MODE repeatedly to select the recording mode. The display changes on the TV screen as follows: HQ HSP SP LSP SLP EP LP ESP For details about the recording mode, see page 46. 7 Press z REC. Recording starts. Recording continues until you stop the recording or the disc is full. Leave the cable box/satellite receiver turned on and do not change the channel you are recording. To stop recording Press x STOP. Note that it may take a few seconds for the recorder to stop recording. To pause recording Press X PAUSE. To restart recording, press X PAUSE again. To watch a VHS tape while recording Press VIDEO to operate the VCR, insert a tape, then press H PLAY. z Hints • To play a disc recorded with this recorder on other equipment, finalize the disc (page 88). • You can turn off the TV during recording. Notes • Recording may not start immediately after z REC is pressed. • You cannot change the recording mode during recording or recording pause. • If there is a power failure, the program you are recording may be erased. • You cannot change the input source during recording. Recording using the Quick Timer (One-touch Timer Recording) You can set the recorder to record in 30-minute increments. 1 Press DVD to operate the DVD recorder. 2 Press z REC repeatedly to set the duration. Each press increases the time by 30 minutes, up to eight hours*. 0:30 1:00 7:30 8:00 (Normal recording) "c" and "OTR" light up, and the remaining recording time appears in the front panel display. When the time counter reaches "0:00," the recorder stops recording and turns off. * 14 hours 30 minutes for DVD+R DL (Double Layer) discs. To cancel the Quick Timer Press z REC repeatedly until the counter appears in the front panel display. The recorder returns to normal recording mode. To stop recording Press x STOP twice. Note that it may take a few seconds for the recorder to stop recording. 48
-
 1
1 -
2
-
3
-
4
-
5
-
6
-
7
-
8
-
9
-
10
-
11
-
12
-
13
-
14
-
15
-
16
-
17
-
18
-
19
-
20
-
21
-
22
-
23
-
24
-
25
-
26
-
27
-
28
-
29
-
30
-
31
-
32
-
33
-
34
-
35
-
36
-
37
-
38
-
39
-
40
-
41
-
42
-
 43
43 -
 44
44 -
 45
45 -
 46
46 -
 47
47 -
 48
48 -
 49
49 -
 50
50 -
 51
51 -
 52
52 -
 53
53 -
54
-
55
-
56
-
57
-
58
-
59
-
60
-
61
-
62
-
63
-
64
-
65
-
66
-
67
-
68
-
69
-
70
-
71
-
72
-
73
-
74
-
75
-
76
-
77
-
78
-
79
-
80
-
81
-
82
-
83
-
84
-
85
-
86
-
87
-
88
-
89
-
90
-
91
-
92
-
93
-
94
-
95
-
96
-
97
-
98
-
99
-
100
-
101
-
102
-
103
-
104
-
105
-
106
-
107
-
108
-
109
-
110
-
111
-
112
-
113
-
114
-
115
-
116
-
117
-
118
-
119
-
120
-
121
-
122
-
123
-
124
-
125
-
126
-
127
-
128
-
129
-
130
-
131
-
132
-
133
-
134
-
135
-
136
-
137
-
138
-
139
-
140
-
141
-
142
-
143
-
144
-
145
-
146
-
147
-
148
-
149
-
150
-
151
-
152
-
153
-
154
-
155
-
156
-
157
-
158
-
159
-
160
 |
 |