Sony RDR-VX525 Operating Instructions - Page 98
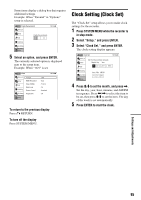
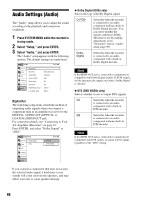
Audio Settings (Audio), Press SYSTEM MENU while the recorder is, in stop mode., Select Setup
 |
UPC - 027242716056
View all Sony RDR-VX525 manuals
Add to My Manuals
Save this manual to your list of manuals |
Page 98 highlights
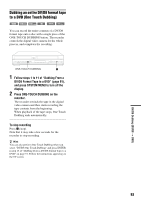
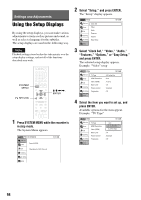
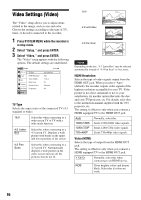
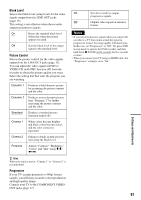
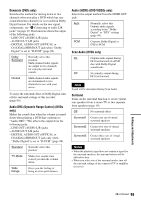
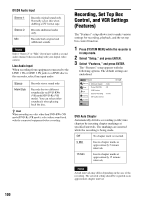
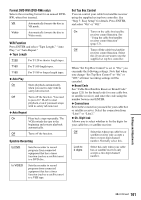
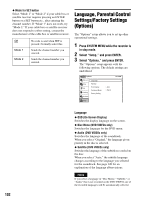
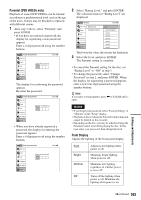
Audio Settings (Audio) The "Audio" setup allows you to adjust the sound according to the playback and connection conditions. 1 Press SYSTEM MENU while the recorder is in stop mode. 2 Select "Setup," and press ENTER. 3 Select "Audio," and press ENTER. The "Audio" setup appears with the following options. The default settings are underlined. Audio 10:10 AM Title List Timer Edit Dubbing Disc Setting Setup Digital Out Downmix Audio DRC Audio (HDMI) Scan Audio Surround DV/D8 Audio Input Line Audio Input : Dolby Surround : Standard : Auto : On : Off : Stereo 1 : Stereo Digital Out The following setup items switch the method of outputting audio signals when you connect a component such as an amplifier (receiver) to the DIGITAL AUDIO OUT (OPTICAL or COAXIAL)/HDMI OUT jack. For connection details, see "Connecting to Your AV Amplifier (Receiver)" on page 18. Press ENTER, and select "Dolby Digital" or "DTS." Digital Out Title List Timer Dolby Digital DTS 10:10 AM : 4:3DL-PetCteMr Box OnDolby Digital Edit Dubbing Disc Setting Setup ◆ Dolby Digital (DVDs only) Selects the type of Dolby Digital signal. D-PCM Select this when the recorder is connected to an audio component lacking a built-in Dolby Digital decoder. You can select whether the signals conform to Dolby Surround or not by making adjustments to the "Downmix" item in "Audio" setup (page 99). Dolby Digital Select this when the recorder is connected to an audio component with a built-in Dolby Digital decoder. Note If the HDMI OUT jack is connected to equipment not compatible with Dolby Digital signals, D-PCM signals will be automatically output, even when "Dolby Digital" is selected. ◆ DTS (DVD VIDEOs only) Selects whether or not to output DTS signals. On Select this when the recorder is connected to an audio component with a built-in DTS decoder. Off Select this when the recorder is connected to an audio component without a built-in DTS decoder. Note If the HDMI OUT jack is connected to equipment not compatible with DTS signals, no signal will be output, regardless of the "DTS" setting. If you connect a component that does not accept the selected audio signal, a loud noise (or no sound) will come out from the speakers, and may affect your ears or cause speaker damage. 98
-
 1
1 -
2
-
3
-
4
-
5
-
6
-
7
-
8
-
9
-
10
-
11
-
12
-
13
-
14
-
15
-
16
-
17
-
18
-
19
-
20
-
21
-
22
-
23
-
24
-
25
-
26
-
27
-
28
-
29
-
30
-
31
-
32
-
33
-
34
-
35
-
36
-
37
-
38
-
39
-
40
-
41
-
42
-
43
-
44
-
45
-
46
-
47
-
48
-
49
-
50
-
51
-
52
-
53
-
54
-
55
-
56
-
57
-
58
-
59
-
60
-
61
-
62
-
63
-
64
-
65
-
66
-
67
-
68
-
69
-
70
-
71
-
72
-
73
-
74
-
75
-
76
-
77
-
78
-
79
-
80
-
81
-
82
-
83
-
84
-
85
-
86
-
87
-
88
-
89
-
90
-
91
-
92
-
 93
93 -
 94
94 -
 95
95 -
 96
96 -
 97
97 -
 98
98 -
 99
99 -
 100
100 -
 101
101 -
 102
102 -
 103
103 -
104
-
105
-
106
-
107
-
108
-
109
-
110
-
111
-
112
-
113
-
114
-
115
-
116
-
117
-
118
-
119
-
120
-
121
-
122
-
123
-
124
-
125
-
126
-
127
-
128
-
129
-
130
-
131
-
132
-
133
-
134
-
135
-
136
-
137
-
138
-
139
-
140
-
141
-
142
-
143
-
144
-
145
-
146
-
147
-
148
-
149
-
150
-
151
-
152
-
153
-
154
-
155
-
156
-
157
-
158
-
159
-
160
 |
 |