Sony RDR-VX525 Operating Instructions - Page 92
Select DV/D8 Audio Input, and press, Select DV/D8 Dubbing
 |
UPC - 027242716056
View all Sony RDR-VX525 manuals
Add to My Manuals
Save this manual to your list of manuals |
Page 92 highlights
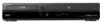
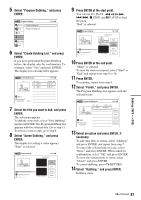
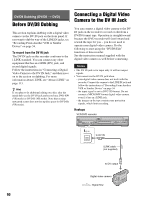
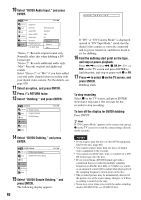
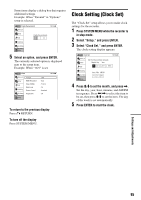
10 Select "DV/D8 Audio Input," and press ENTER. Audio 10:10 AM Title List Timer Edit Dubbing Disc Setting Setup Digital Out Downmix Audio DRC Audio (HDMI) Scan Audio Surround DV/D8 Audio Input Line Audio Input : Dolby Surround : Standard : Auto : On : Off Stereo 1 : SterSetoer1eo 2 : SterMeoix "Stereo 1": Records original sound only. Normally select this when dubbing a DV format tape. "Stereo 2": Records additional audio only. "Mix": Records original and additional sounds. Select "Stereo 2" or "Mix" if you have added a second audio channel when recording with your digital video camera. For the details, see page 100. 11 Select an option, and press ENTER. 12 Press O RETURN twice. 13 Select "Dubbing," and press ENTER. Dubbing Title List Timer Edit Simple Dubbing Program Dubbing DV/D8 Dubbing Dubbing Disc Setting Setup 10:10 AM 14 Select "DV/D8 Dubbing," and press ENTER. DV/D8 Dubbing Title List Timer DV/D8 Simple Dubbing DV/D8 One Touch Dubbing Edit Dubbing Disc Setting Setup 10:10 AM 15 Select "DV/D8 Simple Dubbing," and press ENTER. The following display appears. 92 DV Tape Mode If "DV" or "DV Camera Mode" is displayed instead of "DV Tape Mode," check that the digital video camera is correctly connected and its power turned on, and that its mode is set for dubbing. 16 Find the dubbing start point on the tape, and stop or pause playback. Press
-
 1
1 -
2
-
3
-
4
-
5
-
6
-
7
-
8
-
9
-
10
-
11
-
12
-
13
-
14
-
15
-
16
-
17
-
18
-
19
-
20
-
21
-
22
-
23
-
24
-
25
-
26
-
27
-
28
-
29
-
30
-
31
-
32
-
33
-
34
-
35
-
36
-
37
-
38
-
39
-
40
-
41
-
42
-
43
-
44
-
45
-
46
-
47
-
48
-
49
-
50
-
51
-
52
-
53
-
54
-
55
-
56
-
57
-
58
-
59
-
60
-
61
-
62
-
63
-
64
-
65
-
66
-
67
-
68
-
69
-
70
-
71
-
72
-
73
-
74
-
75
-
76
-
77
-
78
-
79
-
80
-
81
-
82
-
83
-
84
-
85
-
86
-
 87
87 -
 88
88 -
 89
89 -
 90
90 -
 91
91 -
 92
92 -
 93
93 -
 94
94 -
 95
95 -
 96
96 -
 97
97 -
98
-
99
-
100
-
101
-
102
-
103
-
104
-
105
-
106
-
107
-
108
-
109
-
110
-
111
-
112
-
113
-
114
-
115
-
116
-
117
-
118
-
119
-
120
-
121
-
122
-
123
-
124
-
125
-
126
-
127
-
128
-
129
-
130
-
131
-
132
-
133
-
134
-
135
-
136
-
137
-
138
-
139
-
140
-
141
-
142
-
143
-
144
-
145
-
146
-
147
-
148
-
149
-
150
-
151
-
152
-
153
-
154
-
155
-
156
-
157
-
158
-
159
-
160
 |
 |
