Sony RDR-VX525 Operating Instructions - Page 63
Editing a Playlist, Select Edit Playlist, and press ENTER.
 |
UPC - 027242716056
View all Sony RDR-VX525 manuals
Add to My Manuals
Save this manual to your list of manuals |
Page 63 highlights
Editing a Playlist -RWVR -RVR You can edit Playlist titles or scenes within them, without changing the actual recordings. 4 Select "Edit Playlist," and press ENTER. The "Playlist" Title List appears. Playlist 1/2 No. Title 01 LINE 1 02 LINE 1 10:10 AM Length Edit 00:05:04 > 00:00:51 > DVD SYSTEM MENU 123 456 789 0 O RETURN ./> M/m/
-
 1
1 -
2
-
3
-
4
-
5
-
6
-
7
-
8
-
9
-
10
-
11
-
12
-
13
-
14
-
15
-
16
-
17
-
18
-
19
-
20
-
21
-
22
-
23
-
24
-
25
-
26
-
27
-
28
-
29
-
30
-
31
-
32
-
33
-
34
-
35
-
36
-
37
-
38
-
39
-
40
-
41
-
42
-
43
-
44
-
45
-
46
-
47
-
48
-
49
-
50
-
51
-
52
-
53
-
54
-
55
-
56
-
57
-
 58
58 -
 59
59 -
 60
60 -
 61
61 -
 62
62 -
 63
63 -
 64
64 -
 65
65 -
 66
66 -
 67
67 -
 68
68 -
69
-
70
-
71
-
72
-
73
-
74
-
75
-
76
-
77
-
78
-
79
-
80
-
81
-
82
-
83
-
84
-
85
-
86
-
87
-
88
-
89
-
90
-
91
-
92
-
93
-
94
-
95
-
96
-
97
-
98
-
99
-
100
-
101
-
102
-
103
-
104
-
105
-
106
-
107
-
108
-
109
-
110
-
111
-
112
-
113
-
114
-
115
-
116
-
117
-
118
-
119
-
120
-
121
-
122
-
123
-
124
-
125
-
126
-
127
-
128
-
129
-
130
-
131
-
132
-
133
-
134
-
135
-
136
-
137
-
138
-
139
-
140
-
141
-
142
-
143
-
144
-
145
-
146
-
147
-
148
-
149
-
150
-
151
-
152
-
153
-
154
-
155
-
156
-
157
-
158
-
159
-
160
 |
 |

63
DVD Editing
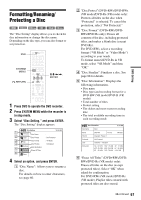
Editing a Playlist
You can edit Playlist titles or scenes within them,
without changing the actual recordings.
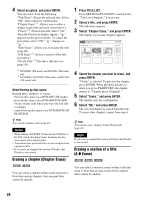
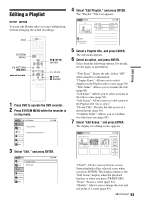
1
Press DVD to operate the DVD recorder.
2
Press SYSTEM MENU while the recorder is
in stop mode.
3
Select “Edit,” and press ENTER.
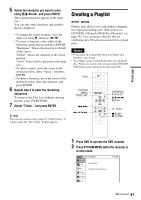
4
Select “Edit Playlist,” and press ENTER.
The “Playlist” Title List appears.
5
Select a Playlist title, and press ENTER.
The sub-menu appears.
6
Select an option, and press ENTER.
Select from the following options. For details,
see the pages in parentheses.
“Title Erase”: Erases the title. Select “OK”
when asked for confirmation.
“Chapter Erase”: Allows you to select
chapters in the Playlist title to erase (page 58).
“Title Name”: Allows you to rename the title
(page 60).
“A-B Erase”: Allows you to select sections in
the title to erase (page 58).
“Edit Scene”: Allows you to re-edit scenes in
the Playlist title. Go to step 7.
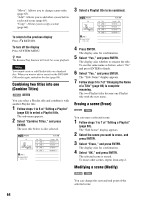
“Divide Title”: Divides the title in two at a
desired point (page 59).
“Combine Titles”: Allows you to combine
two titles into one (page 64).
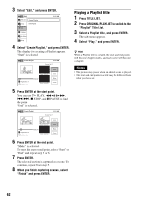
7
Select “Edit Scene,” and press ENTER.
The display for editing scenes appears.
“Check”: Allows you to preview a scene.
Starts playback of the selected scene when
you press ENTER. The display returns to the
“Edit Scene” display when the playback
finishes or when you press
O
RETURN.
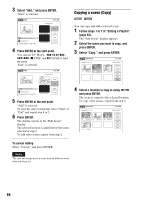
“Erase”: Erases a scene (page 64).
“Modify”: Allows you to change the start and
end point of a scene (page 64).
-
RW
VR
-
R
VR
1
2
3
4
5
6
7
8
0
9
SYSTEM
MENU
DVD
M
/
m
/
<
/
,
,
ENTER
H
PLAY
x
STOP
X
PAUSE
O
RETURN
.
/
>
Press ENTER :
Title Menu for DVD Title List.
10:10 AM
Title List (Original)
Setup
Disc Setting
Edit
Title List
Timer
Dubbing
10:10 AM
Create Playlist
Edit Playlist
Edit
Setup
Disc Setting
Edit
Title List
Timer
Dubbing
Playlist
10:10 AM
01
LINE 1
>
00:05:04
02
LINE 1
>
00:00:51
03:25
PM
May/02/2007
T
No.
Title
Length
Edit
1/2
LINE
1
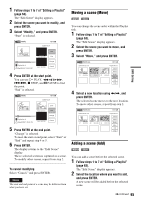
Edit Scene
10:10 AM
Scene No.01 / 03
Playlist No.01
03
00:04:20
02
00:00:10
01
00:00:34
Check
Erase
Modify
Move
Add
Copy
,
continued