Yamaha CL3 Cl Editor Owner's Manual - Page 2
Getting Started, Overview of CL Editor, Configuring CL Editor - cl 3 console
 |
View all Yamaha CL3 manuals
Add to My Manuals
Save this manual to your list of manuals |
Page 2 highlights
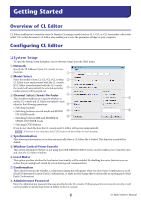
Getting Started Overview of CL Editor CL Editor enables you to remotely control a Yamaha CL mixing console (such as CL5, CL3, or CL1; hereinafter collectively called "CL" in this document). CL Editor also enables you to save the parameter settings on your computer. Configuring CL Editor ❏ System Setup To open the System Setup dialogbox, choose [System Setup] from the [File] menu. 1 Network Specify the IP Address of your CL console to com- municate. 1 2 Model Select Select the model of your CL (CL5/CL3/CL1) when 2 CL Editor is not synchronized with the CL console. If CL Editor is synchronized with the CL console, the model will automatically be selected and other 3 model options will be grayed out. 3 Channel Select/Sends On Fader 4 This checkbox enables you to specify whether or 7 not the CL console and CL Editor are linked to each other for the following operations: 5 • Selecting channels • Switching between normal mode and SENDS 6 8 ON FADER mode 9 • Switching between MIX and MATIRX in SENDS ON FADER mode • Selecting [CUE] buttons If you do not check the box, the CL console and CL Editor will operate independently. NOTE If the box is not checked, the [CUE] button will be hidden in each window. 4 Synchronization This allows synchronization to be done automatically when a CL Editor file is loaded. This function is enabled by default. 5 Window Control From Console This option determines whether or not using the USER DEFINED KEYS on the console enables you to remotely open and close the CL Editor windows. 6 Level Meter This option specifies whether the level meter functionality will be enabled. By disabling the meter function you can reduce the processing load caused by screen drawing and communication. 7 Confirmation These check boxes specify whether a confirmation dialog box will appear when you store (Store Confirmation), recall (Recall Confirmation), patch (Patch Confirmation), or make a patch change that would modify an existing patch (Steal Patch Confirmation). 8 Administrator Password Enter the Administrator password that was specified on the CL console. If this password is not entered correctly, it will not be possible to synchronize from CL Editor to the CL console. 2 CL Editor Owner's Manual
-
 1
1 -
 2
2 -
 3
3 -
 4
4 -
 5
5 -
 6
6 -
 7
7 -
 8
8 -
9
-
10
-
11
-
12
-
13
-
14
-
15
-
16
-
17
-
18
-
19
-
20
-
21
-
22
-
23
-
24
-
25
-
26
-
27
-
28
-
29
-
30
-
31
-
32
-
33
-
34
-
35
-
36
-
37
-
38
-
39
-
40
-
41
-
42
-
43
-
44
-
45
-
46
-
47
-
48
-
49
-
50
-
51
-
52
-
53
-
54
-
55
-
56
-
57
-
58
-
59
-
60
-
61
-
62
-
63
-
64
-
65
-
66
-
67
-
68
-
69
-
70
-
71
-
72
-
73
-
74
-
75
-
76
-
77
-
78
-
79
-
80
-
81
-
82
-
83
-
84
-
85
-
86
-
87
-
88
-
89
 |
 |
