Yamaha CL3 Cl Editor Owner's Manual - Page 70
Mute Group Assign Mute Group, Mute Mute Master, Mute Safe On, Clear, Dimmer Level
 |
View all Yamaha CL3 manuals
Add to My Manuals
Save this manual to your list of manuals |
Page 70 highlights
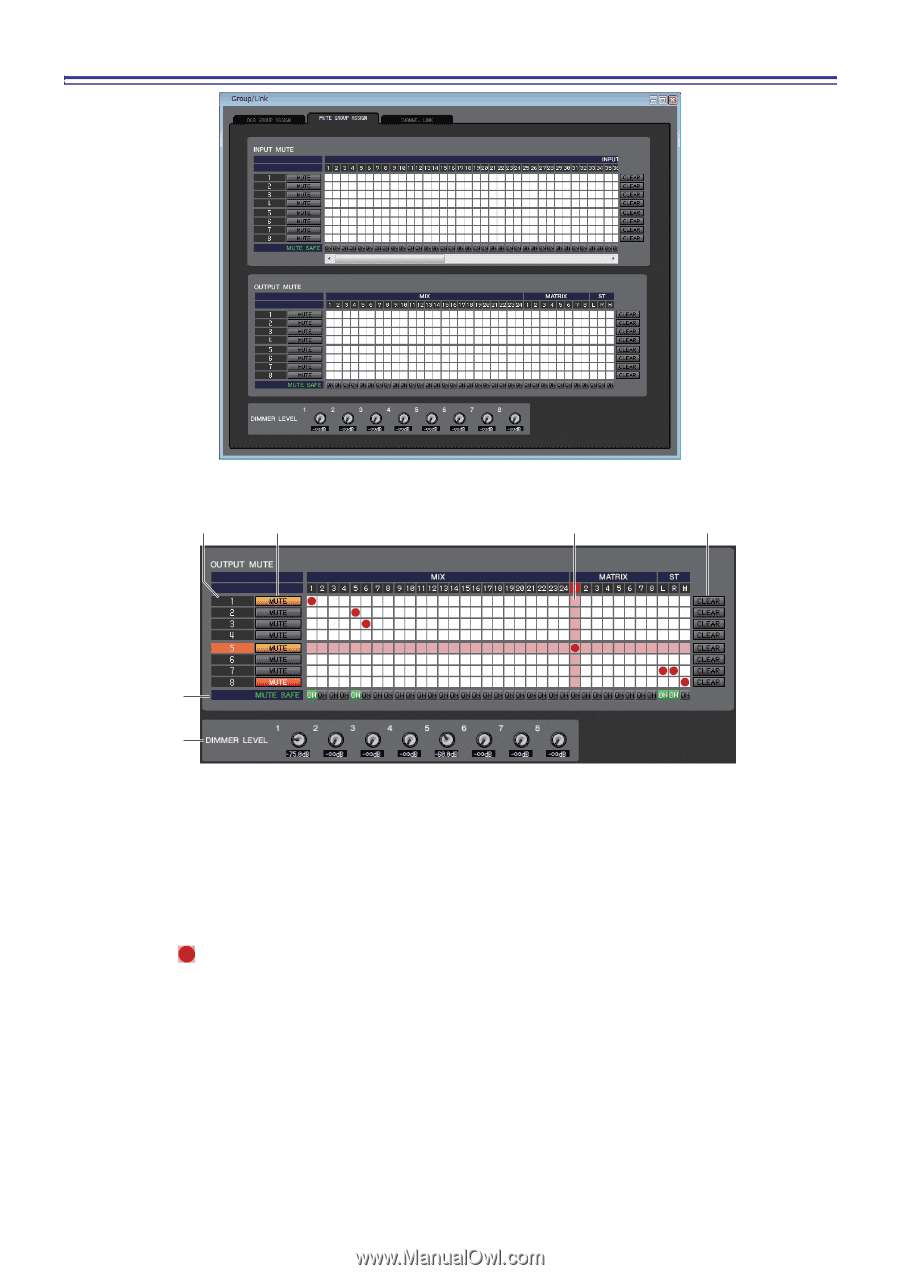
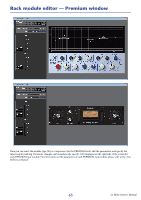
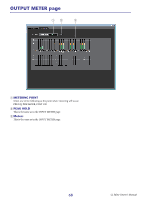
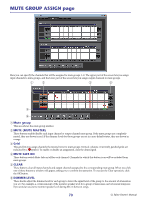
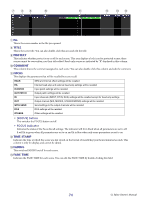
MUTE GROUP ASSIGN page Here you can specify the channels that will be assigned to mute groups 1-8. The upper part of the screen lets you assign input channels to mute groups, and the lower part of the screen lets you assign output channels to mute groups. 1 2 3 5 4 6 1 Mute group This area shows the mute group number. 2 MUTE (MUTE MASTER) These buttons enable/disable each input channel or output channel mute group. If the mute groups are completely muted, they are shown in red. If the dimmer levels for those groups are set in a non-default status, they are shown in orange. 3 Grid This grid lets you assign channels (horizontal rows) to mute groups (vertical columns.) Currently-patched grids are indicated by a symbol. To enable or disable an assignment, click the desired grid. 4 MUTE SAFE ON These buttons switch Mute Safe on/off for each channel. Channels for which this button is on will be excluded from mute groups. 5 CLEAR These buttons clear all input channels and output channels assigned to the corresponding mute group. When you click one of these buttons a window will appear, asking you to confirm the operation. To execute the Clear operation, click the OK button. 6 DIMMER LEVEL These knobs adjust the dimmer level for each group to lower the signal level of the group to the amount of attenuation you set. For example, a certain amount of the monitor speaker level for a group of musicians can be lowered temporarily to avoid an excessive monitor speaker level during MC in between songs. 70 CL Editor Owner's Manual
-
 1
1 -
2
-
3
-
4
-
5
-
6
-
7
-
8
-
9
-
10
-
11
-
12
-
13
-
14
-
15
-
16
-
17
-
18
-
19
-
20
-
21
-
22
-
23
-
24
-
25
-
26
-
27
-
28
-
29
-
30
-
31
-
32
-
33
-
34
-
35
-
36
-
37
-
38
-
39
-
40
-
41
-
42
-
43
-
44
-
45
-
46
-
47
-
48
-
49
-
50
-
51
-
52
-
53
-
54
-
55
-
56
-
57
-
58
-
59
-
60
-
61
-
62
-
63
-
64
-
 65
65 -
 66
66 -
 67
67 -
 68
68 -
 69
69 -
 70
70 -
 71
71 -
 72
72 -
 73
73 -
 74
74 -
 75
75 -
76
-
77
-
78
-
79
-
80
-
81
-
82
-
83
-
84
-
85
-
86
-
87
-
88
-
89
 |
 |