Yamaha CL3 Cl Editor Owner's Manual - Page 86
Outport Setup window
 |
View all Yamaha CL3 manuals
Add to My Manuals
Save this manual to your list of manuals |
Page 86 highlights
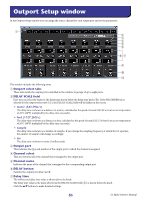
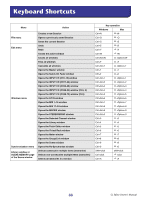
Outport Setup window In the Outport Setup window you can assign the source channel for each output port and set the parameters. 1 2 3 4 5 6 87 9 0 A The window includes the following items. 1 Outport select tabs These tabs switch the output ports controlled in the window in groups of up to eight ports. 2 DELAY SCALE field Here you can select the units for the delay time shown below the delay time knob (8). If the RECORDER tab is selected for the outport select tabs (1), the DELAY SCALE field will be hidden in the screen. • meter (343.59m/s) The delay time is shown as a distance in meters, calculated as the speed of sound (343.59 m/s) at an air temperature of 20°C (68°F) multiplied by the delay time (seconds.) • feet (1127.26ft/s) The delay time is shown as a distance in feet, calculated as the speed of sound (1127.26 feet/s) at an air temperature of 20°C (68°F) multiplied by the delay time (seconds.) • sample The delay time is shown as a number of samples. If you change the sampling frequency at which the CL operates, the number of samples will change accordingly. • ms The delay time is shown in units of milliseconds. 3 Output port This indicates the type and number of the output port to which the channel is assigned. 4 Channel select This area lets you select the channel that is assigned to the output port. 5 Channel name Indicates the name of the channel that is assigned to the corresponding output port. 6 DELAY button Switches the output port delay on/off. 7 Delay time The millisecond delay time value is shown above the knob. The delay time value in the units selected in the DELAY SCALE field (2) is shown below the knob. Click the ▲/▼ buttons to make detailed settings. 86 CL Editor Owner's Manual
-
 1
1 -
2
-
3
-
4
-
5
-
6
-
7
-
8
-
9
-
10
-
11
-
12
-
13
-
14
-
15
-
16
-
17
-
18
-
19
-
20
-
21
-
22
-
23
-
24
-
25
-
26
-
27
-
28
-
29
-
30
-
31
-
32
-
33
-
34
-
35
-
36
-
37
-
38
-
39
-
40
-
41
-
42
-
43
-
44
-
45
-
46
-
47
-
48
-
49
-
50
-
51
-
52
-
53
-
54
-
55
-
56
-
57
-
58
-
59
-
60
-
61
-
62
-
63
-
64
-
65
-
66
-
67
-
68
-
69
-
70
-
71
-
72
-
73
-
74
-
75
-
76
-
77
-
78
-
79
-
80
-
 81
81 -
 82
82 -
 83
83 -
 84
84 -
 85
85 -
 86
86 -
 87
87 -
 88
88 -
 89
89
 |
 |
