Yamaha CLP-535 Owner's Manual - Page 110
Attach C., Set the adjuster., Attach the headphone hanger., in step 8-1.
 |
View all Yamaha CLP-535 manuals
Add to My Manuals
Save this manual to your list of manuals |
Page 110 highlights
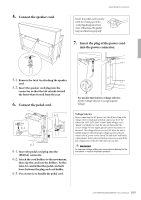
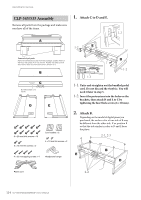
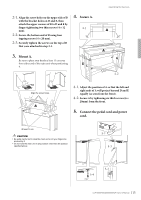
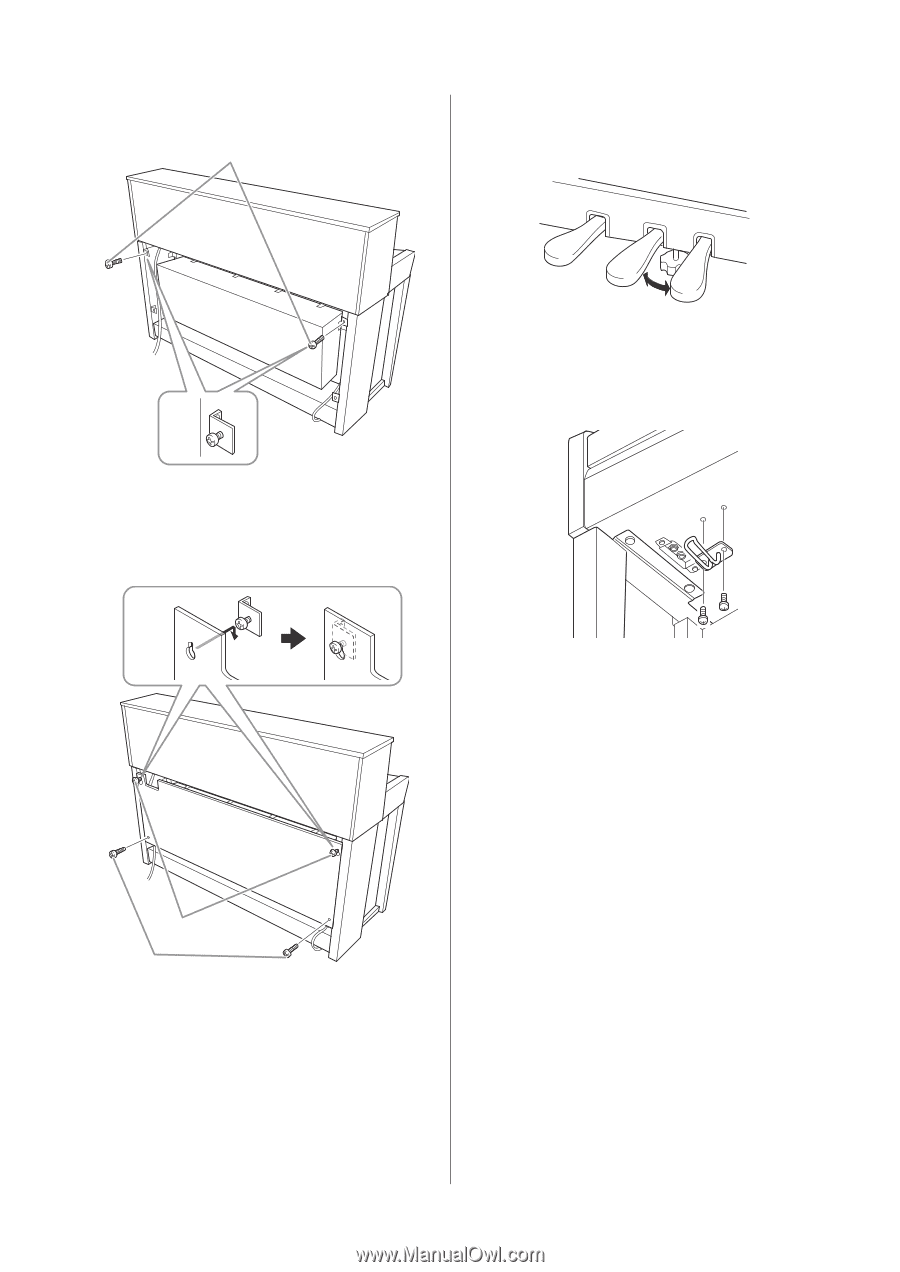
Assembling the Clavinova 8. Attach C. 8-1 9. Set the adjuster. Rotate the adjuster until it comes in firm contact with the floor surface. F 8-1 10. Attach the headphone hanger. E Use the two thin screws (4 × 10 mm) to attach the hanger as shown in the illustration. 8-1. Attach the 4 × 14 mm round head screws to the brackets on the upper side of E and F. Make sure to leave a slight gap by not fully tightening the screws. 8-2 F C E 8-4 8-3 8-2. Hook C with holes onto the screws attached in step 8-1. 8-3. Secure the lower part of C using two 4 × 14 mm round head screws. 8-4. Securely tighten the screws on the upper part of C. 110 CLP-585/575/545/535/565GP Owner's Manual
-
 1
1 -
2
-
3
-
4
-
5
-
6
-
7
-
8
-
9
-
10
-
11
-
12
-
13
-
14
-
15
-
16
-
17
-
18
-
19
-
20
-
21
-
22
-
23
-
24
-
25
-
26
-
27
-
28
-
29
-
30
-
31
-
32
-
33
-
34
-
35
-
36
-
37
-
38
-
39
-
40
-
41
-
42
-
43
-
44
-
45
-
46
-
47
-
48
-
49
-
50
-
51
-
52
-
53
-
54
-
55
-
56
-
57
-
58
-
59
-
60
-
61
-
62
-
63
-
64
-
65
-
66
-
67
-
68
-
69
-
70
-
71
-
72
-
73
-
74
-
75
-
76
-
77
-
78
-
79
-
80
-
81
-
82
-
83
-
84
-
85
-
86
-
87
-
88
-
89
-
90
-
91
-
92
-
93
-
94
-
95
-
96
-
97
-
98
-
99
-
100
-
101
-
102
-
103
-
104
-
 105
105 -
 106
106 -
 107
107 -
 108
108 -
 109
109 -
 110
110 -
 111
111 -
 112
112 -
 113
113 -
 114
114 -
 115
115 -
116
-
117
-
118
-
119
-
120
-
121
-
122
-
123
-
124
-
125
-
126
 |
 |
Assembling the Clavinova
110
CLP-585/575/545/535/565GP Owner’s Manual
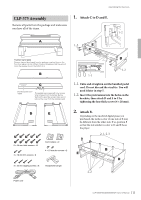
8.
Attach C.
8-1.
Attach the 4 × 14 mm round head screws to
the brackets on the upper side of E and F.
Make sure to leave a slight gap by not fully
tightening the screws.
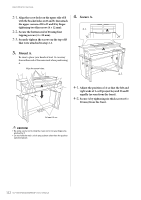
8-2.
Hook C with holes onto the screws attached
in step 8-1.
8-3.
Secure the lower part of C using two 4 ×
14 mm round head screws.
8-4.
Securely tighten the screws on the upper
part of C.
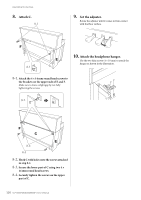
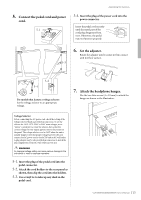
9.
Set the adjuster.
Rotate the adjuster until it comes in firm contact
with the floor surface.
10.
Attach the headphone hanger.
Use the two thin screws (4 × 10 mm) to attach the
hanger as shown in the illustration.
8-1
8-1
F
E
8-2
8-3
8-4
F
E
C