Yamaha CLP-535 Owner's Manual - Page 77
Connecting by the Accesspoint Mode
 |
View all Yamaha CLP-535 manuals
Add to My Manuals
Save this manual to your list of manuals |
Page 77 highlights
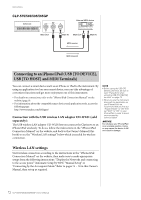
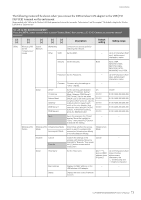
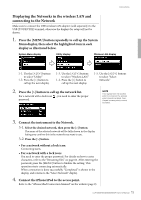
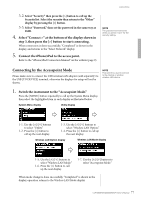
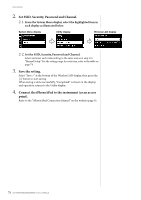
Connections 3-2. Select "Security" then press the [>] button to call up the Security list. Select the security then return to the "Other" display by pressing the [] button to start connecting. When connection is done successfully, "Completed" is shown in the display, and returns to the "Select Network" display. 5. Connect the iPhone/iPad to the access point. Refer to the "iPhone/iPad Connection Manual" on the website (page 9). NOTE The password cannot be set when you select "none" for the security setting. Connecting by the Accesspoint Mode Please make sure to connect the USB wireless LAN adaptor (sold separately) to the USB [TO DEVICE] terminal, otherwise the displays for setup will not be shown. NOTE This cannot be used to connect to the internet or another wireless LAN device. 1. Switch the instrument to the "Accesspoint Mode." Press the [MENU] button repeatedly to call up the System Menu display, then select the highlighted item in each display as illustrated below. System Menu display Utility display 1-1. Use the [V]/[E] buttons to select "Utility." 1-2. Press the [>] button to call up the next display. 1-3. Use the [V]/[E] buttons to select "Wireless LAN Option." 1-4. Press the [>] button to call up the next display. Wireless LAN Option display Wireless LAN Mode display 1-5. Use the [V]/[E] buttons to select "Wireless LAN Mode." 1-6. Press the [>] button to call up the next display. 1-7. Use the [V]/[E] buttons to select "Accesspoint Mode." When mode change is done successfully, "Completed" is shown in the display, operation returns to the Wireless LAN Mode display. 77 CLP-585/575/545/535/565GP Owner's Manual
-
 1
1 -
2
-
3
-
4
-
5
-
6
-
7
-
8
-
9
-
10
-
11
-
12
-
13
-
14
-
15
-
16
-
17
-
18
-
19
-
20
-
21
-
22
-
23
-
24
-
25
-
26
-
27
-
28
-
29
-
30
-
31
-
32
-
33
-
34
-
35
-
36
-
37
-
38
-
39
-
40
-
41
-
42
-
43
-
44
-
45
-
46
-
47
-
48
-
49
-
50
-
51
-
52
-
53
-
54
-
55
-
56
-
57
-
58
-
59
-
60
-
61
-
62
-
63
-
64
-
65
-
66
-
67
-
68
-
69
-
70
-
71
-
 72
72 -
 73
73 -
 74
74 -
 75
75 -
 76
76 -
 77
77 -
 78
78 -
 79
79 -
 80
80 -
 81
81 -
 82
82 -
83
-
84
-
85
-
86
-
87
-
88
-
89
-
90
-
91
-
92
-
93
-
94
-
95
-
96
-
97
-
98
-
99
-
100
-
101
-
102
-
103
-
104
-
105
-
106
-
107
-
108
-
109
-
110
-
111
-
112
-
113
-
114
-
115
-
116
-
117
-
118
-
119
-
120
-
121
-
122
-
123
-
124
-
125
-
126
 |
 |