Yamaha CLP-535 Owner's Manual - Page 118
Attach two front legs and a rear leg., Install the pedal box.
 |
View all Yamaha CLP-535 manuals
Add to My Manuals
Save this manual to your list of manuals |
Page 118 highlights
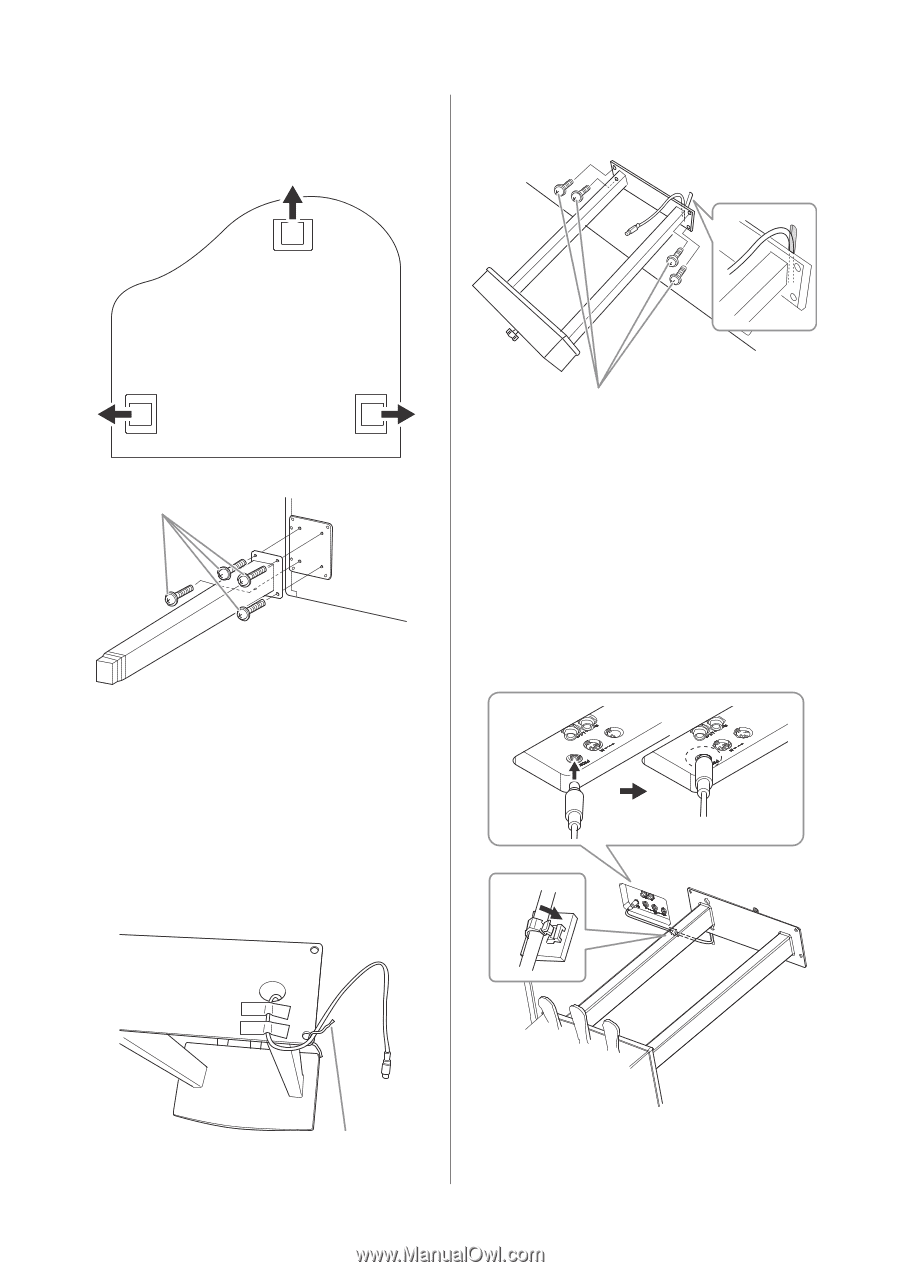
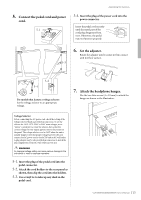
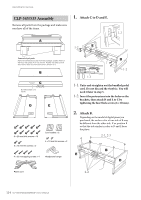
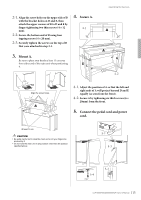
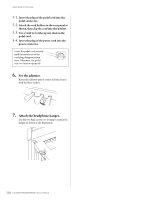
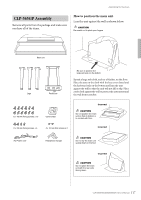
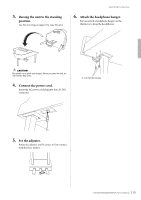
Assembling the Clavinova 1. Attach two front legs and a rear leg. Refer to the diagram below to verify the orientation of the legs. 2-2. Align the cord with the groove on the unit, and attach the pedal box using four screws. Rear leg Front leg Front leg 6 × 40 mm fixing screws 1-1. Install and tighten four screws on each leg, starting with one of the front legs. 1-2. Slowly tilt the main unit forward until front legs reaches the floor. 6 × 20 mm fixing screws 2-3. Insert the pedal cord plug into the pedal connector. Insert the plug so the arrow side faces front (toward the keyboard). If the plug will not go in easily, do not force it. Double-check the orientation of the plug, then try again. Insert the pedal cord securely until the metal part of the cord plug disappears from view. Otherwise, the pedal may not function properly. 2-4. Attach the cord holders to the rear panel as shown, then clip the cord into the holders. 2-3 2. Install the pedal box. 2-1. Remove the twist tie that affixes the pedal cord to the upper portion of the pedal box. 2-4 Twist tie 118 CLP-585/575/545/535/565GP Owner's Manual
-
 1
1 -
2
-
3
-
4
-
5
-
6
-
7
-
8
-
9
-
10
-
11
-
12
-
13
-
14
-
15
-
16
-
17
-
18
-
19
-
20
-
21
-
22
-
23
-
24
-
25
-
26
-
27
-
28
-
29
-
30
-
31
-
32
-
33
-
34
-
35
-
36
-
37
-
38
-
39
-
40
-
41
-
42
-
43
-
44
-
45
-
46
-
47
-
48
-
49
-
50
-
51
-
52
-
53
-
54
-
55
-
56
-
57
-
58
-
59
-
60
-
61
-
62
-
63
-
64
-
65
-
66
-
67
-
68
-
69
-
70
-
71
-
72
-
73
-
74
-
75
-
76
-
77
-
78
-
79
-
80
-
81
-
82
-
83
-
84
-
85
-
86
-
87
-
88
-
89
-
90
-
91
-
92
-
93
-
94
-
95
-
96
-
97
-
98
-
99
-
100
-
101
-
102
-
103
-
104
-
105
-
106
-
107
-
108
-
109
-
110
-
111
-
112
-
 113
113 -
 114
114 -
 115
115 -
 116
116 -
 117
117 -
 118
118 -
 119
119 -
 120
120 -
 121
121 -
 122
122 -
 123
123 -
124
-
125
-
126
 |
 |