Yamaha CLP-535 Owner's Manual - Page 53
MIDI Recording—Independent Tracks, to enter the Recording mode with a new blank
 |
View all Yamaha CLP-535 manuals
Add to My Manuals
Save this manual to your list of manuals |
Page 53 highlights
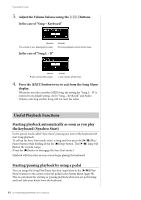
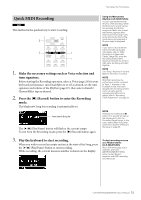
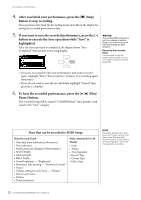
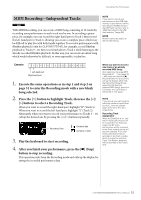
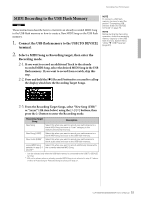
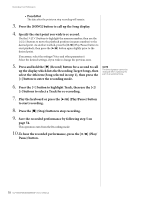
Recording Your Performance MIDI Recording-Independent Tracks MIDI With MIDI Recording, you can create a MIDI Song consisting of 16 tracks by recording your performance to each track one by one. In recording a piano piece, for example, you can record the right-hand part to Track 1 then record the left-hand part to Track 2, allowing you create a complete piece which may be difficult to play live with both hands together. To record a performance with Rhythm playback (only for CLP-585/575/545), for example, record Rhythm playback to Tracks 9 - 10, then record melodies to Track 1 while listening to the already recorded Rhythm playback. In this way, you can create an entire Song which would otherwise be difficult, or even impossible, to play live. NOTE If you want to record your performance to the USB flash memory or you want to add the recording to the MIDI Song in the USB flash memory, refer to "MIDI Recording to the USB flash memory" (page 55). NOTE Rhythm cannot be added to the recorded Song. Example: 1 2 3 4 5 6 7 8 9 10 11 12 13 14 15 16 Left-hand part Right-hand part 1. Execute the same operations as in step 1 and step 2 on page 51 to enter the Recording mode with a new blank Song selected. 2. Press the [E] button to highlight Track, then use the [] buttons to select a Recording Track. When you want to record the right-hand part, highlight "R" (Track 1). When you want to record the left-hand part, highlight "L" (Track 2). Alternately, when you want to record your performance to Tracks 3 - 16, call up the desired one by pressing the [] buttons repeatedly. Recording Track Contains data. Contains no data. 3. Play the keyboard to start recording. 4. After you finish your performance, press the [] (Stop) button to stop recording. This operation exits from the Recording mode and calls up the display for saving the recorded performance data. When you want to record a new track of an already recorded MIDI Song: After selecting the target MIDI Song (steps 1 - 4 on pages 39 - 40), press and hold the [] (Record) button for a second to call up the display which lists the Recording Target Songs, select the 4th item (the selected MIDI Song), press the [>] button, then go to step 2 described on this page. NOTE If you record your performance with both hands to track R then to track L, both are played back at the same time as a single Song. Recording Track Assignment When the Dual/Split is on, only the R1 Voice performance will be recorded to the Track you select, the R2 Voice performance will be recorded to the Track number which is 6 plus the selected Track, the L Voice performance will be recorded to the Track number which is 3 plus the selected Track. The Rhythm playback will be recorded to the Tracks 9/10. 53 CLP-585/575/545/535/565GP Owner's Manual
-
 1
1 -
2
-
3
-
4
-
5
-
6
-
7
-
8
-
9
-
10
-
11
-
12
-
13
-
14
-
15
-
16
-
17
-
18
-
19
-
20
-
21
-
22
-
23
-
24
-
25
-
26
-
27
-
28
-
29
-
30
-
31
-
32
-
33
-
34
-
35
-
36
-
37
-
38
-
39
-
40
-
41
-
42
-
43
-
44
-
45
-
46
-
47
-
 48
48 -
 49
49 -
 50
50 -
 51
51 -
 52
52 -
 53
53 -
 54
54 -
 55
55 -
 56
56 -
 57
57 -
 58
58 -
59
-
60
-
61
-
62
-
63
-
64
-
65
-
66
-
67
-
68
-
69
-
70
-
71
-
72
-
73
-
74
-
75
-
76
-
77
-
78
-
79
-
80
-
81
-
82
-
83
-
84
-
85
-
86
-
87
-
88
-
89
-
90
-
91
-
92
-
93
-
94
-
95
-
96
-
97
-
98
-
99
-
100
-
101
-
102
-
103
-
104
-
105
-
106
-
107
-
108
-
109
-
110
-
111
-
112
-
113
-
114
-
115
-
116
-
117
-
118
-
119
-
120
-
121
-
122
-
123
-
124
-
125
-
126
 |
 |
